

Are you tired of spending hours digging up your lawn just to install edging? What if you could create clean, sharp borders around your garden without breaking a sweat or damaging your yard?
Installing no-dig lawn edging is the simple solution you’ve been looking for. You’ll discover easy steps to transform your lawn quickly and neatly. Keep reading to find out how you can get professional-looking results with minimal effort and no heavy digging!
Benefits Of No-dig Lawn Edging
No-dig lawn edging is a simple way to keep your garden neat. It creates clear borders without heavy work.
This edging style protects your lawn and plants while saving time and effort.
Time And Effort Savings
No-dig edging means you do not have to dig trenches. This saves hours of hard labor in your garden.
You can install it quickly using simple tools and no heavy equipment.
- Easy to place along lawn edges
- Requires no digging or soil removal
- Fast installation for any garden size
Soil And Root Protection
No-dig edging keeps soil and roots safe. It does not disturb the ground or plant roots below.
This helps plants grow healthy and prevents soil erosion around your lawn.
- Preserves soil structure
- Prevents root damage
- Reduces soil erosion risks
Aesthetic Appeal
No-dig edging offers a clean, sharp look to your lawn borders. It creates a neat separation between grass and flower beds.
It comes in different styles and colors to match your garden design.
- Clear, defined garden edges
- Various colors and shapes available
- Maintains a tidy lawn appearance

Credit: www.amazon.ca
Choosing The Right No-dig Edging
No-dig lawn edging helps define garden beds and paths. It keeps grass and soil separate without digging trenches.
Choosing the right edging means picking the best material, size, and durability for your lawn needs.
Material Options
No-dig edging comes in different materials like plastic, metal, and rubber. Each has its benefits and uses.
Plastic is lightweight and easy to install. Metal edges are strong and last longer. Rubber is flexible and safe for kids.
- Plastic:Affordable, lightweight, good for straight lines
- Metal:Durable, good for curved designs, resists weather
- Rubber:Flexible, soft edges, good for playground areas
Size And Shape Considerations
Pick edging size based on your lawn and garden style. Height and thickness affect how well it holds soil.
Shapes vary from straight strips to flexible curves. Choose shapes that fit your garden layout and design.
- Height:Taller edges hold soil better but may be more visible
- Thickness:Thicker edges last longer but may cost more
- Shape:Flexible edges suit curves; straight edges work for borders
Durability Factors
Durability matters for long-lasting lawn edging. Consider weather, sun exposure, and soil type.
Look for materials that resist rust, cracking, or fading. Good durability means less repair and replacement.
- Metal edges with rust-resistant coating last longer
- Plastic edges should be UV resistant to avoid cracking
- Rubber edges resist damage from impacts and weather
Preparing Your Lawn Edge
Preparing your lawn edge is important for a neat finish. It helps the no-dig lawn edging fit well and last longer.
Take time to prepare the ground carefully before installing the edging. This makes the job easier and the results better.
Marking The Border
First, mark the edge where you want the lawn edging. Use a garden hose or string to create a clear line.
Mark the line with spray paint or small flags. This shows exactly where to place the edging.
- Use a garden hose for curved borders
- Use string for straight edges
- Mark clearly with spray paint or flags
Clearing Debris And Grass
Remove grass and debris from the marked area. This clears space for the edging to sit properly.
Use a spade or garden fork to lift grass and roots. Take out stones, sticks, and leaves too.
- Dig a narrow strip along the marked border
- Lift out grass and soil carefully
- Clear away stones and plant debris
Leveling The Ground
Make sure the ground is flat and even where you will place the edging. This helps the edging stay stable.
Use a rake or flat board to smooth the soil. Fill low spots with soil and press it down firmly.
- Check the level with a small board or level tool
- Fill holes or dips with extra soil
- Press soil firmly to avoid sinking later
Installing No-dig Edging
No-dig lawn edging is easy to install and helps keep your garden neat. It does not require digging trenches or heavy tools.
This type of edging is perfect for defining garden beds or pathways quickly and cleanly.
Positioning The Edging
Start by planning where you want the edging to go. Mark the line with spray paint or string for a straight guide.
Make sure the line is clear of roots, rocks, or debris that could block the edging.
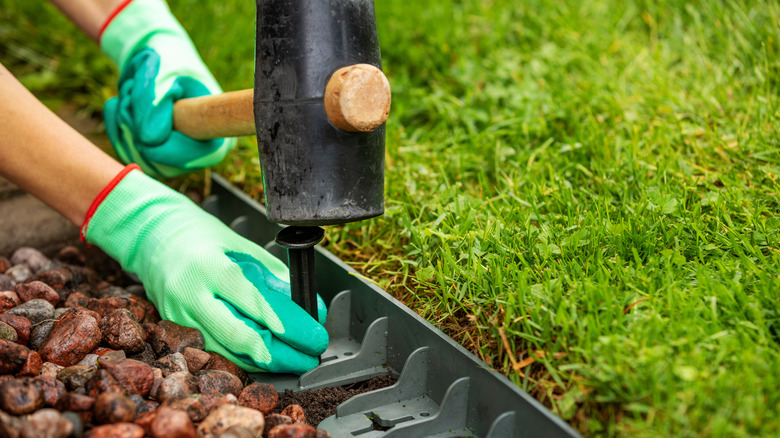
Securing The Edging In Place
Push the no-dig edging into the soil along the marked line. Use your hands or a rubber mallet to press it firmly.
Check that the edging is straight and level. The top should be visible above the ground for the best look.
- Press edges firmly into the soil
- Use stakes if the edging kit includes them
- Keep edging straight and aligned
Connecting Multiple Sections
Join sections of no-dig edging by aligning the ends carefully. Most products have connectors or slots to fit pieces together.
Make sure each connection is tight to prevent gaps or movement in the edging line.
- Align ends before pressing together
- Use connectors included in the kit
- Check connections after installation
Finishing Touches
Installing no-dig lawn edging is almost done. The final steps ensure the edging stays strong and looks nice.
These finishing touches help protect the edging and improve your garden’s appearance.
Backfilling And Firming Soil
After placing the edging, fill the gap with soil. Use soil to support the edging and hold it in place.
Firm the soil by pressing it down with your hands or feet. This stops the edging from moving or tilting.
Adding Mulch Or Decorative Elements
Put mulch or stones along the edging. This covers bare soil and adds style to your lawn.
Mulch also helps keep moisture in the soil and stops weeds from growing near the edging.
- Use bark mulch for a natural look
- Choose decorative stones for a clean finish
- Keep mulch a few inches away from plants
Watering And Maintenance Tips
Water the soil around the edging after installation. This helps the soil settle firmly around the edges.
Check the edging often. Remove any dirt or debris that builds up to keep it neat and strong.
- Water deeply once or twice a week
- Clear leaves and grass clippings regularly
- Fix loose edging parts quickly
Credit: www.housedigest.com
Common Mistakes To Avoid
Installing no-dig lawn edging is a great way to define garden borders. It is important to avoid certain mistakes to achieve the best results.
Let’s explore common errors people make and how to avoid them for a clean and lasting edge.
Improper Placement
Placing lawn edging incorrectly can lead to a messy look. Ensure the edging is aligned with your desired border shape.
- Check the alignment with a string or a hose
- Avoid placing edging too close to tree roots
- Ensure all sections are at the same height
Skipping Ground Preparation
Neglecting ground preparation can cause uneven borders. Preparing the soil ensures the edging stays in place.
Use a spade to level the ground and remove debris. This prevents shifting after installation.
Ignoring Maintenance
Even after installation, maintenance is crucial for keeping the edging neat. Regular checks prevent overgrowth and displacement.
| Maintenance Task | Frequency |
| Trim grass along the edge | Weekly |
| Check for displacement | Monthly |
| Re-level if necessary | Quarterly |
:max_bytes(150000):strip_icc()/spr-easy-flex-no-dig-adirondak-landscape-edging-jena-wilson-07-during-3983ef1d4a014130b79f143b2130bd31.jpeg)
Credit: www.thespruce.com
Frequently Asked Questions
What Tools Are Needed For No-dig Lawn Edging Installation?
You only need basic tools like a mallet, measuring tape, and gloves. No digging tools are necessary. This makes the process quick and easy for beginners.
How Long Does No-dig Lawn Edging Installation Take?
Installation usually takes between 1 to 3 hours, depending on the lawn size. It is faster than traditional edging since no trenching is required.
Can No-dig Lawn Edging Work On Uneven Ground?
Yes, flexible no-dig edging adapts well to curves and slopes. It maintains a clean border even on uneven terrain.
Is No-dig Lawn Edging Durable And Long-lasting?
Yes, most no-dig edging materials like plastic or metal resist weather and wear. They typically last several years with minimal maintenance.
Conclusion
No-dig lawn edging is easy and quick to install. It keeps your garden neat and tidy without hard work. Just follow the steps carefully for best results. This method saves time and protects your plants. You can create clean lines around flower beds or paths.
Enjoy a beautiful lawn with less effort. Try it yourself and see the difference today. Simple tools, clear steps, and patience make it work well. Your garden will look great all season long.
