
Are you ready to give your lawn the care it truly deserves? Dethatching can be a game-changer for a healthy, green yard—but only if you do it right.
Avoiding common dethatching mistakes will save you time, money, and frustration. You’ll discover the key errors many people make and how you can easily steer clear of them. Keep reading to make sure your lawn thrives and looks its best all season long.
Credit: www.yourgreenpal.com
Common Dethatching Errors
Dethatching helps keep your lawn healthy by removing dead grass and debris. Many gardeners make mistakes that hurt their grass instead of helping it.
Knowing common dethatching errors can save your lawn from damage. This guide covers key risks and how to avoid them.
Overdethatching Risks
Removing too much thatch can harm your lawn. It exposes roots and stresses the grass. Overdethatching can cause bare spots and slow growth.
- Weakens grass roots
- Increases chance of weeds
- Leads to soil erosion
- Makes lawn dry and patchy
- Delays lawn recovery
Timing Mistakes
Doing dethatching at the wrong time reduces its benefits. The best timing depends on your grass type and climate. Dethatching during drought or extreme heat can kill grass.
| Season | Best Grass Type | Reason |
| Spring | Cool-season grasses | Grass starts growing actively |
| Early Fall | Warm-season grasses | Grass recovers before winter |
| Summer | Not recommended | Heat stress risks |
| Winter | Not recommended | Grass is dormant |
Ignoring Lawn Type
Different lawns need different dethatching methods. Using the wrong tools or depth can harm your grass. Knowing your lawn type helps you choose the right approach.
Here are tips by lawn type:
- Cool-season grasses:Dethatch in early spring or fall with light raking.
- Warm-season grasses:Dethatch in late spring or early summer with a dethatching machine.
- Fine fescues and thin lawns:Avoid heavy dethatching to prevent damage.
Tools And Equipment Tips
Dethatching helps keep your lawn healthy by removing dead grass and debris. Using the right tools makes the job easier and safer.
Picking good equipment and caring for it prevents problems during dethatching. Avoid common mistakes to get better results.
Choosing The Right Dethatcher
Choose a dethatcher that fits your lawn size and type. Small lawns need hand tools, while large lawns need power dethatchers.
Check the tines on the dethatcher. Sharp tines work better but can harm your grass if too aggressive.
- Use a rake dethatcher for small areas.
- Use a dethatching machine for big lawns.
- Pick tines that suit your grass type.
- Avoid tools that are too strong or weak.
Maintaining Equipment
Keep your dethatching tools clean and sharp. Dirt and rust reduce their effectiveness and can damage your lawn.
Check your equipment before each use. Tighten loose parts and oil moving pieces to keep them working well.
- Clean tools after every use.
- Sharpen tines regularly.
- Oil moving parts to prevent rust.
- Store tools in a dry place.
- Inspect for damage and fix it quickly.
Preparation Steps
Preparing your lawn before dethatching helps protect the grass and soil. Proper steps make dethatching easier and more effective.
Two key points to focus on are mowing your lawn and checking soil moisture. These steps prepare the grass for dethatching without damage.
Mowing Before Dethatching
Mowing your lawn short before dethatching helps the dethatcher reach the thatch layer better. Cut the grass to about 1.5 to 2 inches tall.
- Use a sharp mower blade to avoid tearing grass
- Mow evenly to keep grass height consistent
- Remove grass clippings to prevent clogging the dethatcher
- Avoid mowing when the grass is wet
Soil Moisture Levels
Check the soil moisture before dethatching to avoid damaging your lawn. Soil should be moist but not soggy or dry.
| Soil Condition | Effect on Dethatching | What to Do |
|---|---|---|
| Too Dry | Dethatcher may tear grass roots | Water lawn a day before dethatching |
| Too Wet | Soil can compact and damage roots | Wait 1-2 days after rain or watering |
| Ideal Moisture | Easy dethatching, less damage | Proceed with dethatching |
Credit: www.yourgreenpal.com
Dethatching Techniques
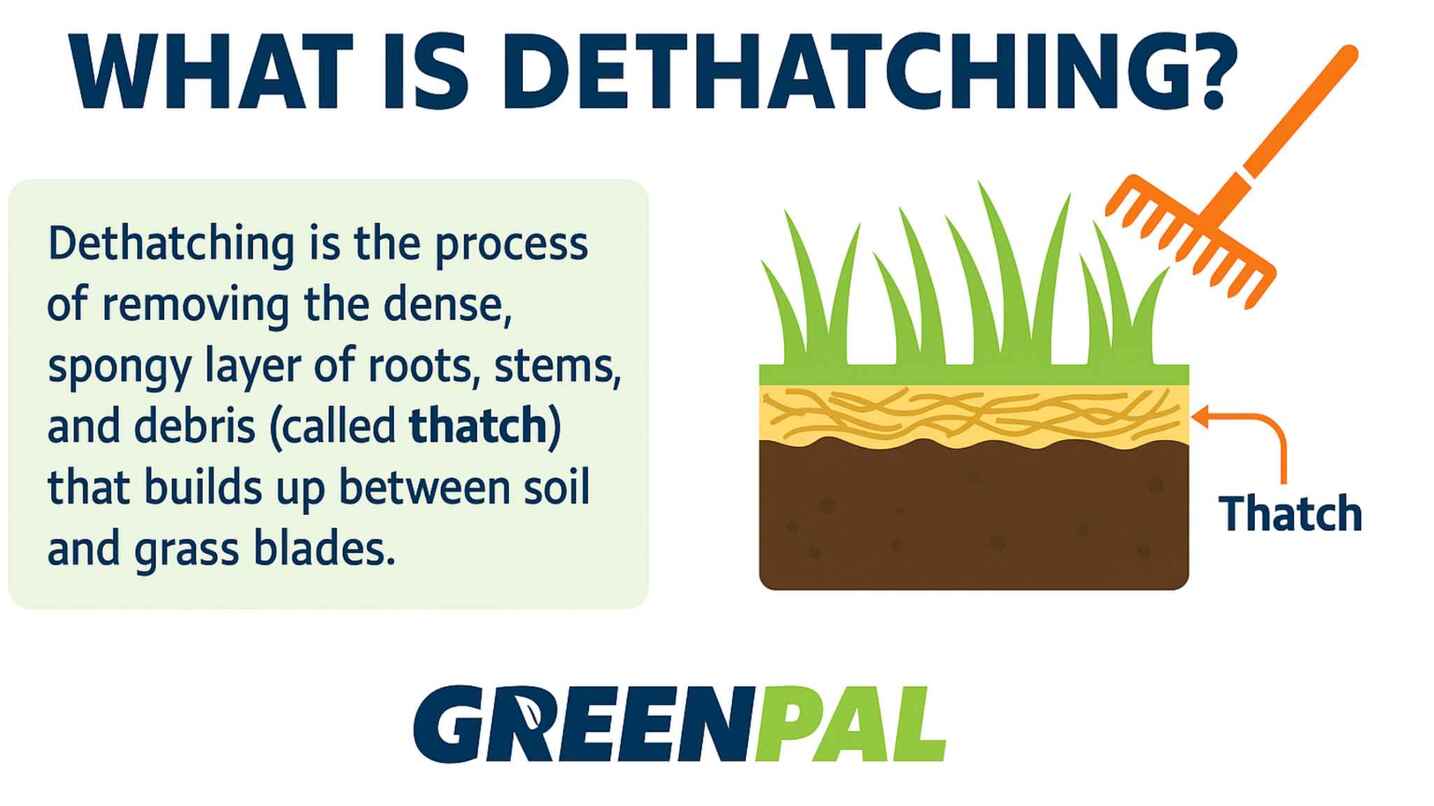
Dethatching is the process of removing dead grass and roots from your lawn. It helps the grass grow strong and healthy.
Using the right dethatching techniques keeps your lawn in good shape. Avoid common mistakes to get the best results.
Proper Depth Control
Set your dethatcher to the right depth. Going too deep can harm grass roots.
The blade should only cut through the thatch layer, not into the soil. This prevents lawn damage and helps recovery.
- Start with a shallow setting
- Check the thatch layer thickness before dethatching
- Adjust depth gradually if needed
- Stop if you see soil damage
Frequency Guidelines
Dethatch your lawn only when needed. Doing it too often can stress grass and soil.
Most lawns need dethatching once a year or less. Check the thatch thickness before deciding.
- Measure thatch layer; over 0.5 inches means dethatching is needed
- Dethatch in early spring or fall for cool-season grass
- Avoid dethatching during hot, dry weather
- Skip dethatching if lawn is healthy and thatch is thin
Post-dethatching Care
Dethatching removes the layer of dead grass and roots from your lawn. After dethatching, the lawn needs special care to heal well.
Proper care helps the grass grow strong and healthy again. Focus on watering, fertilizing, and fixing bare spots.
Watering And Fertilizing
After dethatching, your lawn may look thin and dry. Watering keeps the soil moist and helps new grass grow fast. Fertilizing gives the lawn nutrients it needs to recover.
- Water the lawn deeply right after dethatching.
- Keep watering lightly every day for the first week.
- After one week, water less often but more deeply.
- Apply a balanced fertilizer two weeks after dethatching.
- Avoid too much fertilizer to prevent burning the grass.
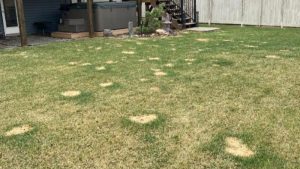
Seeding Bare Spots
Dethatching can leave bare or thin spots on your lawn. Seeding these spots helps the grass fill in quickly. Prepare the soil and spread seeds evenly.
| Step | Action | Tip |
|---|---|---|
| 1 | Rake the bare spots to loosen soil. | Remove any debris or dead grass. |
| 2 | Spread grass seed over the bare area. | Use the same seed type as your lawn. |
| 3 | Lightly press seeds into the soil. | Use a roller or your hands. |
| 4 | Water gently to keep soil moist. | Water daily until grass sprouts. |
Credit: www.innovationgrounds.com
Frequently Asked Questions
What Is Dethatching And Why Is It Important?
Dethatching removes thick layers of dead grass and roots. It improves air, water, and nutrient flow to the soil. This helps lawns grow healthier and stronger. Regular dethatching prevents lawn diseases and promotes vibrant grass.
When Is The Best Time To Dethatch My Lawn?
The best time to dethatch is during the growing season. For cool-season grasses, early spring or early fall works well. For warm-season grasses, late spring to early summer is ideal. This timing ensures quick recovery after dethatching.
How Often Should I Dethatch My Lawn?
Most lawns need dethatching every 1 to 3 years. The frequency depends on grass type and thatch buildup. Avoid dethatching too often to prevent lawn damage. Regular monitoring helps determine when dethatching is necessary.
What Common Mistakes Should I Avoid When Dethatching?
Avoid dethatching during drought or extreme heat. Don’t dethatch too deeply, or you may damage roots. Avoid dethatching a healthy lawn with minimal thatch. Using improper tools can also harm your grass.
Conclusion
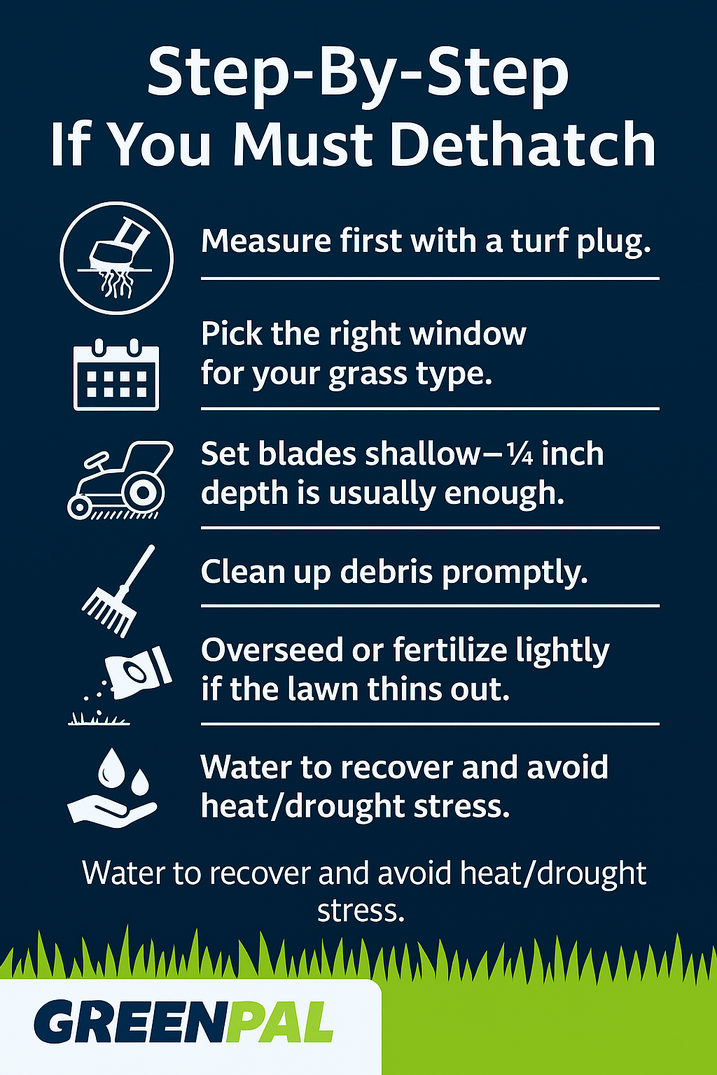
Avoid common dethatching mistakes to keep your lawn healthy. Use the right tools and timing. Do not dethatch too often or too deeply. Clear debris before starting to prevent damage. Watch your grass type and weather conditions. Careful dethatching helps grass grow strong and green.
Simple steps lead to a beautiful lawn. Stay patient and consistent for best results. Your lawn will thank you with vibrant growth. Keep these tips in mind for easy lawn care.
