
Is your extension cord looking worn out and frayed? Ignoring it could put you and your home at serious risk.
But don’t worry—repairing a frayed extension cord is easier and safer than you might think. You’ll discover simple, step-by-step tips to fix your cord quickly while keeping yourself protected. Keep reading, and you’ll learn how to bring your extension cord back to life without any guesswork or danger.
Your safety and peace of mind start here.
Identify Frayed Sections
Carefully examine the entire extension cordfor any visible damage. Look for areas where the outer plastic is cut, cracked, or worn. These spots are often where the cord is weakest.
Check for exposed wiresor discoloration. These signs can mean the cord is unsafeto use. Feel along the cord for any soft or brittle spots. These may not be easy to see but can cause problems.
- Look for frayed insulationor broken strands.
- Check if the cord feels warm or hotduring use.
- Notice any burn marks or melted areas.
- Ensure the plug and socket ends are intactand not loose.

Credit: totcables.com
Gather Necessary Tools
To fix a frayed extension cord, gather essential toolsfirst. These include electrical tape, wire strippers, and a screwdriver. You also need heat shrink tubingfor insulation. A multimeterhelps check if the cord is safe to use after repair.
Safety is very important. Wear insulated glovesto protect your hands from electric shock. Use safety glassesto protect your eyes from sparks or debris. Work in a dry areaand avoid any water nearby.
| Essential Repair Materials | Safety Gear Recommendations |
|---|---|
|
|
Disconnect Power Source
Always unplug the extension cord before starting any repair work. Cutting off power prevents electric shocks and ensures safety.
Ensuring Complete Power Off
Unplug the extension cord from the wall. Turn off the power switch if it has one. Check if any devices are still on. Make sure all appliances are disconnected.Precautions Before Repair
Wear rubber gloves to protect yourself. Use insulated tools for safety. Check the cord for any exposed wires. Ensure your work area is dry. Keep children and pets away from the area. `
Credit: www.youtube.com
Remove Damaged Insulation
Use a sharp utility knife or wire stripper to remove the outer insulation. Cut carefully around the cord without pressing too hard. This avoids cutting the inner wires.
Peel back the insulation slowly. Expose about 1 inch of the inner wires for repair. Avoid pulling or bending the wires too much.
- Choose the right tool for clean cuts.
- Work in a well-lit area for better visibility.
- Hold the cord firmly but gently while cutting.
- Strip only as much insulation as needed.
Damaging the wires inside can cause shorts or failure. Do not nick or score the wires. Check wires for breaks or frays before continuing.
Stripping insulation carefully keeps the cord safe to use. Protect the wires to prevent electrical hazards.
Assess Wire Condition
Check the outer insulationfor cuts or cracks. Small cracks might hide internal wire damage. Gently bend the cord near the frayed area. Look for any sparks or unusual smells. These signs mean the wires inside could be broken or exposed.
Use a multimeterto test the cord’s continuity. No reading means a break inside. If the cord feels hot or the wire looks burnt, it must be replaced immediately. Damaged wires can cause shocks or fires.
| Condition | Action |
|---|---|
| Outer insulation slightly damaged but wires intact | Repair with electrical tape or heat shrink tubing |
| Internal wires broken or exposed | Replace the entire extension cord |
| Burn marks, sparks, or melted areas | Discard the cord immediately for safety |

Credit: www.familyhandyman.com
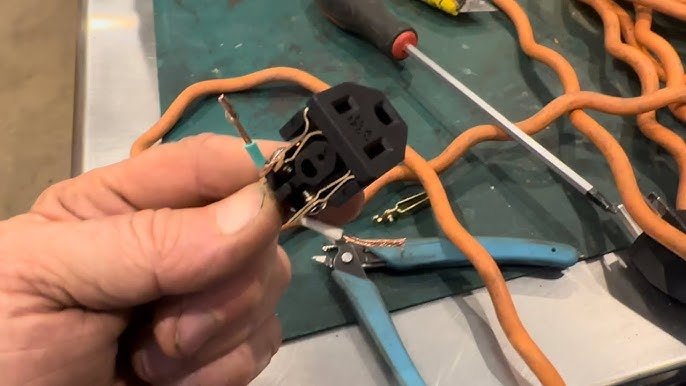
Repair Or Replace Wires
Splicing frayed wires requires care and the right tools. First, cut out the damaged section cleanly. Strip about half an inch of insulation from each wire end. Align wires by color or type to avoid confusion. Twist the bare wires tightly together to ensure a strong connection.
Using wire connectors is a safe way to join wires. Slide the twisted wires into the connector and twist it until tight. These connectors protect the wires and stop them from touching each other. Always check that the connection feels firm before moving on.
- Cut damaged wire part
- Strip insulation carefully
- Match wire colors
- Twist wires tightly
- Use wire connector securely
- Test connection strength
Insulate The Repair Area
Electrical tape is a good choice for small repairs on frayed cords. Wrap the tape tightly around the damaged area. Make sure to cover all exposed wires to stop shocks and shorts. Overlap the tape by half its width for better hold. Avoid stretching the tape too much; this can cause it to peel off later.
Heat shrink tubing offers stronger protection. Slide the tubing over the damaged part before fixing the wires. Use a heat gun or hair dryer to shrink the tubing. It will fit snugly, sealing the repair from water and dirt. This method lasts longer and looks cleaner than tape.
Test The Cord Safely
Use a multimeterto check electrical continuity. Set it to the resistance or continuity mode. Touch the probes to each end of the cord wires. A beep or low resistance means the wire is intact. No beep or high resistance shows a break in the wire.
Make sure the cord is unplugged before testing. Inspect the entire length for visible damage. Look for cuts, cracks, or exposed wires.
For confirming safe operation, plug in the cord after repairs. Turn on the connected device to check if it works properly. Watch for any sparks or unusual heat around the repaired area. If you see any signs, stop using the cord immediately.
Prevent Future Damage
Avoiding future damage means fixing frayed cords properly and checking them often. Using tape or replacing parts keeps cords safe and working well.
Proper Storage Tips
Storing extension cords properly prevents damage. Coil cords neatly to avoid twists. Use cord organizers for tidy storage. Keep cords in a dry place away from water. Avoid hanging cords by their plugs. This weakens the connection. Place cords in cool areas to prevent heat damage. Check cords regularly for wear and tear.Avoiding Common Hazards
Always unplug cords when not in use. This prevents overheating. Keep cords away from sharp objects. They might cut the insulation. Do not run cords under rugs. This can cause fraying. Avoid kinking the cord. This weakens the wires inside. Do not use cords as a clothesline. It’s unsafe and damages the cord. Always inspect cords before use. Look for cracks or frays in the insulation. `Frequently Asked Questions
How Can I Safely Repair A Frayed Extension Cord?
First, unplug the cord and inspect the damage. Use electrical tape or heat shrink tubing to cover exposed wires. If damage is severe, replace the cord to avoid hazards. Always ensure the cord is dry and work in a safe environment.
What Tools Do I Need To Fix A Frayed Extension Cord?
You’ll need wire strippers, electrical tape or heat shrink tubing, a utility knife, and a screwdriver. Optionally, use a multimeter to check for electrical continuity. These tools help ensure a proper and safe repair of the extension cord.
Is It Safe To Use A Frayed Extension Cord Without Repairs?
No, using a frayed cord is dangerous. Exposed wires can cause electric shock or fire. Always repair or replace damaged cords immediately to maintain safety and prevent accidents in your home or workplace.
How Long Does It Take To Repair A Frayed Extension Cord?
Repairing a minor fray usually takes about 10 to 15 minutes. It depends on the damage extent and your experience level. Taking your time ensures a thorough and safe repair without rushing the process.
Conclusion
Repairing a frayed extension cord keeps your home safe. Always unplug the cord before starting any fix. Use proper tools and materials for a strong repair. Check the cord often for new damage or wear. Replace the cord if the damage is too big.
Safety should always come first with electrical repairs. Taking these steps helps prevent accidents and saves money. Stay careful, and your extension cord will last longer.
