
Are you tired of wasting time and chemicals every time you use your handheld sprayer? Getting your sprayer properly calibrated is the secret to saving money, protecting your plants, and achieving the perfect spray every time.
In this guide, you’ll learn simple, step-by-step methods to calibrate your handheld sprayer with ease. By the end, you’ll feel confident that your sprayer is working just right, so you can focus on what really matters—healthy, thriving plants. Ready to make every spray count?
Let’s dive in.
Why Calibration Matters
Calibrating a handheld sprayer helps apply the right amount of liquid. It ensures the sprayer works properly and delivers even coverage.
Without calibration, you may use too much or too little product. This can cause poor results and extra costs.
Impact On Application Accuracy
Calibration improves how accurately the sprayer applies liquids. It helps target the exact area and avoid missed spots.
- Ensures even coverage on plants or surfaces
- Prevents under-application that may reduce effectiveness
- Reduces over-application that can harm plants or soil
- Helps maintain proper chemical concentration
Preventing Waste And Overuse
Proper calibration saves money by preventing waste. It stops using extra product that is not needed.
| Risk | Effect | Cost Impact |
| Overuse of chemicals | Environmental harm and plant damage | Increased expenses |
| Underuse of chemicals | Poor pest or weed control | Need for reapplication |
| Uneven spraying | Missed areas and inconsistent results | Wasted product and effort |

Credit: www.no-tillfarmer.com
Tools Needed For Calibration
Calibrating a handheld sprayer ensures you apply the right amount of liquid. Using the right tools makes this process easy and accurate.
This guide covers the basic tools you need to calibrate your sprayer properly.
Measuring Containers
Measuring containers help you collect and measure the spray output. Use clear containers with marked measurements for accuracy.
Choose a container size that matches the sprayer’s output volume. It should be easy to read and clean.
- Graduated cylinders
- Measuring cups with milliliter marks
- Clear plastic bottles with measurement labels
Timer Or Stopwatch
A timer or stopwatch tracks the time it takes to spray the measuring container. This helps calculate the flow rate.
Use a device that can measure seconds accurately. Many smartphones have built-in stopwatch apps.
- Digital stopwatch
- Smartphone timer app
- Wall clock with second hand
Protective Gear
Wear protective gear to stay safe while handling chemicals and spraying. This gear reduces exposure to harmful substances.
Always use gear that covers your skin, eyes, and lungs during calibration and spraying.
- Gloves resistant to chemicals
- Safety goggles or glasses
- Face mask or respirator
- Long sleeves and pants
Preparing The Sprayer
Before you start spraying, you need to prepare your handheld sprayer. Preparing helps you spray evenly and avoid problems.
Check the sprayer parts and make sure everything works well. This saves time and keeps your plants safe.
Cleaning The Nozzle
Clean the nozzle to remove dirt and old spray material. A clean nozzle sprays evenly and prevents clogging.
Use water and a soft brush to clean the nozzle gently. Avoid using sharp tools that can damage it.
- Remove the nozzle from the sprayer
- Rinse it with clean water
- Use a soft brush to clear any dirt
- Check that the spray holes are open
- Reattach the nozzle securely
Checking For Leaks
Look for leaks in the sprayer before filling it. Leaks waste spray and can cause harm.
Inspect the hose, seals, and connections. Tighten loose parts or replace damaged seals to stop leaks.
- Fill the sprayer with water
- Pressurize the sprayer as usual
- Watch for dripping or wet spots
- Tighten or replace parts if needed
- Test again until no leaks appear
Filling With Water
Fill the sprayer tank with clean water before adding chemicals. Water helps you measure and mix sprays well.
Do not overfill the tank. Leave space for the spray mix to move and pressurize properly.
- Place the sprayer on a flat surface
- Open the tank lid carefully
- Fill with clean water up to the marked level
- Close the lid tightly
- Mix spray chemicals as directed after filling
Measuring Spray Output
Measuring spray output helps you know how much liquid your sprayer releases. It ensures you apply the right amount of solution.
This process makes your spraying efficient and saves chemicals. It also helps you adjust the sprayer if needed.
Spraying Into A Container
Start by spraying into a clean container. Use a container that can hold enough liquid for a good measurement.
Spray at the normal pressure and speed you would use in the field. Collect the spray for a set time, like 30 seconds.
- Use a bucket or large measuring cup
- Spray steadily for consistent output
- Keep the sprayer nozzle close to the container
Recording The Volume
After spraying, measure the liquid collected in the container. Use a measuring cup or a container with volume marks.
Write down the total volume sprayed during the set time. This helps you calculate the sprayer’s flow rate.
- Check the measurement in milliliters or liters
- Note the exact time sprayed
- Repeat the test for accuracy
Calculating Flow Rate
Flow rate shows how much liquid your sprayer uses per minute. Divide the volume by the spraying time.
For example, if you sprayed 500 milliliters in 30 seconds, multiply by 2 to get per minute flow rate.
- Flow rate (ml/min) = Volume (ml) ÷ Time (min)
- Use the flow rate to adjust your spray settings
- Keep the flow consistent for even spraying
Adjusting The Sprayer Settings
Calibrating a handheld sprayer helps you apply liquids accurately. Adjusting the settings ensures even coverage and saves product.
Focus on nozzle pressure, spray pattern, and testing your changes. Each part affects how well the sprayer works.
Changing Nozzle Pressure
Nozzle pressure controls the spray force and droplet size. Too high pressure wastes liquid. Too low pressure causes poor coverage.
- Check the sprayer manual for recommended pressure levels.
- Use the pressure regulator or adjust the pump speed.
- Watch the spray stream to see if droplets are fine and even.
- Adjust gradually to avoid over-pressurizing the nozzle.
Altering Spray Pattern
The spray pattern affects how the liquid covers the target area. Different tasks need different patterns like fan, cone, or jet spray.
| Spray Pattern | Description | Best Use |
|---|---|---|
| Fan | Wide, flat spray | Cover large, flat surfaces |
| Cone | Circular spray with droplets | Cover irregular plants or areas |
| Jet | Strong, narrow stream | Target specific spots or weeds |
Change the nozzle tip or adjust the angle to get the desired pattern.
Testing Adjustments
Testing helps confirm your settings work well. Use clean water and check coverage and flow rate.
Try this test:
- Spray water on a flat white surface.
- Measure how much liquid sprays in 30 seconds.
- Check if spray covers the area evenly.
- Adjust pressure or nozzle if spray is uneven or too weak.
Calculating Application Rate
Calibrating a handheld sprayer helps you apply the right amount of liquid. Calculating the application rate is key for effective coverage.
This guide explains how to measure the area, find spray volume per area, and adjust for the desired coverage.
Measuring Area Size
Measure the area you want to spray. Use a tape measure or a wheel to find the length and width.
Multiply length by width to get the total area in square feet or meters.
- Measure the length of the area.
- Measure the width of the area.
- Multiply length × width to find area size.
Determining Spray Volume Per Area
Spray a test area and collect the liquid used. Measure how much spray covers a known area.
Use a container to catch spray for a set time. Measure the volume to find spray rate per area.
- Spray a small test area.
- Collect spray in a container.
- Measure the volume collected.
- Divide volume by test area size.
Adjusting For Desired Coverage
Decide how much liquid you want to apply per area. Compare it to your test spray volume.
Adjust sprayer pressure or walking speed to increase or decrease coverage as needed.
- If spray volume is too low, slow down or increase pressure.
- If spray volume is too high, speed up or reduce pressure.
- Repeat test until desired coverage is reached.
Performing A Test Spray
Calibrating a handheld sprayer ensures you apply the right amount of liquid. A test spray helps check if the sprayer works evenly.
This process lets you see how the spray covers the area before starting your job. It saves time and prevents waste.
Selecting A Test Area
Pick a flat area that looks like the surface you will spray. It should be easy to clean or absorb the spray.
Try to avoid windy or very sunny spots. These can change how the spray lands on the surface.
- Choose a small, open space
- Use a surface similar to your work area
- Avoid windy or hot places
- Make sure the area is safe and easy to clean
Monitoring Spray Uniformity
Spray evenly across the test area. Watch how the droplets spread and if any spots are missed.
Look for patches with too much or too little liquid. These show if the sprayer needs adjustment.
- Spray in steady, smooth motions
- Check for even coverage
- Note any dry or heavy spots
- Use paper or fabric to see spray patterns clearly
Making Final Adjustments
Change the sprayer settings to fix uneven spray. Adjust the nozzle, pressure, or spray speed.
Repeat the test spray after each change. Keep adjusting until the spray is even and matches your needs.
- Turn the nozzle to change spray pattern
- Increase or decrease pressure
- Move sprayer at a steady speed
- Test again after every adjustment
Credit: www.tti.com.au
Maintaining Calibration Accuracy
Keeping your handheld sprayer calibrated is important for good results. Accurate calibration helps apply the right amount of liquid.
Regular care and checks keep your sprayer working well. Follow these tips to maintain calibration accuracy.
Regular Calibration Schedule
Check your sprayer’s calibration often. This keeps spray amounts correct. How often you check depends on use and conditions.
- Calibrate before each use if possible
- Check calibration monthly for regular use
- Recalibrate after any repairs or part changes
- Test spray pattern and flow rate regularly
Cleaning After Use
Clean your sprayer well after each use. Dirt or chemicals can clog the nozzle and change spray rates.
- Flush sprayer with clean water
- Remove and clean the nozzle
- Check and clean filters
- Dry all parts before storage
Storing Sprayer Properly
Store your sprayer in a safe, dry place. Proper storage protects parts and keeps calibration intact.
| Storage Tip | Reason |
| Keep away from direct sunlight | Prevents damage to seals and plastic |
| Store upright | Stops leaks and nozzle damage |
| Empty all liquids before storing | Prevents corrosion and clogging |
| Cover nozzle and hose | Keeps dirt and insects out |
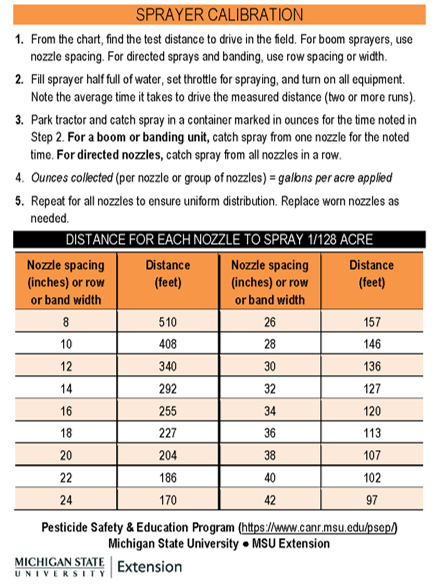
Credit: www.canr.msu.edu
Frequently Asked Questions
How Do I Know When To Calibrate A Handheld Sprayer?
Calibrate your sprayer before each use or when changing chemicals. Calibration ensures accurate application rates and prevents under or over spraying. Regular checks maintain effectiveness and save costs.
What Tools Are Needed To Calibrate A Handheld Sprayer?
You need a measuring container, stopwatch, and calculator. These tools help measure flow rate, spray area, and calculate the correct application rate precisely.
How Often Should I Recalibrate My Sprayer?
Recalibrate every time you change spray nozzles or chemicals. Also, recalibrate after repairs or if spray patterns look uneven. This keeps your application accurate and consistent.
Can I Calibrate A Sprayer Without A Stopwatch?
While a stopwatch is ideal, you can use a clock with a second hand. Accurate timing helps measure flow rate, which is crucial for proper calibration.
Conclusion
Calibrating a handheld sprayer is essential for effective spraying. Proper calibration ensures even distribution of chemicals. It saves you time and money. Regular checks maintain optimal performance. Follow simple steps for accuracy. Safety is a priority; always wear protective gear.
Understanding your sprayer improves results. With practice, calibration becomes second nature. Keep your garden or crops healthy and thriving. Remember, precise spraying leads to better outcomes. Achieve the best results with consistent care and attention.
