
Are you tired of unevenly planted seeds that lead to patchy and unpredictable growth in your garden or farm? Calibrating your seeder might just be the solution you’ve been searching for.
By taking a few simple steps to ensure your seeder is properly calibrated, you can achieve consistent seed distribution, optimize plant growth, and ultimately boost your harvest. Imagine the satisfaction of seeing a lush, evenly sprouted field or garden bed, knowing that each seed was placed with precision.
In this guide, we’ll show you exactly how to calibrate a seeder, eliminating guesswork and saving you time and resources. Stick with us, and you’ll soon master the art of perfect seeding.
Why Seeder Calibration Matters
Seeder calibration helps farmers plant seeds evenly and correctly. It makes sure the machine drops the right amount of seeds in the soil.
Calibrating a seeder can save money, reduce waste, and improve the growth of plants. It is an important step before planting.
Impact On Planting Accuracy
Proper calibration makes sure seeds go in the ground at the right depth and spacing. This helps plants grow better and stronger.
If seeds are not placed well, some may not grow, or plants could crowd each other. Calibration avoids these problems.
Reducing Seed Waste
Calibrating your seeder stops too many seeds from being dropped at once. This lowers seed loss and saves money.
When seeds are wasted, farmers must buy more and spend more time planting. Calibration helps use seeds efficiently.
- Prevents overseeding
- Reduces seed costs
- Minimizes replanting
Improving Crop Yields
Good calibration leads to healthy plants and better crop growth. Plants get enough space and nutrients to grow well.
Higher crop yields mean more food or product from the same amount of land. Calibration helps farmers get the best results.

Credit: tractorkarvan.com
Tools Needed For Calibration
Calibrating a seeder helps plant seeds at the right rate. Using the right tools makes calibration easy and accurate.
This guide covers the main tools needed to calibrate a seeder properly. These tools help measure and adjust seed flow.
Measuring Containers
Measuring containers collect seeds from the seeder for counting and weighing. They must be clean and accurate.
Use containers that fit the seed type and quantity. Common types include buckets, trays, or small bins.
- Choose a container that holds seeds without spilling
- Containers should be easy to empty and clean
- Use containers with clear markings if possible
Calibration Charts
Calibration charts show seed rates and settings for different seed types. They help set the seeder correctly.
Use charts from the seeder manual or seed supplier. These charts save time and improve planting accuracy.
- Find charts for your seeder model and seed type
- Charts show seed weight per volume and seeder settings
- Keep charts handy during calibration for quick reference
Basic Hand Tools
Basic hand tools help adjust and measure parts of the seeder during calibration. They ensure proper seed flow.
Common tools include wrenches, screwdrivers, and measuring tapes. These tools make small adjustments easier and faster.
- Wrenches to tighten or loosen bolts
- Screwdrivers for adjusting seed plates or covers
- Measuring tape to check distances and seed spacing
- Scales to weigh seeds accurately
Preparing The Seeder
Calibrating a seeder helps plant seeds evenly and at the right depth. Preparing the seeder correctly is the first step in this process.
Cleaning and checking the parts before use ensures better accuracy and performance. Adjusting settings fits the seeder to the seed type you plan to sow.
Cleaning Seed Meters
Seed meters must be clean to work well. Dirt or old seed residue can block seed flow and cause errors.
Use a soft brush to remove dust and debris from the seed meter parts. Wipe metal parts with a dry cloth to avoid rust.
- Remove seed plates and clean thoroughly
- Check seed tubes for blockages
- Ensure moving parts turn freely
- Do not use water on electrical parts
Checking Seed Types
Different seeds need different settings. Check your seed type before calibration. This helps you set the seeder properly.
Look at seed size, shape, and weight. These factors affect how seeds drop from the seeder and into the soil.
- Small seeds like lettuce need gentle handling
- Large seeds like corn require wider meter openings
- Round seeds flow differently than flat seeds
- Dry seeds flow better than moist seeds
Adjusting Seeder Settings
Adjust the seeder to match the seed type and desired spacing. Proper settings help spread seeds evenly and avoid waste.
Set the seed rate, planting depth, and seed spacing. Check your seeder manual for exact adjustment instructions.
- Change seed plate size if needed
- Set depth control for correct seed placement
- Adjust spacing wheel or mechanism
- Test settings with a small seed sample
Step-by-step Calibration Process
Calibrating a seeder ensures seeds are planted evenly and at the right depth. This process helps you save seeds and get a good crop.
Follow these steps to measure seed flow, adjust settings, and test seed distribution for the best results.
Measuring Seed Flow Rate
First, measure how many seeds flow through the seeder in a set time. This tells you if the seeder is delivering seeds properly.
Use a container to catch seeds for 30 seconds or one minute. Count the seeds collected to find the flow rate.
- Turn on the seeder at normal speed
- Catch seeds in a container
- Count seeds after time ends
- Note the number for adjustments
Adjusting Seed Rate Settings
Change the seeder’s settings to match the desired seed rate. This controls how many seeds drop per area.
Use the seed flow rate you measured to guide your adjustments. Increase or decrease the rate as needed.
- Check the seed rate dial or control panel
- Adjust settings to increase or reduce seed flow
- Keep notes of each change
- Repeat seed flow measurement after adjustments
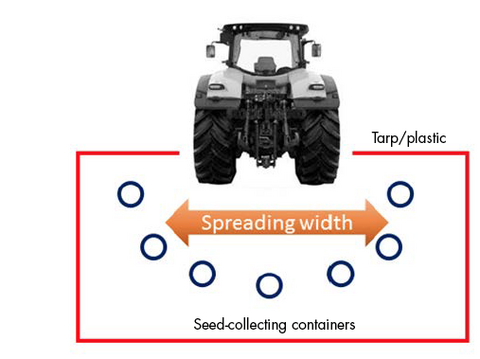
Testing Seed Distribution
After adjusting, check how seeds spread in the soil. Good distribution means even crop growth.
Perform a test run over a marked area. Count seeds or measure spacing to confirm even planting.
- Mark a test area in the field
- Run the seeder over this area
- Check seed placement and spacing
- Adjust settings again if seeds are uneven
Common Calibration Challenges
Calibrating a seeder can be tricky. Many farmers face issues that affect seed placement and crop growth.
Understanding common challenges helps fix problems faster and improve seeding accuracy.
Dealing With Irregular Seed Sizes
Seeds often come in different sizes and shapes. This difference can cause uneven seed flow during planting.
Adjusting the seed meter settings can help accommodate various seed sizes. Using seed plates made for specific seed types improves accuracy.
- Measure seed size before calibration
- Use correct seed plates or meters
- Test seed flow and adjust settings
- Repeat calibration if seeds vary within the batch
Addressing Meter Blockages
Seed meters can get blocked by dirt, debris, or damaged seeds. Blockages reduce seeding speed and cause gaps.
Regular cleaning and inspection prevent blockages. Check meters before and during operation to keep seeds flowing smoothly.
- Clean meters and seed tubes regularly
- Remove broken or oversized seeds
- Inspect for worn or broken parts
- Clear any debris before planting
Handling Uneven Terrain
Uneven ground causes inconsistent seed depth and spacing. This leads to poor seed germination and growth.
Adjusting seeder depth and speed helps manage uneven fields. Use equipment with good suspension or depth control systems.
- Set seeder depth to match field conditions
- Drive at steady speeds on rough ground
- Check seed placement regularly
- Use equipment designed for uneven terrain
Credit: extension.msstate.edu
Maintaining Calibration Over Time
Keeping your seeder calibrated is important for good planting results. Calibration can change over time due to wear and weather. Regular checks help keep your seeder working right.
This guide covers ways to keep your seeder calibrated over time. You will learn about inspection, seasonal checks, and record keeping.
Regular Seeder Inspections
Check your seeder often to find problems early. Look for worn parts, loose bolts, and dirt build-up. Fix issues right away to keep accuracy.
- Inspect seed plates for damage
- Clean seed tubes and hoppers
- Check for rust or corrosion
- Tighten all fasteners
- Test seed drop rate
Seasonal Recalibration
Recalibrate your seeder at the start of each planting season. Changes in seed type or soil can affect calibration. Adjust the settings to fit current conditions.
| Season | Action |
| Spring | Check seed rate and depth |
| Summer | Adjust for soil moisture changes |
| Fall | Test calibration with new seed types |
| Winter | Inspect and repair parts |
Record Keeping For Consistency
Keep notes of your calibration settings and results. Records help you spot trends and avoid repeated mistakes. Use a simple log book or digital file.
- Write down seed type and size
- Record calibration date and settings
- Note soil conditions and weather
- Log any repairs or part changes
- Compare results each season
Tips For Optimal Planting Results
Calibrating a seeder correctly helps plant seeds at the right depth and spacing. This improves crop growth and yield.
Following simple tips makes seeder calibration easier and more accurate for better planting results.
Choosing The Right Seed Rate
Select a seed rate that matches your crop type and soil conditions. Too many seeds can crowd plants.
Too few seeds reduce the chance of a full harvest. Adjust the rate for best plant growth.
- Check seed package for recommended rates
- Test seed flow from your seeder
- Adjust settings to match seed size and weight
- Consider soil fertility and moisture
Adjusting For Weather Conditions
Weather affects seed planting depth and soil moisture. Wet soil can cause seeds to clump.
Dry soil may need deeper planting to reach moisture. Change your seeder settings based on weather.
- Plant shallower in moist soil
- Plant deeper in dry soil
- Delay planting if the soil is too wet
- Check weather forecasts before planting
Using Technology For Precision
Modern tools help you calibrate seeders with accuracy. GPS and sensors guide seed placement.
Use digital displays to monitor seed rate and spacing. This reduces waste and increases efficiency.
- Use GPS for exact seed row spacing
- Install seed flow sensors for real-time data
- Use calibration apps for quick adjustments
- Record settings to repeat good results

Credit: www.youtube.com
Frequently Asked Questions
How Often Should I Calibrate My Seeder?
Calibrate your seeder before each planting season. Regular calibration ensures accurate seed distribution. It improves crop yield and reduces seed waste.
What Tools Are Needed To Calibrate A Seeder?
You need a calibration tray, measuring tape, calculator, and seeds. These tools help measure seed flow and spacing precisely. Proper tools simplify the calibration process.
How Do I Adjust Seed Rate On A Seeder?
Adjust the seed rate using the seeder’s control lever or dial. Consult the manual for specific settings. Proper adjustment ensures even seed spacing and optimal growth.
Can I Calibrate A Seeder Without Seeds?
Yes, you can use a substitute like rice or sand for calibration. It mimics seed flow without wasting seeds. This method is cost-effective and easy.
Conclusion
Calibrating a seeder ensures seeds are spread evenly and at the right depth. This helps plants grow healthy and strong. Check your seeder regularly to keep it working well. Small adjustments make a big difference in your crop yield. Take your time and follow the steps carefully.
Good calibration saves seeds and money. A well-set seeder makes planting easier and more efficient. Keep practicing to improve your skill. Your hard work will show in a better harvest.
