
Are you tired of messy garden edges that spoil the look of your lawn? Installing flexible lawn edging can give your yard a clean, polished appearance in no time.
It’s easier than you might think, and you don’t need special tools or experience to get it right. In this guide, you’ll learn simple steps to install flexible lawn edging that fits your garden’s shape perfectly. Keep reading, and you’ll soon have a neat, professional-looking lawn that makes your outdoor space stand out.

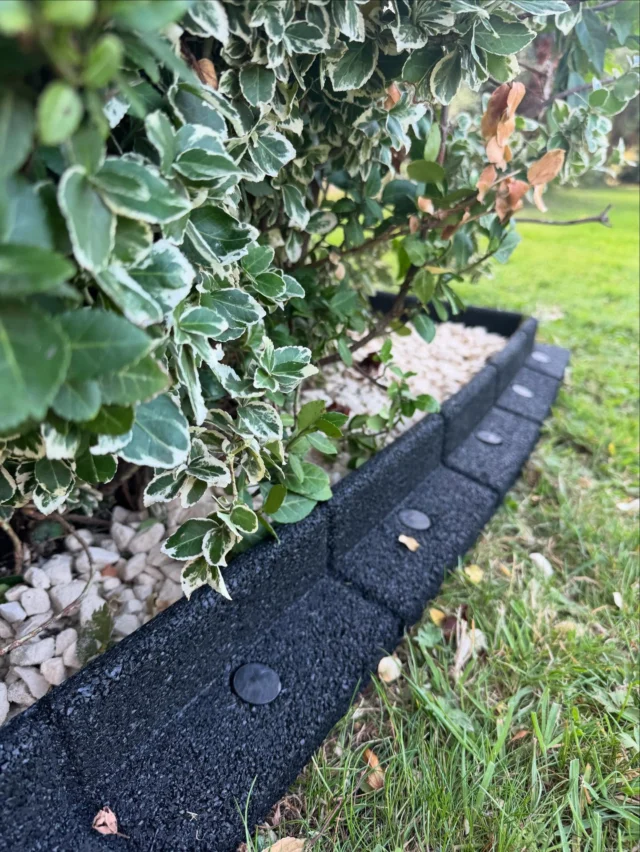
Credit: www.amazon.ca
Choosing Flexible Lawn Edging
Flexible lawn edging helps shape your garden and keep grass contained. Choosing the right kind makes installation easier and the look neater.
This guide covers the main types of flexible edging materials, what to think about before buying, and tools needed for installation.
Types Of Flexible Edging Materials
Flexible lawn edging comes in different materials. Each has benefits for your garden design and lawn care.
- Plastic:Lightweight and easy to install. It bends smoothly around curves.
- Rubber:Durable and eco-friendly. It resists cracking in cold weather.
- Metal:Thin steel or aluminum strips. They hold shape well and last long.
- Composite:Made from recycled wood and plastic. It looks natural and is strong.
Factors To Consider Before Buying
| Factor | What to Check |
| Flexibility | Can it bend around curves in your lawn? |
| Durability | Will it last through weather changes? |
| Height | Is it tall enough to hold back grass and soil? |
| Color | Does it match your garden style? |
| Price | Fits your budget for materials and installation. |
| Ease of Installation | Do you need special tools or skills? |
Tools Needed For Installation
Installing flexible lawn edging requires a few basic tools. These help you place and secure the edging properly.
- Shovel or spade for digging a shallow trench
- Measuring tape to mark the edging length
- Rubber mallet to tap edging into place
- Garden gloves to protect your hands
- Stakes or pins to hold edging firmly in the ground
- Utility knife or scissors to cut edging to size

Credit: www.flexiborder.co.uk
Preparing The Lawn Edge
Preparing the lawn edge is important before installing flexible lawn edging. It helps the edging fit well and last longer.
This process includes marking the path, clearing the area, and leveling the ground. Each step makes installation easier.
Marking The Edging Path
Mark where the lawn edging will go. Use a garden hose or string to create a smooth line.
Follow the shape you want, such as curves or straight lines. This helps you see the exact placement.
Clearing The Area
Remove grass, weeds, and debris along the marked path. Clear space for the edging to sit properly.
Dig a shallow trench about 2-3 inches deep and the width of the edging. This helps the edging stay in place.
Leveling The Ground
Make sure the trench bottom is flat and even. Use a small rake or shovel to smooth the soil.
Level ground helps the edging sit firmly and prevents shifting over time.
Installing The Edging
Installing flexible lawn edging helps keep your garden neat. It separates grass from flower beds and paths.
This guide explains how to position, secure, and bend the edging to fit your lawn shape.
Positioning The Edging
Place the edging where you want a clear boundary. Mark the line with spray paint or a rope.
Make sure the line looks smooth and follows the shape of your garden bed or path.
Securing With Stakes
Use stakes to hold the edging firmly in place. Push them into the ground every few feet along the edging.
Drive the stakes deep enough to keep the edging from moving or bending out of shape.
- Place stakes on the inside edge of the lawn edging
- Space stakes about 12 to 18 inches apart
- Use a hammer or mallet to insert stakes securely
Bending Around Curves
Flexible edging bends easily around curves and corners. Gently bend the edging along your marked line.
If the curve is tight, bend slowly to avoid cracking or breaking the edging.
- Start bending at one end of the curve
- Work slowly to follow the shape
- Use stakes to keep the edging in the curved position

Credit: www.amazon.ca
Finishing Touches
After installing flexible lawn edging, finishing touches make your yard look neat. These final steps secure the edging and improve its appearance.
Careful finishing ensures the edging lasts longer and stays in place during weather changes.
Backfilling Soil
Backfilling soil helps keep the edging stable. Fill the trench on both sides of the edging with soil.
Press the soil firmly but gently to avoid shifting the edging out of place.
- Use soil removed during trench digging
- Pack soil tightly to reduce gaps
- Water the soil lightly to settle it
Trimming Excess Edging
Trim any extra edging to fit your lawn shape perfectly. Use sharp garden shears or a utility knife for clean cuts.
Cut the edging carefully to avoid damaging the main part. Smooth the edges if needed to prevent injuries.
- Measure twice before cutting
- Cut slowly to keep a straight edge
- File rough edges with sandpaper
Maintaining The Edging
Keep your lawn edging neat by checking it regularly. Remove debris like leaves and grass clippings from the edges.
Adjust the soil around the edging if it sinks or shifts. Clean the edging with water to prevent dirt buildup.
- Inspect edging after heavy rain
- Trim plants growing over the edging
- Repack soil yearly for stability
Frequently Asked Questions
What Tools Are Needed To Install Flexible Lawn Edging?
You need a mallet, garden gloves, a tape measure, and edging stakes. These tools help ensure precise and secure installation. A flat shovel or spade is useful to create a trench for the edging. Having the right tools makes the process easier and cleaner.
How Deep Should Flexible Lawn Edging Be Installed?
Install flexible lawn edging about 3 to 4 inches deep. This depth secures the edging firmly in place. It prevents shifting or tipping over time. Digging a trench to this depth ensures durability and neat separation between lawn and garden.
Can Flexible Lawn Edging Be Curved Easily?
Yes, flexible lawn edging can be bent to create smooth curves. Its material allows easy shaping without breaking. This makes it ideal for irregular garden beds or pathways. Proper installation maintains the curve’s shape and keeps the edging stable.
How Do You Secure Flexible Lawn Edging In Place?
Use metal or plastic stakes to anchor the edging firmly. Place stakes every 12 to 18 inches along the edging. This prevents movement from soil pressure or lawn equipment. Proper staking ensures long-lasting and neat lawn borders.
Conclusion
Installing flexible lawn edging is simple and effective. It shapes your garden and keeps grass neat. Follow the steps carefully for best results. Use the right tools and take your time. This small effort makes a big difference outside. Enjoy a tidy, clean lawn all year round.
Try it yourself and see how easy it can be. Your garden will look well cared for and fresh.
