
Are you tired of seeing your lawn struggle no matter how much you water or fertilize? The secret to a lush, green yard starts beneath the surface—right in your soil.
Knowing exactly what your soil needs can save you time, money, and frustration. That’s where a soil test kit comes in. By using one, you can uncover the hidden problems holding your lawn back and take simple steps to fix them.
Ready to transform your grass into the envy of the neighborhood? Keep reading, and I’ll show you how to use a soil test kit for your lawn with easy, clear steps.

Credit: lawnsynergy.com
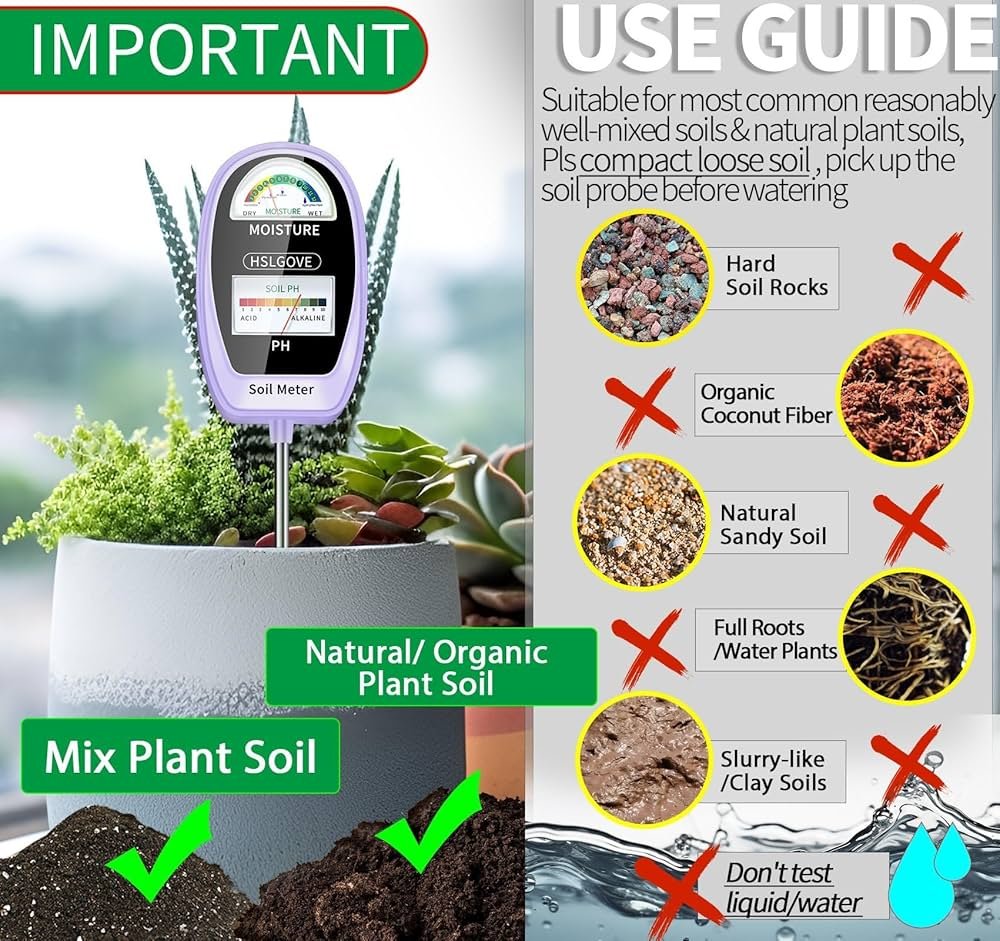
Choosing The Right Soil Test Kit
Using a soil test kit helps you know what your lawn needs to grow healthy. Picking the right kit is important for accurate results.
There are many types of kits available. Each one tests different things and works in its own way.
Types Of Soil Test Kits
Soil test kits vary by what they measure and how they deliver results. Some kits test only pH, while others check nutrients.
- pH Test Kits:Measure soil acidity or alkalinity.
- Nutrient Test Kits:Check levels of nitrogen, phosphorus, and potassium.
- Comprehensive Kits:Test pH and multiple nutrients together.
- Digital Testers:Use electronic sensors for fast readings.
- Lab-Submission Kits:Collect samples and send to a lab for detailed analysis.
Factors To Consider Before Buying
Think about your lawn needs and how much detail you want from the test. Some kits are simple, others are more complex.
- Purpose:Decide if you only need pH or also nutrient levels.
- Ease of Use:Choose a kit that matches your comfort with testing.
- Accuracy:Lab tests are more accurate but take time.
- Cost:Kits vary in price. Pick one that fits your budget.
- Speed:Digital testers give quick results, lab kits take longer.
- Instructions:Look for clear, simple directions.

Credit: www.amazon.com
Preparing Your Lawn For Testing
Testing your lawn’s soil helps you understand its health. Proper preparation makes the test accurate.
Collecting soil samples correctly is important. Follow these steps to prepare your lawn well.
Selecting Sampling Areas
Choose different spots in your lawn to collect soil samples. This gives a clear picture of soil health.
Avoid areas with unusual conditions like dead grass or heavy shade. Focus on normal lawn sections.
- Pick 5 to 10 spots evenly spread across the lawn
- Exclude flower beds, compost piles, or paths
- Sample areas that get similar sunlight and water
- Collect samples from spots with different grass types
Tools Needed For Soil Collection
Use the right tools to collect soil samples easily and cleanly. This helps keep samples pure.
Common tools include simple items you may have at home or in a garden shed.
- A soil probe, trowel, or small shovel for digging
- A clean bucket or container to mix samples
- Plastic bags or soil test kit containers to store samples
- Gloves to keep hands clean
- Marker or labels for sample identification
Collecting Soil Samples
Testing your lawn’s soil helps you understand its health. It shows nutrient levels and pH balance. Collecting good soil samples is key for accurate results.
Follow clear steps to take samples from different areas. Avoid mistakes that can lead to wrong readings.
How To Take Soil Samples
Use a clean tool like a spade or soil probe to collect samples. Take soil from about 4 to 6 inches deep. Remove grass or mulch before digging.
- Pick several spots in your lawn to sample.
- Dig a small hole or use a probe to collect soil.
- Take about one cup of soil from each spot.
- Mix all samples in a clean container.
- Let the soil dry before testing or sending it to a lab.
Avoiding Common Sampling Mistakes
Wrong sampling can cause wrong results. Avoid these common errors to get accurate data.
| Mistake | Why It’s a Problem | How to Avoid It |
|---|---|---|
| Sampling only one spot | Soil varies across your lawn | Take samples from multiple areas |
| Collecting soil too shallow or deep | Not measuring root zone soil | Dig 4-6 inches deep |
| Using dirty tools | Can contaminate samples | Clean tools before sampling |
| Including grass or mulch | Changes soil sample makeup | Remove surface debris before sampling |
| Sampling after fertilizer or lime | Skews nutrient readings | Wait a few weeks after treatment |
Using The Soil Test Kit
Testing your lawn soil helps you know its health. A soil test kit gives clear results fast.
Follow simple steps to collect samples and check your soil’s condition accurately.
Step-by-step Testing Process
Start by gathering tools like a clean trowel, soil test kit, and a clean container.
- Use the trowel to dig 4 to 6 inches deep in several spots around your lawn.
- Place soil from each spot into the container and mix well.
- Remove any roots, stones, or debris from the mixed soil.
- Fill the test kit’s sample container with the mixed soil up to the marked line.
- Follow the kit instructions to add testing solutions or strips to the soil.
- Wait the recommended time for the test to develop color or readings.
Interpreting Test Results
Your test kit will show results for pH, nitrogen, phosphorus, and potassium. Each affects lawn health.
| Test Type | Low | Optimal | High |
| pH Level | Below 6.0 | 6.0 – 7.0 | Above 7.5 |
| Nitrogen (N) | Less than 10 ppm | 10 – 30 ppm | Above 30 ppm |
| Phosphorus (P) | Less than 15 ppm | 15 – 40 ppm | Above 40 ppm |
| Potassium (K) | Less than 50 ppm | 50 – 150 ppm | Above 150 ppm |
Use results to decide if your lawn needs lime, fertilizer, or other treatments to grow well.
Improving Lawn Health Based On Results
Using a soil test kit helps you learn what your lawn needs. Test results guide you on how to care for your grass.
Adjusting soil pH and adding fertilizers improve growth and color. Follow these steps to keep your lawn healthy.
Adjusting Soil Ph
Soil pH affects nutrient availability for grass roots. Your test shows if the soil is too acidic or alkaline.
- If pH is below 6.0, add lime to raise it.
- If pH is above 7.5, add sulfur to lower it.
- Mix amendments evenly into the soil.
- Water the lawn after applying materials.
- Retest soil after a few months.
Applying Fertilizers And Amendments
Your soil test shows which nutrients your lawn lacks. Use the right fertilizer to fill those gaps.
| Nutrient | Common Sources | Benefits |
| Nitrogen (N) | Urea, Ammonium Nitrate | Boosts leaf growth and color |
| Phosphorus (P) | Superphosphate, Bone Meal | Supports root development |
| Potassium (K) | Potash, Sulfate of Potash | Improves disease resistance |
Apply fertilizer evenly on dry grass. Water the lawn after fertilizing to help nutrients soak in.
Maintaining A Healthy Lawn
Using a soil test kit helps you keep your lawn healthy. It shows what your soil needs to grow strong grass.
Testing soil regularly lets you add the right nutrients. This keeps your lawn green and full all year.
Regular Soil Testing Schedule
Test your soil at least twice a year. Early spring and fall are the best times. This helps catch problems early.
- Collect soil samples from different lawn areas.
- Dry the samples before testing.
- Use the soil test kit as per instructions.
- Record the results to track changes.
- Adjust lawn care based on the results.
Tips For Consistent Lawn Care
Consistent care makes your lawn strong. Follow these simple tips to keep it healthy all year.
| Care Activity | Recommended Frequency | Notes |
| Watering | 2-3 times a week | Water deeply early in the morning |
| Mowing | Once a week | Keep grass at 2.5 to 3 inches tall |
| Fertilizing | Every 6-8 weeks | Use fertilizer based on soil test |
| Weed Control | Monthly | Remove weeds promptly |

Credit: yardmastery.com
Frequently Asked Questions
What Is The Best Time To Use A Soil Test Kit For Lawn?
The best time to test your lawn soil is early spring or fall. This timing helps you prepare for planting and fertilizing effectively. Testing during these seasons provides accurate nutrient levels for optimal lawn growth.
How Do I Collect Soil Samples For Testing?
Collect soil samples from 4-6 spots in your lawn. Dig 4-6 inches deep, remove grass, and mix samples in a clean container. This ensures a representative soil sample for accurate test results.
What Nutrients Does A Soil Test Kit Measure?
A soil test kit typically measures pH, nitrogen, phosphorus, and potassium levels. Some kits also check for calcium, magnesium, and organic matter. These nutrients are essential for healthy lawn growth and proper fertilization.
How Often Should I Test My Lawn Soil?
Test your lawn soil at least once every 2-3 years. More frequent testing is recommended if you notice poor growth or suspect nutrient imbalances. Regular testing helps maintain healthy, vibrant grass.
Conclusion
A soil test kit helps keep your lawn healthy and vibrant. It provides essential insights into your lawn’s nutrient needs. Testing regularly ensures you apply the right amount of fertilizer. This prevents over-fertilization, which can harm grass. Understanding soil pH helps balance nutrients effectively.
Easy to use, these kits guide lawn care decisions. Healthy soil leads to greener, thicker grass. Your lawn becomes a beautiful, welcoming space. So, grab a kit and test your soil today. A little effort goes a long way in achieving a stunning lawn.
Enjoy the process and watch your lawn thrive!
