
Are you curious about the health of your garden or farm soil? Sending soil samples to university labs can provide you with detailed insights that are crucial for optimal growth and productivity.
You might wonder why this step is necessary or how it can benefit you. The reality is, understanding the composition of your soil can be the difference between thriving plants and a disappointing harvest. University labs offer precise analysis, giving you valuable data to enhance your soil’s fertility.
But how do you get started? Stay with us as we guide you through the simple steps to send your soil samples to university labs, ensuring you make informed decisions for your garden or farm.
Credit: extension.missouri.edu
Preparing Your Soil Sample
Sending soil samples to university labs helps you learn about your soil’s health. Proper preparation is key for accurate results.
Follow these steps to prepare your soil sample correctly before sending it.
Selecting The Right Location
Choose spots that represent the area you want to test. Avoid unusual places like compost piles or animal spots.
Sample multiple areas if your land looks different in parts. This gives better overall results.
- Pick at least 5 to 10 random spots
- Stay away from edges and paths
- Sample areas with similar plants or soil
- Do not include spots with visible contamination
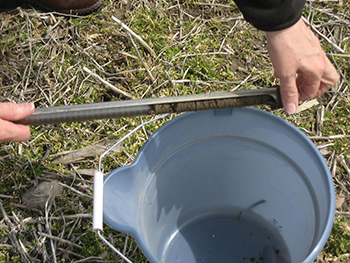
Gathering Necessary Tools
Use clean tools to avoid mixing other materials with your soil. Prepare all items before you start.
- Clean trowel or soil probe
- Plastic bucket or clean container
- Plastic bags or paper soil sample bags
- Permanent marker for labeling
- Gloves to keep hands clean
Collecting Soil Samples Properly
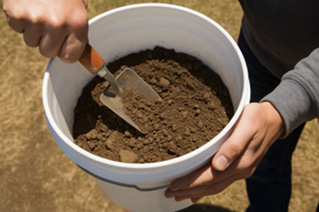
Dig 6 to 8 inches deep to get the soil for testing. Remove any plants, roots, or debris on top before sampling.
Mix soil from all spots in the container. Take about one cup of the mixed soil for your sample.
- Clear surface debris before digging
- Use the same depth for every sample
- Mix all collected soil well
- Place mixed soil into labeled bags
- Label with your name, date, and location
Packaging Your Sample
Sending soil samples to university labs needs careful packaging. Proper packaging protects the sample during shipping.
Good packaging helps keep the soil sample fresh and uncontaminated for accurate testing.
Choosing Suitable Containers
Use clean, dry containers to hold soil samples. Avoid containers that can break or leak during transit.
Plastic bags or small plastic jars work well. Make sure the containers can be sealed tightly.
- Use sturdy plastic bags or jars
- Avoid metal or glass containers
- Do not use containers that held chemicals before
- Seal containers tightly to prevent spills
Labeling Samples Clearly
Write clear labels for each soil sample. Include important information like the sample location and date.
Use waterproof markers or printed labels. This prevents the label from smudging or falling off during shipping.
- Write sample ID or location
- Include the date of collection
- Use waterproof ink or labels
- Attach labels firmly to containers
Preventing Contamination
Keep soil samples free from dirt, water, or other substances. Contamination can change test results.
Use clean tools when collecting soil. Avoid touching the soil inside the container with bare hands.
- Use clean scoops or trowels
- Wear gloves when handling samples
- Do not mix soil from different spots in one container
- Keep samples dry and cool
Finding University Labs
Sending soil samples to university labs helps get detailed soil analysis. Finding the right lab is key for good results.
University labs often have experts and proper tools to test your soil. This guide will help you find and contact these labs.
Researching Local University Labs
Start by looking for universities near you that have agriculture or environmental science departments. These often run soil testing labs.
Check the university website or call the main office to ask about soil sample testing services. Local extension offices can also help.
- Search university websites for soil testing labs
- Contact agriculture or environmental science departments
- Ask local cooperative extension offices for lab recommendations
Checking Lab Services And Fees
Each lab offers different soil tests and prices. Find out which tests they provide and what fees apply before sending samples.
Some labs may test for nutrients, pH levels, or contaminants. Compare these options to what you need for your soil.
| Service | Description | Typical Fee |
|---|---|---|
| Nutrient Analysis | Checks soil for nitrogen, phosphorus, potassium | $10 – $30 |
| Soil pH Test | Measures acidity or alkalinity of soil | $5 – $15 |
| Contaminant Screening | Detects harmful chemicals or metals | $20 – $50 |
Contacting The Lab For Instructions
Call or email the lab to get detailed instructions on how to collect and send your soil samples. Proper handling ensures accurate results.
Ask about sample size, packaging, and any forms you need to include. Also check where to send the samples and expected processing time.
- Request soil sample collection guidelines
- Ask about packaging and shipping methods
- Confirm mailing address and lab hours
- Inquire about how long results take
Shipping Your Sample
Sending soil samples to university labs needs care. Proper shipping keeps the sample safe and accurate.
Follow clear steps to choose the best way to ship your soil sample. This helps the lab give correct results.
Selecting A Shipping Method
Pick a shipping service that is fast and reliable. Soil samples should reach the lab quickly to stay fresh.
Choose a carrier that handles packages carefully. Avoid slow or untracked shipping options.
- Use express or overnight shipping if possible
- Check for carriers that offer package tracking
- Package your soil sample to avoid leaks or damage
Preparing Shipment Documentation
Fill out all forms required by the university lab. Include details like your name, address, and sample ID.
Attach the paperwork securely to the package or place it inside. Clear information helps the lab process your sample fast.
- Include a sample submission form if provided
- Label the package with your contact details
- Write any special instructions for the lab
Tracking Your Package
Keep the tracking number from your carrier. This helps you watch your sample’s journey to the lab.
Check the package status regularly. Contact the carrier if there are delays or problems.
- Save the tracking number after shipping
- Use online tools to check delivery progress
- Notify the lab when your package is on its way
After Sending The Sample
After you send your soil sample to the university lab, there are a few important steps to follow. Knowing what to expect helps you prepare for the results and make good choices for your soil.
It is important to wait patiently and understand the report clearly. Then, you can take the right actions to improve your soil health.
Waiting For Results
University labs usually take a few days to two weeks to analyze soil samples. The exact time depends on the lab’s workload and tests requested.
Keep your sample receipt and contact information handy. This helps if you need to follow up or ask questions about your sample.
Interpreting Lab Reports
The lab report shows numbers for soil nutrients, pH level, and other properties. Each value tells you about your soil’s condition.
Look for sections like nitrogen, phosphorus, potassium, and pH. These are key for plant growth. The report may also include recommendations.
- Nitrogen helps plants grow leaves
- Phosphorus supports root and flower growth
- Potassium improves overall plant health
- pH shows if soil is acidic or alkaline
Taking Next Steps Based On Results
Use the report to decide what your soil needs. Add fertilizers or lime if the lab suggests it. Follow the recommended amounts carefully.
Plan your soil care based on the results. Regular testing helps track changes and improve soil over time.
- Apply nutrients according to lab advice
- Adjust soil pH with lime or sulfur
- Retest soil every 1-2 years
- Keep records of your soil tests

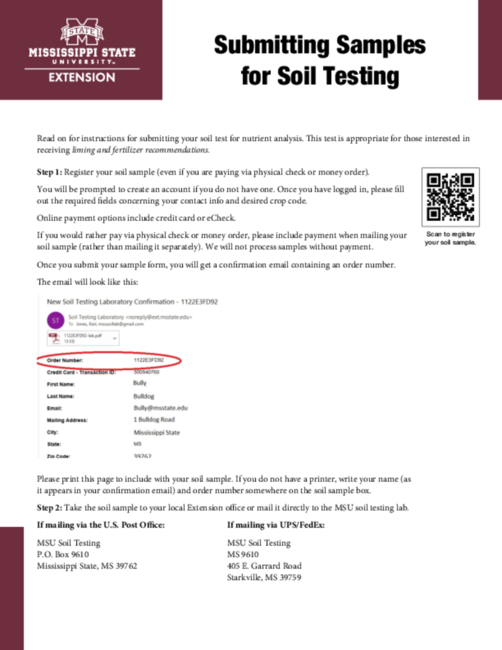
Credit: extension.msstate.edu
Credit: www.canr.msu.edu
Frequently Asked Questions
How Do I Prepare Soil Samples For University Testing?
Collect soil from multiple spots using a clean tool. Mix samples well, air dry, and place in a labeled, clean container before sending.
What Information Should I Include With Soil Samples?
Include details like sample location, depth, and collection date. Also, provide contact info and specific tests requested by the lab.
How Should Soil Samples Be Packaged For Shipping?
Use sturdy, sealed containers to prevent contamination or spillage. Cushion samples in a box and label clearly with your details.
How Long Does University Soil Testing Usually Take?
Most labs take 1 to 3 weeks to analyze soil samples. Timing depends on test types and lab workload.
Conclusion
Sending soil samples to university labs helps get clear soil health results. Follow the right steps to collect, package, and label your samples carefully. Use clean tools and avoid mixing different soils. Fill out any forms the lab needs. Send samples quickly to keep them fresh.
Good preparation means accurate lab tests. This guide makes the process simple and stress-free. Trust the lab to give you useful information for your soil. Keep these tips in mind for your next soil test.
