

Are you tired of grass creeping into your flower beds or garden paths? Laying brick lawn edging is a simple way to give your yard a clean, polished look while keeping everything neatly in place.
You don’t need to be a pro to do this yourself. With just a few tools and some easy steps, you can create a sturdy, attractive border that lasts for years. Keep reading, and you’ll discover how to transform your lawn with brick edging that stands out—and stands strong.
Credit: www.familyhandyman.com
Choosing The Right Bricks
Picking the right bricks for your lawn edging is important. The bricks should match your garden style and last long outdoors.
This guide helps you understand brick types, colors, and durability. You will learn what works best for your lawn border.
Types Of Bricks For Edging
Many bricks suit lawn edging. Common types include clay bricks, concrete bricks, and recycled bricks.
- Clay bricks:Classic and strong. They have a natural red or brown color.
- Concrete bricks:Affordable and come in many shapes. They can be painted or stained.
- Recycled bricks:Eco-friendly choice. They add a rustic look with varied colors.
Color And Texture Options
Bricks come in many colors and textures. Your choice affects the look of your edging.
| Color | Texture |
| Red | Smooth |
| Brown | Rough |
| Gray | Textured |
| Mixed tones | Weathered |
Choose colors that match your lawn and home. Textured bricks add character and hide dirt well.
Durability Considerations
Durability matters because bricks face weather and lawn care tools. Strong bricks last longer and need less repair.
- Clay bricks resist cracking and fading.
- Concrete bricks can chip but resist moisture well.
- Recycled bricks vary; check each for damage.
Credit: www.familyhandyman.com
Gathering Tools And Materials
Before starting to lay brick lawn edging, gather all the tools and materials you need. Having everything ready helps the work go smoothly.
It is important to use the right tools for a neat and strong brick edging. Safety gear keeps you protected during the work.
Essential Tools
You need basic tools to lay brick lawn edging. These tools help you measure, cut, and place the bricks correctly.
- Tape measure to check lengths and distances
- Shovel for digging the trench
- Level to keep bricks even and straight
- Rubber mallet to gently tap bricks into place
- Trowel for spreading mortar or sand
- Wheelbarrow to carry materials
Additional Supplies
Besides tools, you need materials to build the edging. These supplies make sure the bricks stay in place and look good.
- Bricks chosen for edging style and size
- Sand or gravel for the base layer
- Mortar or adhesive to hold bricks together
- Landscape fabric to prevent weed growth under bricks
- Water to mix with mortar or clean tools
Safety Gear
Wear safety gear to protect yourself from injuries. Safety gear is important when working with heavy tools and materials.
- Gloves to protect hands from rough surfaces
- Safety glasses to guard eyes from dust and debris
- Knee pads for comfort when kneeling on hard ground
- Sturdy shoes to protect feet from falling bricks
Preparing The Lawn Edge
Creating a neat border with brick edging gives your lawn a polished look. Begin with proper preparation to ensure success.
Follow these steps to prepare your lawn edge effectively before laying bricks.
Measuring The Border
Accurate measurements are essential for a well-aligned brick border. Measure the length and width of the desired area carefully.
- Use a measuring tape to find the length of your border.
- Write down the measurements to ensure accuracy.
- Calculate the number of bricks needed based on your measurements.
Marking The Layout
Marking the layout is crucial for a straight and even edge. Use tools that help in creating clear, visible lines.
Consider using the following methods:
- Chalk lines for straight edges.
- Spray paint for visibility on grass.
- Wooden stakes and string for long borders.
Clearing The Area
Ensure the space is free from debris and obstacles. This makes it easier to lay the bricks evenly.
| Task | Description |
| Remove Grass | Clear grass from the marked area. |
| Eliminate Debris | Pick up rocks and sticks. |
| Level the Ground | Use a rake to smooth the soil. |
Laying The Bricks
Laying brick lawn edging gives your garden a neat border. It also helps keep grass and soil in place. The process needs careful work to ensure the bricks stay firm and look good.
This guide covers the main steps: digging the trench, adding a base layer, and placing the bricks. Each step is important for a strong and lasting lawn edge.
Digging The Trench
Start by marking the line where you want the brick edging. Use a garden hose or string to create a smooth curve or straight line. Then dig a trench along this line. The trench should be about 6 inches deep and 4 inches wide. This size fits most bricks and allows room for the base material.
Remove all roots, rocks, and debris from the trench. Make sure the bottom is flat and level. This helps the bricks sit evenly and prevents wobbling later.
Adding A Base Layer
Put a base layer of crushed stone or gravel into the trench. This layer supports the bricks and improves drainage. Spread about 2 to 3 inches evenly along the bottom. Then, use a tamper or flat board to compact the base firmly.
- Pour crushed stone into the trench
- Spread it evenly to cover the bottom
- Compact the stone using a tamper
- Check the level to keep it flat
Placing The Bricks
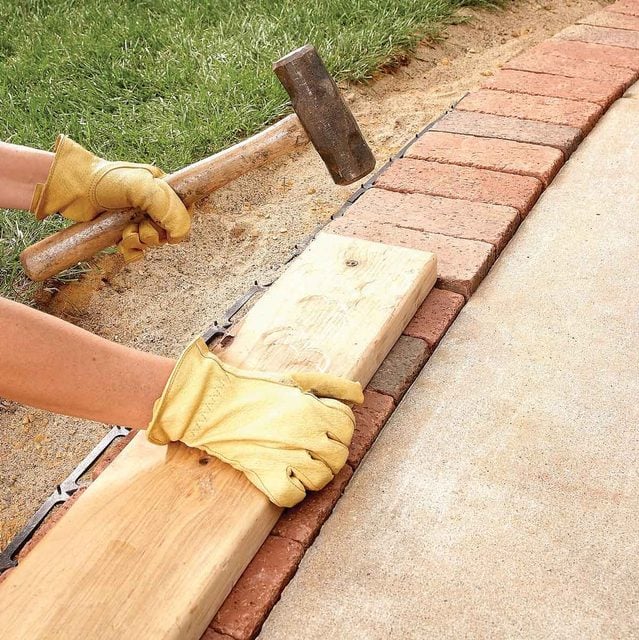
Lay the bricks tightly next to each other on the base. Keep the top edges even by checking with a level often. If you want, arrange the bricks in a pattern like running bond or soldier course. Use a rubber mallet to tap each brick gently into place.
| Pattern | Description |
| Running Bond | Bricks overlap halfway, like a typical wall |
| Soldier Course | Bricks stand upright in a row |
| Stack Bond | Bricks stacked directly on top of each other |
After placing the bricks, fill the gaps with sand or fine gravel. Sweep the material into the joints and water it lightly. This locks the bricks in place and stops weeds from growing between them.
Securing And Finishing
Securing and finishing your brick lawn edging makes it last longer. Proper steps keep the bricks stable and neat.
This guide covers leveling, filling gaps, and compacting the edging for a clean look.
Leveling And Aligning
Start by making sure each brick is level. Use a spirit level to check the height as you place bricks.
Align bricks in a straight line or desired curve to keep the edging uniform. Adjust the base soil if needed for a flat surface.
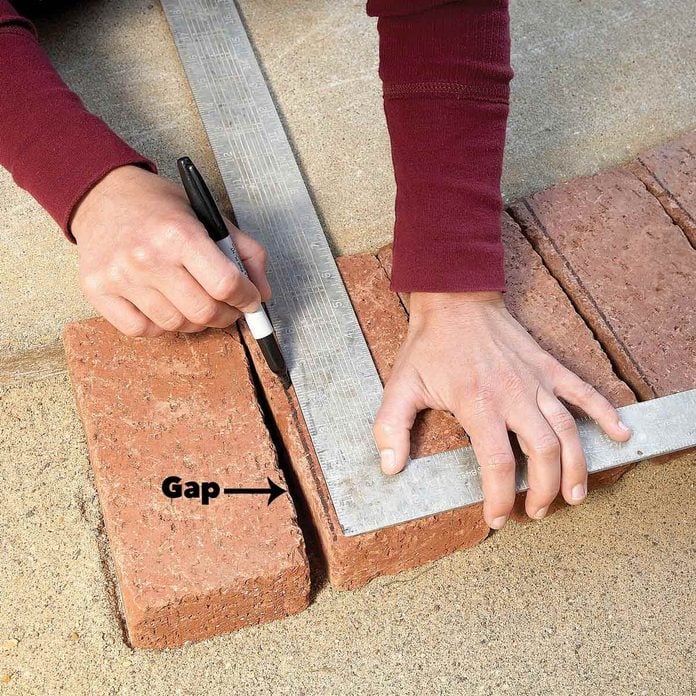
Filling Gaps
Fill gaps between bricks with sand or mortar to lock them in place. This prevents movement and weed growth.
- Brush fine sand into gaps for a flexible finish.
- Use mortar for a hard, fixed edge.
- Wet the sand or mortar after filling to settle it well.
- Repeat filling if gaps appear later.
Compact The Edging
Compact the bricks by pressing down firmly. This strengthens the edging and keeps bricks steady.
| Tool | Purpose |
|---|---|
| Rubber Mallet | Gently tap bricks into place |
| Hand Tamper | Compact soil and bricks firmly |
| Level | Check brick evenness |
Maintaining Your Brick Edging
Brick lawn edging adds a neat border to your garden. Proper care keeps it strong and looking good.
Regular maintenance prevents damage and helps the bricks last longer. Follow simple steps to care for your edging.
Cleaning Tips
Clean your brick edging often to remove dirt and moss. Use a broom or brush with stiff bristles.
For stubborn stains, mix water with mild soap. Scrub gently and rinse with clean water.
- Remove leaves and debris regularly
- Use a garden hose to wash off dirt
- Avoid harsh chemicals that can damage bricks
Repairing Damages
Check your brick edging for cracks or loose bricks. Fix problems early to stop them from worsening.
Replace broken bricks with new ones. Use mortar or sand to secure loose bricks in place.
- Remove damaged bricks carefully
- Clean the area before placing new bricks
- Fill gaps with mortar or polymeric sand
- Let repairs dry fully before use
Seasonal Care
Prepare your brick edging for each season. This helps avoid damage from weather changes.
In winter, clear snow and ice gently. Avoid using salt near bricks, as it can cause damage.
- Spring: Check for winter damage and clean thoroughly
- Summer: Remove weeds and trim plants near edging
- Fall: Clear leaves and debris to prevent mold
- Winter: Avoid salt and use a plastic shovel for snow

Credit: www.homebuilding.co.uk
Frequently Asked Questions
How Do You Prepare The Ground For Brick Lawn Edging?
First, clear the area of grass and debris. Next, dig a trench about 4-6 inches deep and wide. Ensure the trench is level and compact the soil. This preparation helps bricks stay stable and aligned.
What Materials Are Needed To Lay Brick Lawn Edging?
You need bricks, sand or gravel, a shovel, a rubber mallet, a level, and a garden hose. These materials help create a strong, even, and attractive brick border around your lawn.
How Long Does It Take To Lay Brick Lawn Edging?
The time depends on the length and complexity of the edging. Typically, a small to medium project takes 3-5 hours. Proper preparation and steady work ensure a professional finish.
Can Brick Lawn Edging Prevent Grass From Spreading?
Yes, brick edging acts as a barrier, stopping grass roots from spreading into flower beds. It helps keep lawns neat and prevents unwanted grass growth in garden areas.
Conclusion
Laying brick lawn edging adds a neat border to your garden. It keeps grass and soil in place. The process is simple with the right tools and steps. Take your time to measure and dig carefully. Placing bricks evenly creates a strong, lasting edge.
This small project improves your yard’s look instantly. Enjoy the clean lines and tidy appearance. A little effort brings great results you can see daily. Try it yourself and watch your lawn transform.

