
Imagine stepping into your garden and seeing perfectly defined lines that make your lawn look tidy and well-maintained. That’s the magic of lawn edging.
You might think it’s complicated, but installing lawn edging is easier than you think. This guide will show you how to achieve that professional-looking finish right in your backyard. By the end of this article, you’ll have the skills to transform your garden into a neat, organized space that will make you proud.
Stick with us to discover the straightforward steps and tips that will save you time and effort. Get ready to impress not only yourself but anyone who sets foot in your garden.
:max_bytes(150000):strip_icc()/spr-easy-flex-no-dig-adirondak-landscape-edging-jena-wilson-07-during-3983ef1d4a014130b79f143b2130bd31.jpeg)
Credit: www.thespruce.com
Choosing The Right Lawn Edging
Lawn edging helps keep your yard neat and tidy. It separates grass from flower beds or walkways.
Choosing the right edging depends on your yard’s needs and style. The right material makes installation easier.
Types Of Lawn Edging Materials
There are many materials you can use for lawn edging. Each has its own look and strength.
- Plastic:Flexible and easy to install. Good for curves.
- Metal:Strong and durable. Offers a clean, modern look.
- Brick:Classic and sturdy. Adds a traditional style.
- Stone:Natural and heavy. Blends well with garden areas.
- Wood:Natural and warm. Best for rustic or cottage gardens.
Factors To Consider For Your Yard
Think about how your yard looks and what you need from edging. Size, shape, and weather matter.
- Yard shape:Curved yards need flexible edging.
- Soil type:Hard soil may need stronger materials.
- Climate:Some materials last longer in wet or cold areas.
- Maintenance:Choose low maintenance if you want less work.
- Appearance:Pick a style that matches your home and garden.
Tools Needed For Installation
Having the right tools makes installing lawn edging easier and faster.
- Shovel or spade to dig a trench
- Hammer or mallet to set edging in place
- Measuring tape for accurate length
- Garden gloves to protect your hands
- Level to keep edging straight
- Utility knife or saw to cut material
:max_bytes(150000):strip_icc()/spr-easyflex-no-dig-landscape-edging-kit-laura-hard-04-b601fc0708bc4522930427eca7d4168c.jpeg)
Credit: www.thespruce.com
Preparing The Yard
Preparing your yard is the first step to install lawn edging correctly. A clean and marked area makes the process smooth and accurate.
Follow these simple tasks to get your yard ready for the edging installation.
Marking The Edging Line
Use a garden hose, string, or spray paint to mark where the lawn edging will go. This line will guide you during installation.
- Start at one end of your lawn or garden bed.
- Lay the garden hose or string along the desired edge.
- Adjust the curve or straight line as needed.
- Mark the line clearly with spray paint or flags.
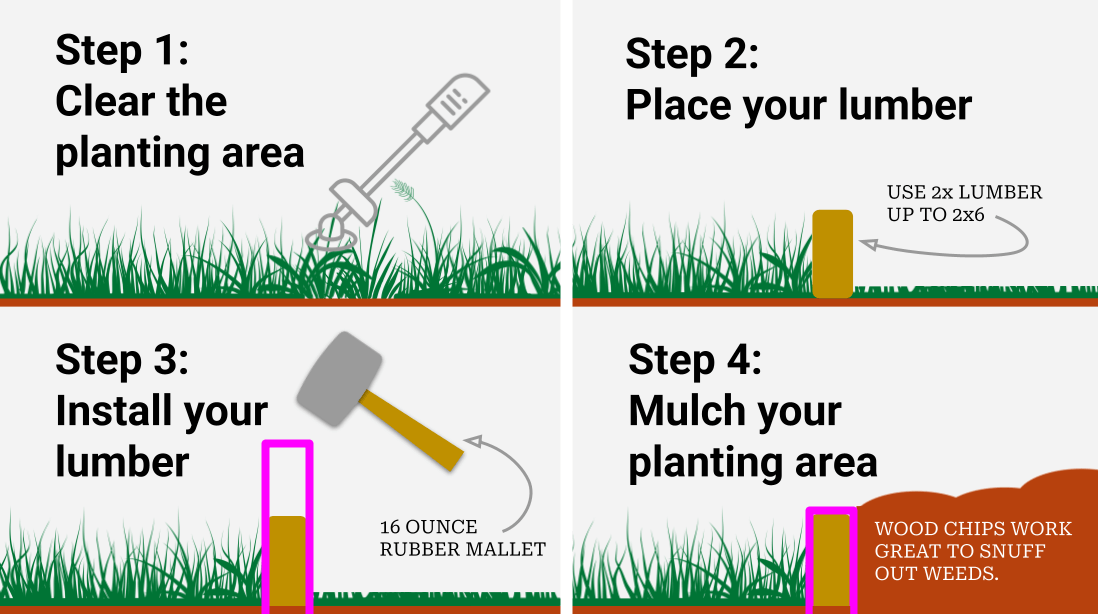
Clearing The Area
Remove grass, weeds, rocks, and debris from the marked area. This prevents problems when placing the edging.
Clear at least 6 inches wide along the line and 4 to 6 inches deep. This space fits most lawn edging materials.
Measuring And Cutting Materials
Measure the total length of the marked line to know how much edging material you need. Cut the pieces to fit the shape.
| Material Type | Cutting Tool | Tips |
| Plastic | Utility knife or garden shears | Score deeply before snapping |
| Metal | Hacksaw or metal snips | Wear gloves to protect hands |
| Wood | Hand saw or power saw | Cut slowly for smooth edges |
Installing The Lawn Edging
Installing lawn edging helps keep your garden neat and defined. It separates grass from flower beds and walkways. This guide covers the main steps to set lawn edging correctly.
Follow the instructions carefully for a clean and lasting edge around your lawn. You will dig a trench, place the edging, and secure it in place.
Digging The Trench
Start by marking the line where you want the edging. Use a rope or garden hose to create a smooth curve or straight edge. Then, dig a trench along this line.
- Make the trench about 4 to 6 inches deep.
- Keep the width slightly wider than your edging material.
- Remove all roots, rocks, and debris from the trench.
- Smooth the bottom so the edging will sit evenly.
Placing The Edging
Once the trench is ready, place your lawn edging into the trench. Make sure it fits tightly against the soil and follows your marked line.
| Material | Placement Tip |
|---|---|
| Plastic | Press firmly but avoid bending it out of shape. |
| Metal | Use a rubber mallet to gently tap it into the soil. |
| Stone | Set stones tightly side by side for a stable edge. |
Securing The Edging In Place
After placing the edging, secure it to keep it stable. This prevents movement and keeps your lawn looking tidy.
- Use stakes or spikes to anchor the edging firmly.
- Drive stakes into the ground at regular intervals, about every 12 to 18 inches.
- Check that the edging stays straight and level as you secure it.
- Fill the trench with soil and pack it tightly around the edging.
Finishing Touches
After installing lawn edging, finishing touches make your garden look neat. These steps help secure the edging and improve your lawn’s appearance.
Proper finishing also protects your edging from shifting or damage over time. Let’s explore key steps for a clean, lasting edge.
Backfilling And Compacting Soil
Backfill the soil on both sides of the edging to hold it in place. Use soil removed during the installation for best results.
Compact the soil firmly to prevent movement. Use a tamper or your foot to press down the soil evenly along the edging line.
- Fill gaps with soil carefully
- Press soil down firmly but gently
- Check the edging stays level
Adding Mulch Or Decorative Elements
Add mulch or stones next to the edging for a tidy look. Mulch also helps keep weeds down and retains soil moisture.
Choose decorative elements that match your garden style. Spread mulch evenly without piling it against the edging to avoid damage.
- Use natural mulch like wood chips or bark
- Keep mulch 1-2 inches away from edging
- Decorative stones add texture and color
Watering And Maintenance Tips
Water the soil around the edging after installation. This helps settle the soil and supports plant roots near the edge.
Check the edging regularly for shifts or damage. Clear debris and recompact soil if needed to keep the border strong.
- Water deeply after installation
- Inspect edging monthly for movement
- Remove weeds and debris near edges
- Top up mulch yearly to maintain appearance
Troubleshooting Common Issues
Installing lawn edging can sometimes be tricky. Small problems can cause big headaches.
This guide will help you fix common issues with lawn edging. Follow simple tips to get your edging right.
Dealing With Uneven Ground
Uneven ground makes lawn edging look messy and unstable. It can cause gaps or bumps along the edge.
To fix this, remove the edging and level the soil underneath. Use a rake or shovel to smooth out bumps and fill low spots.
- Check the ground slope before installing
- Use a level tool for accuracy
- Compact soil after leveling
- Reinstall edging carefully
Fixing Loose Edging
Loose edging shifts and falls over time. It happens when the edging is not secured well or soil settles.
Press the edging firmly into the ground. Add stakes or anchors if your edging type allows it. Tighten any connectors or fasteners.
- Push edging deep into soil
- Use metal or plastic stakes
- Check for loose connectors
- Add extra support if needed
Preventing Soil Erosion
Soil erosion can wash away dirt along your edging. It leaves gaps and makes plants unstable.
Install edging slightly below ground level. Add mulch or stones to hold soil in place. Avoid heavy watering near edges.
- Dig a shallow trench for edging
- Cover soil with mulch or gravel
- Water plants gently
- Check edges after heavy rain

Credit: www.amazon.ca
Frequently Asked Questions
What Tools Are Needed To Install Lawn Edging?
You need a spade, hammer, measuring tape, and lawn edging materials. These tools help create a clean, straight edge quickly and easily.
How Deep Should Lawn Edging Be Installed?
Install lawn edging at least 4 to 6 inches deep. This depth secures the edging firmly and prevents soil or grass from spilling over.
Can I Install Lawn Edging On Slopes?
Yes, lawn edging can be installed on slopes. Use flexible edging materials and secure them with stakes to maintain shape and stability.
How Long Does Lawn Edging Installation Take?
Installation time varies by yard size but typically takes 1 to 3 hours. Preparation and soil type can affect the total time needed.
Conclusion
Installing lawn edging helps keep your garden neat and tidy. It creates clear lines between grass and flower beds. The process is simple and does not take much time. Using the right tools makes the job easier. Regular maintenance keeps the edging looking fresh and strong.
A well-edged lawn can boost your home’s curb appeal. Start with small sections to build confidence. Soon, your garden will look clean and cared for. Enjoy the satisfaction of a well-defined lawn edge.
