
Have you ever faced a frayed or broken extension cord plug and wondered if you could fix it yourself? Replacing an extension cord plug might seem tricky, but with the right steps, you can do it safely and quickly.
In this guide, you’ll learn exactly how to replace your extension cord plug, save money, and avoid the hassle of buying a new cord. Keep reading, and by the end, you’ll feel confident handling this simple repair on your own.
Tools And Materials Needed
Select a replacement plug that matches your extension cord’s voltage and amperage. Check the plug type to fit your socket safely. Avoid plugs with higher ratings than your cord supports.
Gather essential tools before starting. These include:
- Wire strippersto remove insulation cleanly.
- Screwdriverfor opening the plug casing.
- Replacement plugthat fits your cord’s specifications.
- Electrical tapefor extra insulation if needed.
- Multimeterto test connections after replacement.
Safety Precautions
Always unplugthe extension cord from the power outlet before working on it. This stops any electric shockrisks. Check the cord is not connected to any devices.
Wear insulated glovesto protect your hands from electric shocks. Avoid touching metal parts of the plug or wires during replacement.
- Work in a dry area to prevent slips and shocks.
- Use tools with insulated handles for safety.
- Keep children and pets away from your workspace.
Always double-check that power is completely off. This helps keep the task safe and easy.
Removing The Old Plug
Unplug the extension cord from the power source before starting. Use a screwdriver or pliers to carefully remove the old plug from the cord. Avoid pulling on the wires to prevent damage.
Ensure the cord is unplugged from the outlet. Use a sharp knife or scissors. Cut the cord close to the damaged plug. Be careful not to cut too far. A clean cut is important. Use a wire stripper to remove the outer insulation. Expose about half an inch of the wires. Hold the wire firm but gentle. Do not damage the inner wires. The wires should be neat and untangled. `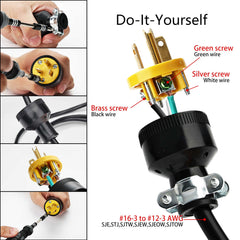
Credit: www.stareloplug.com
Wiring The New Plug
The extension cord has three wires inside. Each wire has a different color. The black wireis for the hotconnection. The white wireis for neutral. The green or bare wireis for ground. Knowing these colors helps to connect the wires correctly.
Each wire must go to the right terminalon the new plug. The black wireconnects to the brass terminal. The white wireattaches to the silver terminal. The green or bare wiregoes to the green grounding terminal. Tighten the screws firmly to keep the wires secure. Loose wires can cause dangerous electrical problems.
Securing The Plug Assembly
Secure the plug assembly by tightening all screws firmly. Loose screws can cause poor connections or sparks. Use a screwdriver to tighten each screw until snug, but avoid over-tightening which can damage parts.
Clamps hold the cord in place. Tighten the clamps securely around the cord to prevent it from slipping out. This keeps the wires stable inside the plug.
- Check that the wires do not move when tugged gently.
- Make sure the screws hold both the wires and the clamps tightly.
- Confirm the plug parts fit together without gaps.
A firm connection ensures safe use and prevents electrical hazards. Double-check all fasteners before using the cord again.

Credit: www.youtube.com
Testing The Repaired Cord
Check the repaired cord by plugging it into a power source and testing its function. Ensure the connection is secure and the device works without issues. Confirm there are no sparks, smells, or overheating before regular use.
Visual Inspection
Check the cord for any visible signs of damage. Look for loose wires or exposed metal parts. Make sure the plug is attached tightly and correctly. The cord’s insulation should be intact without cracks or cuts. A clean and secure connection helps avoid electric shocks and fire risks.
Using A Continuity Tester
A continuity tester helps confirm the cord works well. Connect the tester’s leads to each end of the cord. The tester will show if the electric path is complete. If the tester lights up or beeps, the cord is good. If not, check the connections again or replace the cord.
Tips For Longevity And Safety
Proper cord storagecan greatly increase the life of extension cords. Avoid tight coils or sharp bends. Store cords in a dry place away from direct sunlight. Use hooks or cord reels to keep cords organized and off the ground. This prevents damage and tangling, making cords safer to use.
Regular maintenance checkshelp spot damage early. Look for cracks, cuts, or exposed wires on the cord and plug. Test the plug for a secure fit in outlets. Replace any damaged parts immediately to avoid shocks or fires. Clean plugs and cords with a dry cloth to remove dirt and dust.

Credit: totcables.com
Frequently Asked Questions
How Do I Safely Replace An Extension Cord Plug?
First, unplug the cord and cut off the damaged plug. Strip the wire ends carefully. Connect wires to the new plug terminals matching colors. Secure all connections tightly. Finally, close the plug casing and test the cord.
What Tools Are Needed To Replace An Extension Cord Plug?
You need a wire stripper, screwdriver, utility knife, and a replacement plug. A voltage tester can help ensure safety. These tools make the replacement process safer and more efficient.
Can I Replace A Plug On Any Extension Cord?
Yes, you can replace plugs on most extension cords. Ensure the replacement plug matches the cord’s voltage and amperage ratings. Using compatible parts maintains safety and performance.
How Do I Identify The Wires In An Extension Cord?
Extension cords typically have three wires: black (hot), white (neutral), and green (ground). Properly identifying wires ensures correct and safe connections when replacing a plug.
Conclusion
Replacing an extension cord plug is simple and safe with the right steps. Always unplug the cord before starting. Cut the old plug carefully and strip the wires gently. Connect the new plug wires firmly and securely. Double-check all connections before use.
This small repair saves money and prevents electrical hazards. Taking your time ensures a good, lasting fix. Now, you can use your extension cord safely again.
