
Are you striving for a lush, green lawn that turns heads and feels like a soft carpet beneath your feet? The secret to achieving this lies in understanding your soil.
Collecting soil samples for lawn testing is a simple yet powerful step you can take to transform your lawn into a verdant masterpiece. By knowing exactly what your soil needs, you can provide the right nutrients and care, saving you time, money, and frustration.
In this guide, you’ll discover easy-to-follow steps to collect soil samples effectively, so you can unlock the full potential of your lawn. Don’t let guesswork hold you back—empower yourself with knowledge and watch your lawn flourish. Ready to dig in? Let’s get started!
Why Soil Testing Matters
Soil testing helps you understand the health of your lawn. It shows what nutrients your soil needs.
Knowing your soil’s condition helps you grow a greener, stronger lawn. It saves money and effort.
Detect Nutrient Deficiencies
Soil tests reveal if your lawn lacks important nutrients like nitrogen, phosphorus, or potassium.
Prevent Over-fertilizing
Testing helps you apply only the fertilizer your lawn needs. This avoids waste and pollution.
Improve Lawn Health And Growth
Good soil balance supports root growth and disease resistance. Testing guides the right treatments.
Save Money On Lawn Care
- Identify exact nutrient needs
- Buy only needed fertilizers
- Avoid costly over-application
- Reduce lawn repair expenses
Understand Soil Ph Levels
Soil pH affects nutrient availability. Testing tells you if your soil is acidic, neutral, or alkaline.
| pH Level | Soil Type | Effect on Lawn |
|---|---|---|
| Below 6.0 | Acidic | Reduces nutrient uptake |
| 6.0 – 7.0 | Neutral | Best for most grasses |
| Above 7.0 | Alkaline | Limits some nutrients |

Credit: evolutionsafetysolutions.co.uk
Tools You’ll Need
Collecting soil samples for lawn testing needs a few simple tools. These tools help you take accurate samples for the best results.
Using the right tools makes the process easier and faster. Here are the main tools you will need.
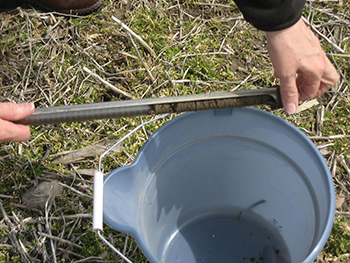
Soil Probe Or Soil Auger
A soil probe or soil auger helps you take deep soil samples. It removes a small core of soil easily.
These tools give a consistent sample from the same depth each time. A soil probe looks like a long tube with a handle.
Garden Spade Or Trowel
A garden spade or trowel works well if you don’t have a soil probe. They let you dig a small hole to collect soil.
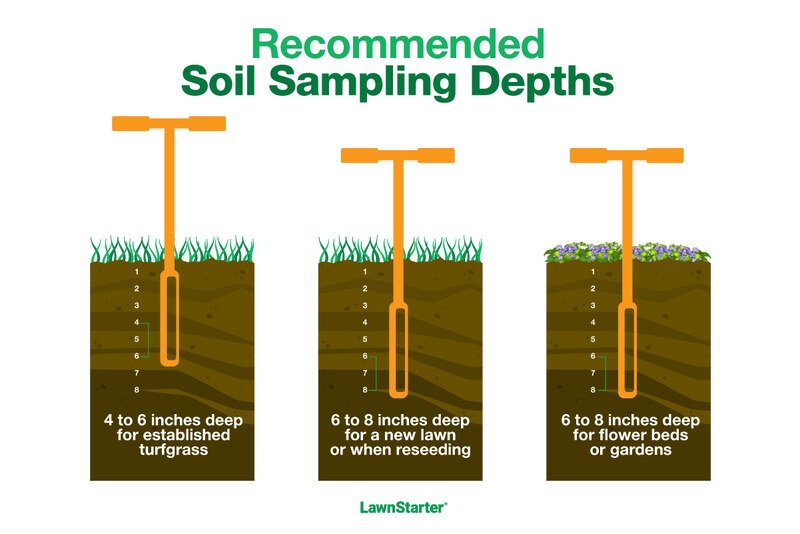
Make sure to take soil from the right depth, usually 4 to 6 inches. Use the spade to loosen the soil before collecting.
Clean Plastic Bucket
You need a clean plastic bucket to mix soil samples. Mixing helps create a uniform sample for testing.
A metal bucket can react with soil and affect results. Always use a clean bucket to avoid contamination.
Soil Sample Bags Or Paper Envelopes
Use soil sample bags or paper envelopes to store the soil. These containers keep samples dry and clean.
Label each bag or envelope with the sample location and date. This helps keep track of different samples.
Permanent Marker And Labels
A permanent marker and labels help you mark the samples clearly. Write the area and date on each sample.
Clear labeling avoids confusion when sending samples to the lab. It also helps you remember where samples came from.
Gloves
Wearing gloves keeps your hands clean and prevents contamination of the soil sample. Use disposable gloves if possible.
Change gloves between different sample areas to avoid mixing soil from different spots.
Choosing Sampling Locations
Collecting soil samples starts with picking the right spots in your lawn. Proper locations help get accurate test results.
Choose areas that represent your lawn’s overall condition. Avoid spots that may give misleading information.
Avoiding Problem Areas
Do not take samples from places that may change soil quality. These spots give false readings and affect your lawn care plan.
- Near compost piles or mulch beds
- Close to trees or flower beds
- Areas with visible damage or dead grass
- Places recently fertilized or treated with chemicals
- Spots with heavy foot or pet traffic
Sampling Different Zones
Your lawn may have zones with different soil types or uses. Test each zone separately to get clear results for each area.
| Zone Type | Sample Reason |
| Shady areas | Soil may hold more moisture and have different nutrients |
| Sunny areas | Soil may be drier and need different care |
| High traffic zones | Soil may be compacted and nutrient-poor |
| Newly seeded or patched spots | Test to check soil readiness for grass growth |
When To Collect Samples
Collecting soil samples at the right time helps get accurate test results. The best timing depends on your lawn type and climate.
Testing soil before planting or fertilizing gives you useful information. Plan sampling to avoid recent watering or heavy rain.
Season To Test
Spring and fall are the best seasons to collect soil samples. Soil is easier to work with and reflects the lawn’s nutrient needs well.
Time Of Day
Collect samples in the morning or late afternoon. Avoid the hottest parts of the day to prevent soil drying out quickly.
Avoid Recent Lawn Treatments
Do not collect soil samples right after fertilizing or applying lime. Wait at least 3 to 4 weeks for results to show true soil conditions.
Check Soil Moisture
Soil should be moist but not wet when sampling. Dry or soggy soil can give inaccurate test results.
- Sample 2-3 days after rain or irrigation
- Avoid sampling during drought or flooding
- Use a moisture meter if unsure
Step-by-step Sampling Process
Collecting soil samples is key to testing your lawn’s health. Accurate samples help you know what nutrients your soil needs.
This guide explains how to collect soil samples in three clear steps. Follow each part carefully for the best results.
Preparing The Soil
Start by clearing the area you want to test. Remove grass, leaves, and debris from the surface. Avoid watering the lawn for at least 24 hours before sampling.
- Choose dry weather to avoid muddy soil
- Divide your lawn into sections if it is large
- Use clean tools to prevent contamination
Collecting Soil Cores
Use a soil probe, trowel, or small shovel to take soil cores. Each core should be about 4 to 6 inches deep. Collect multiple cores from different spots within each section.
- Remove a small slice of soil from the ground
- Place each core into a clean container
- Repeat until you have 10 to 15 cores per section
- Mix the cores well to create one combined sample
Mixing And Storing Samples
Mix the soil cores in a clean bucket or bowl. Break up any clumps and remove roots or stones. Take about one cup of the mixed soil for testing.
| Storage Tips | Details |
| Use a clean plastic bag | To keep the sample dry and uncontaminated |
| Label the bag | Include date and lawn section |
| Store in a cool place | Avoid heat and direct sunlight |
| Send sample quickly | For best results, send to lab soon after collection |
Sending Samples To The Lab
After collecting soil samples from your lawn, you need to send them to a lab. The lab will test your soil and give you important information. This helps you know what your lawn needs to grow healthy.
It is important to prepare your samples correctly. This ensures the lab can give accurate results. Follow the steps below to package your samples and fill out the forms properly.
Packaging Samples
Use clean containers or bags to hold your soil samples. Avoid mixing different areas in the same bag. Label each sample clearly with the area it came from. Keep the samples dry and avoid contamination.
- Use paper bags or plastic containers with lids
- Do not use plastic bags that trap moisture
- Label each sample with location and date
- Keep samples dry and away from chemicals
- Send samples to the lab within a few days
Filling Out Forms
Fill out the lab forms carefully. Provide all the requested details about your lawn and soil samples. This helps the lab give you precise recommendations. Double-check your contact information to get results on time.
- Write your name and contact details
- Describe the sampling locations clearly
- Note any lawn problems or concerns
- Include the date when samples were collected
- Follow the lab’s specific instructions on the form
Interpreting Test Results
After collecting soil samples and sending them for testing, you will receive a report. This report shows the nutrients and pH levels of your soil. Understanding these results helps you know what your lawn needs.
Reading the test results carefully lets you choose the right fertilizer and soil treatments. This improves your lawn’s health and growth over time.
Understanding Ph Levels
The pH level measures how acidic or alkaline your soil is. A pH of 7 is neutral. Below 7 is acidic, and above 7 is alkaline. Most lawns grow best in soil with a pH between 6 and 7.
Adjusting pH helps plants absorb nutrients better. Lime can raise pH if soil is too acidic. Sulfur can lower pH if soil is too alkaline.
Key Nutrient Values
Soil tests show levels of nitrogen (N), phosphorus (P), and potassium (K). These nutrients support different parts of plant growth.
- Nitrogen (N):Helps grass grow green and lush.
- Phosphorus (P):Supports root development.
- Potassium (K):Builds disease resistance and hardiness.
Reading The Nutrient Levels Table
| Nutrient | Low | Optimal | High |
|---|---|---|---|
| Nitrogen (N) | Less than 10 ppm | 10-30 ppm | Above 30 ppm |
| Phosphorus (P) | Less than 15 ppm | 15-40 ppm | Above 40 ppm |
| Potassium (K) | Less than 50 ppm | 50-150 ppm | Above 150 ppm |
Using Test Results To Amend Soil
Match your soil’s needs with the right amendments. Add fertilizer if nutrients are low. Avoid adding more if levels are high. This prevents waste and harm to plants.
- Apply lime for low pH soils.
- Add sulfur for high pH soils.
- Use balanced fertilizer for low nutrient levels.
- Test soil every 2 to 3 years to track changes.
Credit: extension.msstate.edu
Common Mistakes To Avoid
Collecting soil samples for lawn testing helps you understand your soil’s needs. Avoid these common mistakes to get accurate results.
Correct sampling saves time and money. It also helps you choose the right lawn care steps.
Sampling Only One Spot
Many people take soil from just one spot. This gives an incomplete picture of your lawn’s soil health.
Soil can vary in different areas. Take samples from many spots for a better test.
- Collect samples from at least 5 to 10 spots
- Mix the samples together for one test
- Avoid areas with dead grass or recent fertilizer
Taking Samples Too Deep Or Too Shallow
Digging too deep or too shallow changes the test results. The ideal depth is usually 4 to 6 inches.
Use a soil probe or a small shovel to get the right depth. This shows the soil where grass roots grow.
Using Dirty Tools
Dirty tools can contaminate your soil sample. Old fertilizer or chemicals can change the test results.
Clean your tools well with water and dry them before collecting samples. This keeps the sample pure.
Not Mixing The Sample Well
Soil from different spots must be mixed well. This gives a more accurate average of the soil condition.
Mix samples in a clean container before sending them to the lab. Do not send soil from just one spot.
Ignoring The Best Time To Sample
Soil tests done right after fertilizing or heavy rain can be misleading. Wait a few weeks for better results.
Test your soil in early spring or fall. These times show the true soil condition.
Not Labeling The Sample Correctly
Labels help labs know where the sample came from. Missing or wrong labels cause confusion.
Write your name, address, and sample location clearly on the bag or container. This ensures correct results.
Credit: www.canr.msu.edu
Frequently Asked Questions
How Do I Collect Soil Samples For Lawn Testing?
Use a clean tool to take small soil cores from several spots. Mix them evenly in a clean container. Avoid sampling near fertilizer or compost to get accurate results.
When Is The Best Time For Soil Sampling?
Collect soil samples in early spring or fall before fertilizing. These times reflect nutrient levels best for lawn care planning.
How Deep Should I Collect Soil Samples?
Collect soil samples from the top 4 to 6 inches of soil. This depth captures the root zone where most nutrients are absorbed.
How Many Samples Do I Need For Accurate Testing?
Take 10 to 15 soil samples from different lawn areas. Combining them ensures a representative sample for reliable test results.
Conclusion
Collecting soil samples helps you know your lawn’s health. Test your soil to find what it needs. Follow simple steps for accurate results. Regular testing keeps your grass green and strong. Healthy soil means a beautiful lawn all year. Take time to collect samples right.
Your lawn will thank you for the care. Keep your yard growing well and looking great.

