
Imagine stepping into your garden and feeling an immediate sense of calm and beauty. The secret?
Curved edges. They can transform any outdoor space into a serene oasis. If you’ve been dreaming of a garden that feels both elegant and inviting, you’re in the right place. Creating a curved edge in your garden isn’t just about aesthetics—it’s about crafting a space that feels personal and harmonious.
Whether you’re a seasoned gardener or just starting out, this simple change can make a big impact. You’ll discover the joy of a garden that looks professionally designed, yet reflects your unique style. Ready to uncover the magic of curves and enhance your garden’s appeal? Let’s dive into the steps that will bring your garden vision to life.

Credit: blog.thompson-morgan.com
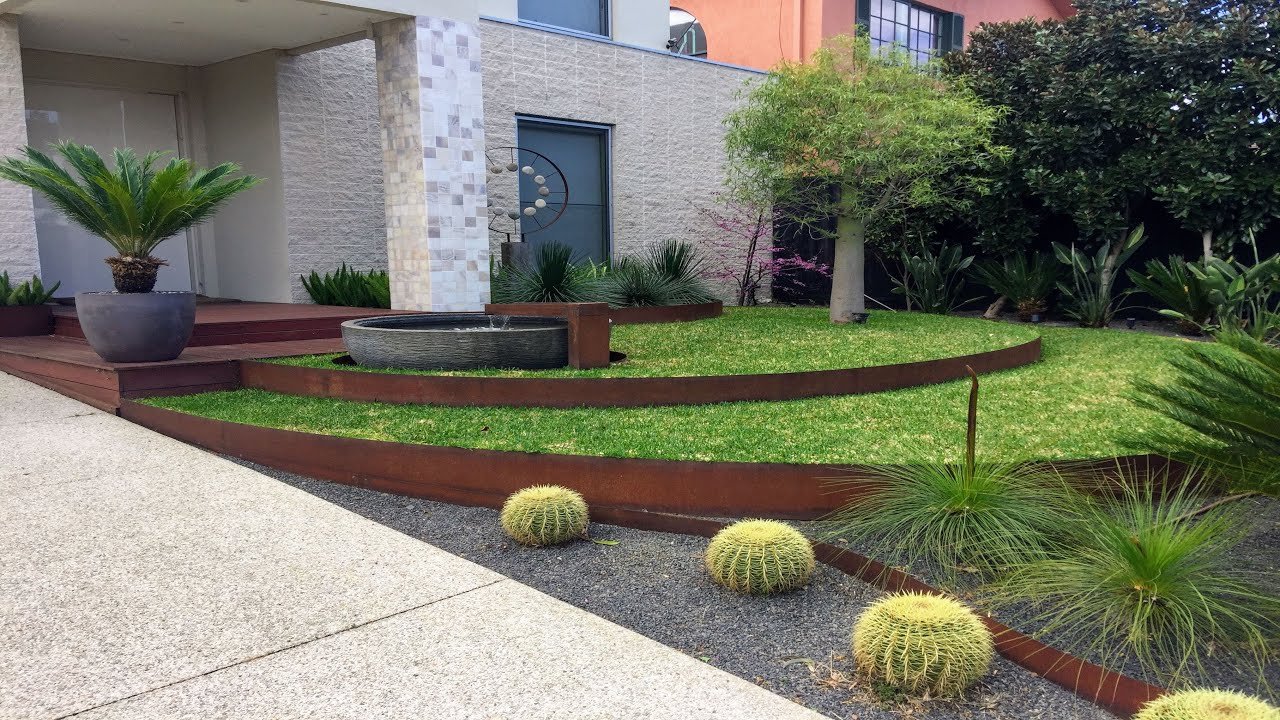
Benefits Of Curved Garden Edges
Curved garden edges add beauty and style to any garden. They create a smooth flow that guides the eye.
Using curves in your garden design can make small spaces feel larger and more inviting.
Enhances Visual Appeal
Curved edges soften the look of your garden. They create natural shapes that look pleasing.
These gentle lines make your garden feel more relaxed and welcoming.
Improves Garden Flow
Curves guide visitors through the garden smoothly. They create paths that feel easy to follow.
This flow helps connect different garden areas and plants naturally.
Easier To Maintain
Curved edges reduce sharp corners where grass and weeds grow. This makes trimming easier.
They also help keep soil and mulch in place better than straight edges.
Adds Value To Your Home
Well-designed curved edges give your garden a polished look. This can increase your home’s curb appeal.
Buyers often like gardens that feel cared for and attractive.
Allows Creative Planting
Curves create pockets of space for different plants. You can mix flowers, shrubs, and ground cover easily.
This design helps plants grow well and look great together.
Choosing The Right Materials
Creating a curved edge in your garden adds beauty and style. Choosing the right materials is key to making it last and look good.
Each material has its own strength and style. Think about your garden’s design and how much work you want to do.
Natural Stone Options
Natural stone gives a classic and sturdy look to garden edges. Stones like flagstone, slate, and limestone work well with curves.
Stone fits into most garden styles and lasts for many years. It is heavy and stays in place without needing extra support.
- Flagstone: flat and easy to shape
- Slate: smooth and dark-colored
- Limestone: light and weather-resistant
Metal And Plastic Edging
Metal and plastic are flexible materials. They bend easily to create smooth curved edges in your garden.
Metal edging is strong and long-lasting. Plastic edging is cheaper and easier to install but may not last as long.
- Metal types: steel, aluminum, or copper
- Plastic types: recycled plastic or vinyl
- Easy to shape and install
- Good for soft curves
Brick And Concrete Choices
Bricks and concrete blocks offer a solid and neat edge. They work well for formal garden curves and straight lines.
You can use curved bricks or cut bricks for smoother bends. Concrete can be poured or molded to fit any shape.
- Standard bricks: easy to stack and shape
- Curved bricks: pre-shaped for smooth edges
- Concrete: poured or molded for custom shapes
- Durable and low maintenance
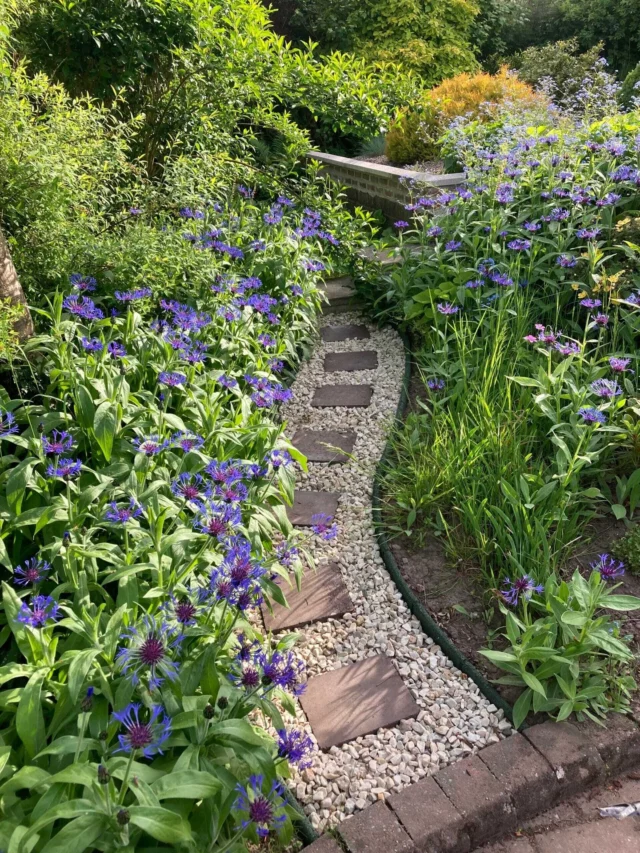
Planning Your Garden Curve
Creating a curved edge in your garden adds charm and softness to the space. Planning is important to make sure your curve looks smooth and fits well.
Start by thinking about where the curve will go and how big it should be. This helps you decide the best shape and size for your garden design.
Measuring And Marking The Area
Use a tape measure to find the length and width of the area where you want the curve. Measure carefully to get the right size.
Mark the edges with stakes or small flags. Then, use a string or garden hose to outline the curve shape on the ground.
- Measure the total length of the curve
- Place stakes at key points along the line
- Use a flexible string or hose to connect stakes smoothly
- Adjust the curve shape until it looks right
Designing Smooth Curves
Smooth curves look natural and pleasing in a garden. Avoid sharp angles or sudden bends to keep the flow gentle.
Try drawing the curve on paper first. Use a compass or round objects to guide the shape. This helps you see how the curve will look.
- Keep curves wide and gentle for a natural feel
- Use round tools to draw smooth edges
- Check the curve from different views before marking
- Make small changes to improve balance and flow
Preparing The Ground
Creating a curved edge in your garden starts with good ground preparation. This step helps your garden edge look neat and last longer.
Preparing the ground well makes it easier to shape the curve and set materials properly.
Clearing And Leveling
Clear the area where you want the curved edge. Remove grass, weeds, and roots.
After clearing, level the ground to make sure the edge will be even. Use a rake or shovel to smooth the soil.
- Remove stones and debris
- Cut roots that may grow under the edge
- Rake the soil to create a flat surface
- Check for low spots and fill them with soil
Digging The Trench
Dig a trench along the curved line you want to create. This trench will hold the edge material.
Make the trench deep and wide enough for your chosen edging. Usually, 4 to 6 inches deep works well.
- Mark the curve with a rope or garden hose
- Dig carefully along the marked line
- Keep the trench smooth and even in depth
- Remove loose soil from the trench
Installing The Edging
Creating a curved edge in your garden adds beauty and order. Installing the edging carefully shapes the curve and keeps soil in place.
Good edging helps separate grass from flower beds and stops mulch from spilling. Follow simple steps to place and secure your edging material.
Placing The Edging Material
Start by marking the curve on the ground using a rope or garden hose. This gives a clear line for placing the edging material.
Lay the edging along the marked line. Bend or shape flexible materials gently to follow the curve.
- Clear the soil along the curve to make a smooth trench
- Place the edging inside the trench, keeping the top edge visible
- Leave small gaps if the material needs to flex
- Check the curve for smooth, even lines
Securing And Adjusting
Secure the edging using stakes or spikes. Push them into the ground at regular intervals to hold the edging firmly.
Adjust the edging by tapping it with a rubber mallet. This helps it fit tightly into the soil and keeps the shape neat.
- Place stakes every 12 to 18 inches along the edging
- Drive stakes deep for strong support
- Use a mallet to fix loose parts
- Check the curve again and make small changes if needed

Credit: www.youtube.com
Finishing Touches
Creating a curved edge in your garden looks great, but the finishing touches make it neat. These steps help protect your garden and keep it tidy.
Adding soil and covering the edge area creates a smooth transition. This also helps your plants grow better.
Backfilling Soil
Backfill the space behind the curved edge with soil. This supports the edging and holds plants in place.
Use good quality soil that drains well. Press the soil down gently to remove air pockets.
- Fill the space evenly behind the edge
- Pack the soil lightly to avoid settling
- Water the soil to help it settle
Adding Mulch Or Decorative Stones
Cover the soil with mulch or decorative stones. This keeps moisture in and stops weeds from growing.
Choose mulch or stones that match your garden style. Spread a layer about 2 to 3 inches thick.
- Mulch improves soil health and appearance
- Stones add a clean, polished look
- Both reduce weed growth and soil erosion
Maintenance Tips
Creating a curved edge in your garden adds style and charm. To keep it looking great, regular maintenance is important.
Simple care tasks help your garden edge stay clean and strong through all seasons.
Cleaning And Repairs
Keep the curved edge free of dirt and debris to maintain its shape. Repair any cracks or loose parts quickly to avoid bigger damage.
- Remove leaves and soil buildup weekly
- Check for cracks or chips in edging material
- Fill small cracks with appropriate filler
- Tighten or replace loose stones or bricks
- Use a garden hose to wash away dirt
Seasonal Care
Different seasons affect your garden edge in different ways. Prepare it for weather changes to keep it strong year-round.
| Season | Care Tips |
| Spring | Clear winter debris and check for damage |
| Summer | Water nearby plants to avoid soil erosion |
| Fall | Remove fallen leaves and reinforce edging |
| Winter | Protect edges from frost and heavy snow |
Credit: www.flexiborder.co.uk
Frequently Asked Questions
What Tools Are Needed To Create A Curved Garden Edge?
To create a curved garden edge, use tools like a garden spade, string, garden hose, and edging materials. These tools help shape and define smooth, precise curves easily and efficiently.
How To Mark A Perfect Curve In Garden Edging?
Use a garden hose or string to lay out the desired curve shape. Adjust until you achieve a smooth, natural curve before cutting or digging along the line.
Which Materials Work Best For Curved Garden Edges?
Flexible materials like metal, plastic, or rubber edging work best. They easily bend to follow curves and provide durable, clean garden edges.
How Deep Should A Curved Garden Edge Be Dug?
Dig about 4 to 6 inches deep to set edging firmly. This depth keeps materials stable and helps prevent soil or mulch from spilling over.
Conclusion
Creating a curved edge in your garden adds style and flow. It softens hard lines and makes your space inviting. Start with a clear plan and use simple tools. Take your time shaping the curve for a neat look. Regular care keeps edges clean and sharp.
Enjoy the natural beauty this brings to your garden. Small changes make a big difference in outdoor spaces. Try it yourself and watch your garden transform.
