

If your lawn feels more like a patchy mess than a lush green carpet, dethatching might be the solution you need. But before you grab your tools and start, there’s an important step you can’t skip: preparing your yard properly.
Taking the right steps beforehand can make dethatching easier, faster, and far more effective. In this guide, you’ll discover exactly how to get your yard ready so you can enjoy a healthier, greener lawn that stands out in your neighborhood.
Ready to transform your outdoor space? Let’s dive in.
Credit: www.yourgreenpal.com
Assess Yard Condition
Before dethatching your yard, you need to check its current state. This helps you know what actions to take.
Assessing your yard ensures dethatching will be effective and safe for your grass.
Check Grass Health
Look at your grass closely to see if it is healthy. Healthy grass grows thick and green.
If the grass is yellow, patchy, or weak, dethatching might harm it more than help.
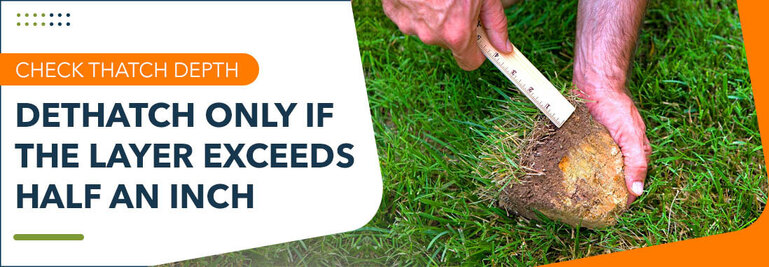
Identify Thatch Thickness
Thatch is a layer of dead grass and roots on the soil surface. Check how thick it is.
Use a small tool or your hand to pull up a bit of grass and thatch. Measure the thickness.
- Less than ½ inch: dethatching is not needed
- Between ½ inch and 1 inch: dethatching may help
- More than 1 inch: dethatching is recommended
Look For Soil Compaction
Soil compaction makes it hard for grass roots to grow. Check if your soil is compacted.
Press a screwdriver or a similar tool into the soil. If it is hard to push in, soil is compacted.
- Soft soil: roots grow easily
- Hard soil: roots struggle and water drains poorly
Gather Necessary Tools
Preparing your yard before dethatching is important for a smooth job. Having the right tools ready saves time and effort.
Getting organized helps you work safely and finish the task well. Let’s look at the tools you need before you start.
Select Dethatching Equipment
Choose the dethatching tool that fits your lawn size and grass type. Manual dethatchers work well for small yards.
For larger areas, consider a power dethatcher or a lawn dethatching machine. These remove thatch faster and easier.
- Manual dethatcher for small lawns
- Power dethatcher for medium to large lawns
- Lawn dethatching machine for very large yards
Prepare Rakes And Aerators
Rakes help gather thatch after dethatching. Use a sturdy garden rake with sharp tines for best results.
Aerators create holes in the soil to improve air and water flow. Prepare a manual or mechanical aerator depending on your yard size.
- Garden rake with sharp tines
- Manual aerator for small yards
- Mechanical aerator for larger lawns
Ensure Safety Gear
Wear safety gear to protect yourself while dethatching. Gloves keep your hands safe from cuts and blisters.
Use eye protection to avoid debris getting into your eyes. Sturdy shoes protect your feet from sharp objects.
- Protective gloves
- Safety goggles or glasses
- Closed-toe shoes or boots
Mow The Lawn
Mowing the lawn is an important step before dethatching. It helps prepare the grass for the process.
Proper mowing makes dethatching easier and more effective. It also protects your lawn.
Set Proper Mowing Height
Set your mower to a higher cutting height before dethatching. This keeps the grass strong.
Cutting too short can stress the grass. Aim for about 3 inches tall to protect roots.
Remove Grass Clippings
Clear away grass clippings after mowing. Clippings can block dethatching tools and cause problems.
Use a rake or blower to clean the lawn. This ensures better dethatching results.
Inspect For Debris
Check the lawn for sticks, stones, or toys before dethatching. Debris can damage your equipment.
Remove all debris carefully. This keeps your lawn and tools safe during dethatching.

Credit: www.jclandscapingllc.com
Water The Lawn
Preparing your yard before dethatching is important. Watering the lawn helps soften the soil. This makes dethatching easier and less stressful for grass.
Knowing how and when to water is key. Proper watering improves lawn health and helps remove thatch effectively.
Determine Optimal Moisture Level
Check the soil moisture before watering. The soil should be damp, not soggy or dry. This helps dethatching without harming roots.
- Insert a screwdriver or soil probe into the ground.
- If it goes in easily, moisture is good.
- If it feels hard, water the lawn lightly.
- If it is very wet, wait before watering again.
Avoid Overwatering
Too much water can cause problems. Overwatering leads to weak roots and disease. It also makes dethatching less effective.
| Watering Issue | Effect on Lawn |
| Overwatering | Root rot and fungal growth |
| Underwatering | Dry soil, hard to dethatch |
| Proper Watering | Healthy roots and soft soil |
Time Watering Correctly
Water your lawn at the right time of day. Early morning is best. This reduces evaporation and helps water soak deep.
- Water before dethatching, about 24 hours prior.
- Use a sprinkler for even coverage.
- Water slowly to avoid runoff.
- Avoid watering late in the evening.
Mark Obstructions
Preparing your yard before dethatching is important for safety and efficiency. Marking obstructions helps avoid damage to tools and injury.
Taking time to spot and mark hidden objects keeps the process smooth. It also protects your lawn and equipment.
Identify Hidden Objects
Look carefully for objects that may be hidden under the grass. These can include rocks, sticks, or garden tools left behind.
- Check areas with thick grass or uneven ground
- Use a rake or hand tool to feel for hidden items
- Mark objects with bright flags or stakes
- Inspect near flower beds and garden edges
Clear Small Debris
Remove small debris like leaves, twigs, and stones before you start dethatching. These items can clog your dethatcher or cause damage.
| Debris Type | Why Remove |
| Leaves | Prevent clogging of equipment |
| Twigs | Avoid damage to blades |
| Stones | Protect mower and dethatcher |
| Pet waste | Keep yard sanitary |
Protect Sensitive Areas
Some parts of your yard need extra care during dethatching. These include flower beds, young plants, and sprinkler heads.
Use these tips to protect sensitive areas:
- Place barriers like boards or plastic sheets over flower beds
- Mark sprinkler heads with tall stakes or flags
- Avoid running equipment too close to young plants
- Check for irrigation pipes before starting
Plan Post-dethatching Care
Preparing your yard for dethatching is important. After dethatching, your yard needs special care to recover and thrive.
This care includes fertilizing, overseeding, and irrigation. Each step helps your lawn stay healthy and green.
Schedule Fertilizing
Fertilizing your lawn after dethatching helps it recover faster. Use a balanced fertilizer to promote growth.
Apply the fertilizer evenly across your yard. This ensures all areas get the nutrients they need.
- Choose a slow-release fertilizer
- Apply during cool weather
- Follow package instructions
Arrange Overseeding
Overseeding fills in bare spots and thickens your lawn. Choose grass seeds that match your existing lawn type.
Spread the seeds evenly over the dethatched area. Water the seeds regularly to help them germinate.
- Select high-quality grass seeds
- Use a spreader for even coverage
- Keep soil moist for seed growth
Prepare For Irrigation
Proper irrigation is crucial after dethatching. Watering helps the grass recover and grow strong roots.
Set up a regular watering schedule. Adjust the amount of water based on weather conditions.
- Water early in the morning
- Avoid overwatering
- Check soil moisture regularly

Credit: www.jclandscapingllc.com
Frequently Asked Questions
What Is The Best Time To Prepare Yard Before Dethatching?
The ideal time is during early spring or fall when grass is actively growing. This ensures quick recovery after dethatching.
How Should I Mow My Lawn Before Dethatching?
Mow your lawn to about 1. 5 to 2 inches tall. This makes dethatching easier and more effective.
Should I Water My Lawn Before Dethatching?
Yes, water your lawn a day before dethatching. Moist soil helps remove thatch without damaging roots.
How Do I Remove Debris Before Dethatching?
Rake or use a blower to clear leaves, sticks, and debris. This prevents clogging and improves dethatcher performance.
Conclusion
Preparing your yard before dethatching helps your grass stay healthy. Clear leaves and debris to make dethatching easier. Water the lawn a day before to soften the soil. Mark any sprinkler heads or obstacles to avoid damage. Use the right tools and take your time.
These steps make dethatching more effective and less stressful. Your yard will look better and grow stronger after dethatching. Take care now to enjoy a lush lawn later. Simple preparation leads to great results.
