
You just finished an epic tailgate party, and your grill is covered in grease, food bits, and ash. Leaving it dirty can cause rust, bad smells, and even affect the taste of your next cookout.
But cleaning your grill doesn’t have to be a hassle. With the right steps, you can quickly get it sparkling clean and ready for your next grilling adventure. Keep reading, and you’ll discover simple, effective tips to make grill cleanup easy and stress-free every time.
:max_bytes(150000):strip_icc()/ses-portable-gas-grills-test-weber-go-anywhere-rkilgore-32-b203918f839e46e187dc6c0cfa413a14.jpeg)
Credit: www.thespruceeats.com
Preparing For Cleaning
Preparing your grill for cleaning after a tailgate is key to making the task easier and more effective. Taking a moment to get everything ready helps you avoid frustration and ensures you don’t miss any important steps. Let’s look at how to gather your supplies and keep safety top of mind before you start scrubbing.
Gathering Supplies
Before you dive into cleaning, make sure you have all the necessary supplies within reach. This includes a stiff grill brush, a bucket of warm soapy water, a sponge or cloth, and a scraper for stubborn residue.
Don’t forget protective gloves to keep your hands clean and safe. You might also want to have some cooking oil handy to season the grates after cleaning.
Having these tools ready saves you from interrupting the process and makes your cleanup smoother. What’s your go-to cleaning tool that you never forget?
Safety Precautions
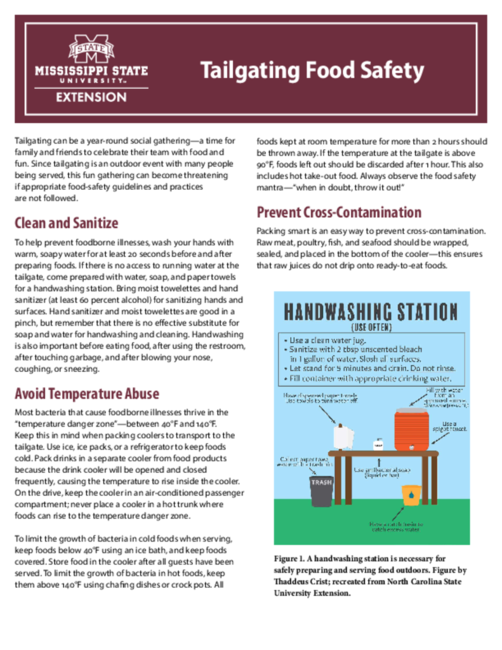
Safety is often overlooked but crucial when cleaning your grill. First, ensure the grill is completely cool before you start—hot surfaces can cause burns or accidents.
Wear gloves to protect your skin from grease and cleaning chemicals. Also, work in a well-ventilated area, especially if you use strong cleaners or degreasers.
Keep children and pets away from the cleaning zone to avoid any mishaps. Taking these steps protects you and makes the cleanup process safer and more comfortable.
Removing Grill Components
Removing grill components is a key step to ensure a thorough cleaning after your tailgate party. Taking apart the grill allows you to reach hidden grease and food particles that can affect the taste of your next meal. This process also helps maintain your grill’s longevity by preventing buildup that causes rust or damage.
Taking Out Grates And Trays
Start by carefully lifting out the grates and any drip trays. These parts usually hold the most residue, so handling them gently prevents damage. If your grill has a locking mechanism or screws, make sure to unlock or unscrew them before pulling the components out.
Have you ever tried scraping the grates while they were still inside the grill? It’s tough and often misses spots. Removing them gives you access to clean every nook and cranny, making your cleaning more effective.
Soaking Removable Parts
Once removed, place grates and trays in a container filled with warm, soapy water. Letting them soak for at least 20-30 minutes softens stubborn grease and charred bits. You can add a few drops of dish soap or a bit of baking soda for extra cleaning power.
After soaking, use a grill brush or sponge to scrub away the loosened grime. This step saves time and effort compared to scrubbing dry parts. Don’t rush—thorough soaking and scrubbing can make a huge difference in how clean your grill looks and performs.
Cleaning The Grill Grates
Cleaning the grill grates is essential after a tailgate to keep your grill in good shape. Dirty grates can affect the taste of your food and reduce the grill’s lifespan. Removing leftover food and grease helps prevent flare-ups and rust. Proper cleaning makes your next grilling session smooth and enjoyable.
Using A Grill Brush
Start by heating the grill for a few minutes. This loosens stuck-on food and grease. Use a grill brush with stiff bristles to scrub the grates. Brush in back-and-forth motions, covering all surfaces. Pay extra attention to spots with heavy buildup. Rinse the grates with water to remove debris.
Applying Cleaning Solutions
For tougher grime, apply a cleaning solution made for grills. You can use a mixture of water and mild dish soap. Spray or apply the solution on the grates and let it sit for 10 minutes. Scrub again with the grill brush or a sponge. Rinse thoroughly to avoid any soap taste on food. Dry the grates with a cloth or let air dry before storing.
Scrubbing The Interior
Scrub the grill’s interior with a stiff brush to remove stuck-on food and grease. Use warm, soapy water to clean hard-to-reach spots. Rinse well and dry completely to prevent rust.
Cleaning your grill after a tailgate might seem tedious, but scrubbing the interior is essential for maintaining its performance and flavor. A clean grill ensures your next barbecue is a hit, leaving your guests raving about your culinary skills. Let’s dive into the nitty-gritty of tackling the interior of your grill.Removing Ash And Debris
Begin by ensuring your grill is completely cool. Safety first! Once cooled, remove the grates to access the interior. Use a handheld vacuum or a small brush to sweep out the ash and debris. Ash buildup can lead to uneven heating and affect the taste of your food. Consider how much better your food will taste when it’s cooked in a clean environment. You’ll be surprised at the difference!Cleaning Burners And Flame Tamers
Inspect the burners for any blockages. Obstructions can cause uneven flames, resulting in poorly cooked food. Use a wire brush to gently scrub the burners. Take care not to damage them, as they are crucial for even heat distribution. Don’t forget the flame tamers! These are often overlooked but essential for catching drippings and protecting burners. A thorough cleaning can extend the life of your grill, saving you money in the long run. Who doesn’t love a good win-win?Wiping Down The Exterior
Wiping down the exterior of your grill after a tailgate is key to keeping it looking fresh and ready for the next cookout. Dirt, grease, and spills can build up quickly, so a proper wipe-down not only improves appearance but also extends the life of your grill. Taking a few minutes to clean the outside helps prevent rust and keeps your grill safe to use.
Choosing The Right Cleaner
Not all cleaners work well on grill surfaces. You want something that cuts through grease but won’t damage the finish. A mild dish soap mixed with warm water often does the trick without harsh chemicals.
For stubborn spots, consider a specialized grill cleaner designed for stainless steel or painted surfaces. Avoid abrasive scrubbers that can scratch and dull the exterior.
Have you checked what your grill manufacturer recommends? Using the right cleaner means avoiding voided warranties and keeping your grill looking brand new.
Polishing For Shine
After cleaning, polishing your grill’s exterior makes a big difference. A good polish restores shine and creates a protective layer against dirt and moisture.
Use a polish suitable for the material—stainless steel polish for metal grills or a gentle wax for painted finishes. Apply with a soft cloth and buff in small circular motions.
Think about how a polished grill can impress your guests and make your tailgate setup stand out. Isn’t it satisfying when your gear looks as good as the food you cook?
Reassembling The Grill
Reassembling the grill after cleaning is a key step to keep it ready for the next cookout. Taking your time ensures every part fits well and works correctly. A clean, dry grill lasts longer and cooks better.
Drying Components
Dry each piece thoroughly before putting it back. Use a clean towel to wipe grills, trays, and racks. Let smaller parts air dry to avoid moisture buildup. Moisture can cause rust and damage metal surfaces.
Ensure the inside of the grill is dry. Use a cloth to wipe down all surfaces. Check for any water left in corners or crevices. Dry parts prevent mold and keep your grill safe to use.
Putting Parts Back Together
Start with the larger components, like the grill body and trays. Fit each piece carefully into its place. Align parts so they lock or fit securely without force.
Install the cooking grates and warming racks last. Make sure they sit flat and steady. Tighten screws or fasteners gently to avoid stripping threads.
Test the grill lid and handles. They should open and close smoothly. A properly assembled grill is safer and easier to use next time.
Maintaining Your Grill
Maintaining your grill after a tailgate ensures it stays in top condition for every cookout. A clean grill not only improves the taste of your food but also extends the life of your equipment. By adopting simple maintenance habits, you can enjoy hassle-free grilling all season long.
Regular Cleaning Tips
Start by scraping off leftover food debris with a grill brush while the grill is still warm. This prevents buildup that can affect future cooking sessions.
Use a soapy water solution to wipe down the grates and exterior regularly. Avoid harsh chemicals that might damage your grill’s finish or leave residues.
Don’t forget to empty grease traps after each use to prevent flare-ups and unpleasant odors. Have you ever noticed how a clean grease tray can make your grill safer and easier to use?
Storage Advice
Keep your grill covered with a weatherproof cover when not in use. This protects it from rain, dust, and other elements that can cause rust or wear.
If you store your grill outside, try to place it in a shaded area to reduce exposure to sun damage. Sunlight can fade surfaces and weaken plastic components over time.
Before storing for long periods, disconnect the gas supply and clean the grill thoroughly. This simple habit prevents pests from nesting and keeps your grill ready for the next tailgate.
Credit: snakeriverfarms.com

Credit: sandersonfarms.com
Frequently Asked Questions
How Do I Clean A Grill After Tailgating?
Start by scraping off food residue with a grill brush. Then, wipe the grates with a damp cloth. Use warm soapy water for stubborn grease. Rinse and dry thoroughly to prevent rust. Regular cleaning ensures better taste and longer grill life.
What Tools Are Best For Cleaning A Tailgate Grill?
Use a sturdy grill brush with metal bristles for scraping. A scraper helps remove tough stuck-on residue. Soft cloths or sponges are good for wiping. Avoid abrasive tools that damage grates. A spray bottle with soapy water aids cleaning.
Can I Clean My Grill Immediately After Cooking?
Wait 10-15 minutes until the grill cools slightly. Cleaning too soon risks burns and damage. Warm grates are easier to clean but not hot. Use caution to avoid injury. Regular quick cleaning helps maintain grill performance.
How Often Should I Deep Clean My Tailgate Grill?
Deep clean your grill after every 5-6 uses. This includes removing grates and cleaning burners. Clean grease traps and exterior surfaces thoroughly. Frequent deep cleaning prevents buildup and flare-ups. It keeps your grill safe and efficient.
Conclusion
Cleaning your grill after a tailgate keeps it ready for next time. Use simple tools and warm water to remove grease and food. Scrape off stuck bits before washing. Dry it well to stop rust. Regular cleaning helps your grill last longer.
A clean grill means better-tasting food and safer cooking. Take a few minutes to care for your grill. It makes your tailgate fun and easy next time. Simple steps, great results.
