

Are you ready to enjoy mouthwatering, smoky flavors right from your own backyard? Learning how to assemble a vertical smoker is the first step to unlocking delicious meals that impress every time.
You might feel overwhelmed by the parts and instructions, but don’t worry—this guide breaks it down into simple, clear steps you can follow easily. By the end, you’ll have your vertical smoker ready to go, setting you up for perfect smoking sessions that your family and friends will love.
Let’s dive in and get your smoker assembled quickly and confidently!
Credit: manualsfact.com
Choosing The Right Vertical Smoker
Choosing the right vertical smoker sets the foundation for great smoked food. The right smoker fits your cooking style and space. It affects the flavor, ease of use, and cooking results. Consider your needs carefully before buying.
Types Of Vertical Smokers
- Charcoal Smokers:Classic flavor and smoky taste. Require more attention to temperature control.
- Electric Smokers:Easy to use with steady temperature. Good for beginners and quick smoking.
- Propane Smokers:Portable and heats up fast. Offers good temperature control but less smoky flavor.
- Pellet Smokers:Use wood pellets for fuel. Provide consistent heat and rich smoke flavor.
Key Features To Consider
- Temperature Control:Look for adjustable vents or digital controls for steady heat.
- Cooking Space:Choose a size that fits your typical food quantities.
- Material:Stainless steel lasts longer and holds heat better.
- Ease of Cleaning:Removable trays and easy access doors save time.
- Portability:Wheels or handles help if you move your smoker often.
Budget And Size Options
Vertical smokers come in many price ranges. Small smokers cost less but fit fewer foods.
Larger smokers hold more but need more space and fuel. Set a budget that matches your use.
Think about where you will place the smoker. Make sure it fits your outdoor area.

Credit: www.atbbq.com
Gathering Necessary Tools And Parts
Before you dive into assembling your vertical smoker, it’s crucial to gather all the necessary tools and parts. Having everything ready saves time and spares you from frustrating interruptions. Plus, it ensures your assembly process flows smoothly from start to finish.
Essential Tools For Assembly
Make sure you have the right tools at hand. Most vertical smokers require a few basic tools that you might already own. Having these tools ready helps avoid unnecessary trips to the hardware store.
- Screwdrivers:Both Phillips and flathead screwdrivers are commonly needed.
- Wrenches or Socket Set:These help tighten bolts securely without stripping them.
- Pliers:Handy for gripping small parts or bending metal tabs.
- Rubber Mallet:Useful for gently tapping parts into place without damaging them.
- Work Gloves:Protect your hands while handling metal components.
Do you already have some of these tools? Gathering them now can help prevent delays halfway through assembly.
Checking The Smoker Components
Unpack your smoker parts carefully and lay them out where you have enough space. Check each component against the parts list in your instruction manual. This step ensures you won’t miss any crucial pieces before starting.
Look for common components like the firebox, cooking grates, charcoal tray, water pan, and the smoker body. Inspect each part for damage or defects such as dents, rust spots, or missing holes for screws.
Have you noticed any parts that don’t match the instructions or seem damaged? It’s better to address these issues early by contacting the seller or manufacturer. Starting with a complete and intact set of parts saves headaches later on.
Preparing The Assembly Area
Preparing the assembly area is a crucial first step when building your vertical smoker. A well-organized space can save you time and reduce frustration. It also helps keep all parts visible and within easy reach, allowing the assembly to go smoothly.
Selecting A Suitable Workspace
Choose a flat, stable surface that can comfortably fit the smoker parts and tools. A spacious garage or a backyard patio often works best. Make sure the area is well-lit to avoid missing any small screws or components.
Think about the weather if you’re outside—assembling in direct sunlight or rain can complicate things. An indoor spot with good ventilation is ideal, especially since some parts might have coatings that release odors when heated later.
Have a table or workbench nearby to lay out your instructions and smaller parts. This keeps everything organized and minimizes the risk of losing important pieces during assembly.
Safety Precautions
Your safety should be a top priority throughout the process. Wear sturdy gloves to protect your hands from sharp edges and rough metal surfaces. Safety goggles can prevent dust or metal shards from getting into your eyes.
Keep children and pets away from the assembly area to avoid distractions or accidents. If you use power tools, double-check that cords aren’t tangled or causing a tripping hazard.
Ask yourself: Have you cleared enough space to move freely without bumping into obstacles? Taking a moment to consider safety can prevent injuries and save you from costly delays.
Step-by-step Assembly Process
Assembling a vertical smoker can seem daunting, but breaking it down into manageable steps makes the process straightforward. Understanding each part and its function not only simplifies assembly but also enhances your grilling experience. Let’s dive into the step-by-step assembly process that will have you ready to smoke your favorite meats in no time.
Assembling The Base And Firebox
Start with the foundation by laying out the base and firebox components. Make sure the base is on a level surface to ensure stability when cooking.
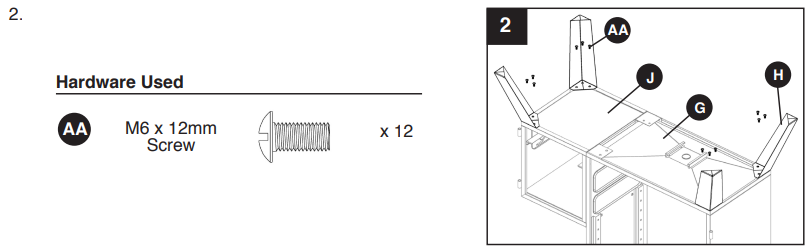
- Align the firebox with the base, ensuring all screw holes are visible.
- Secure them together using the provided screws and a screwdriver.
- Double-check for any wobbles, adjusting as needed for a firm setup.
Installing The Cooking Grates
Cooking grates are where the magic happens, so installation is key. Position them inside the smoker body, ensuring even spacing for optimal heat distribution.
- Slide the grates into the designated slots at various heights depending on your cooking preference.
- Ensure they sit flat and are securely in place.
- Consider how you’ll arrange food for different heat zones, which can enhance flavors.
Attaching The Water Pan
The water pan is crucial for maintaining moisture and flavor. It’s usually placed above the firebox and below the cooking grates.
- Position the pan in its holder, ensuring it’s steady and balanced.
- Fill it with water or other liquids like beer or apple juice for added flavor.
- Check the pan periodically during cooking to keep it from drying out.
Securing The Smoker Body
With the main components in place, it’s time to secure the smoker body. This step ensures everything stays intact during cooking.
- Align the smoker body with the base and attach it using the provided brackets or screws.
- Ensure a snug fit to prevent heat loss.
- Make necessary adjustments to ensure the door closes tightly.
Adding The Lid And Handles
The final touch is adding the lid and handles, completing your vertical smoker setup. These elements make handling and controlling the smoker easy.
- Attach the lid using the hinges, ensuring it opens and closes smoothly.
- Screw in the handles on both the lid and the body for easy maneuverability.
- Test the lid’s fit to ensure it seals well, keeping the heat and smoke inside.
Now that your smoker is assembled, are you ready to start experimenting with flavors and recipes? Embrace this newfound skill and enjoy the culinary adventure that awaits!
Testing And Adjusting The Smoker
Testing and adjusting your vertical smoker is key to getting the best flavor and consistent results. This phase helps you understand how your smoker behaves and lets you fine-tune its performance. Without proper testing, you might face uneven cooking or struggle to maintain the right temperature.
Initial Burn-in
Before cooking your first batch of ribs or brisket, run an initial burn-in to clean out any manufacturing residues. Light a small fire and let the smoker heat up to about 250°F (121°C) for 1 to 2 hours. This process helps remove any paint fumes or oils that could affect the taste of your food.
During this burn-in, watch how the smoker heats up and cools down. Take note if it’s reaching the temperature quickly or if it fluctuates. These observations give you a baseline for future adjustments.
Checking Airflow And Temperature Control
Proper airflow is crucial for maintaining stable temperatures and producing clean smoke. After the burn-in, test how the smoker responds when you adjust the intake and exhaust vents. Try opening and closing them in small increments to see how the temperature changes.
If you notice the temperature spikes too quickly or drops suddenly, it might mean the vents are too large or not sealed well. You can fix this by adding a simple gasket or using high-temp tape to improve the seal.
Here are a few quick tips to help you manage airflow better:
- Keep the bottom vents partially open to feed oxygen to the fire.
- Adjust the top vent to control smoke exit; closing it too much can smother the fire.
- Use a digital thermometer to monitor temperature changes precisely.
Think about how small changes in airflow affect your smoker’s performance. Have you noticed how even a slight vent adjustment can keep your temperature steady for hours? Understanding this will save you from constant fiddling during your cooks.
Maintenance Tips For Longevity
Maintaining your vertical smoker properly ensures it lasts many years. Regular care keeps it working well and prevents damage. Simple habits can protect your smoker from rust and wear. Follow these tips after each use and during storage.
Cleaning After Use
Remove ashes and leftover wood or charcoal once the smoker cools down. Use a soft brush or cloth to clean the inside surfaces. Avoid harsh chemicals; warm water and mild soap work best. Clean the racks and trays carefully to remove grease and food bits. Dry all parts thoroughly before reassembling to stop rust.
Storing The Smoker Properly
Keep your smoker in a dry, sheltered place away from rain and snow. Cover it with a fitted smoker cover or waterproof tarp to protect from dust and moisture. Store it off the ground if possible, using a pallet or stand. Check the smoker regularly for signs of rust or damage. Proper storage helps keep your smoker ready to use anytime.
:max_bytes(150000):strip_icc()/ses-product-nexgrill-vertical-pellet-smoker-donna-currie-08-3eb75cbbf55b466fb06aa44193e21421.jpeg)
Credit: artis-terra.com
Frequently Asked Questions
How Long Does It Take To Assemble A Vertical Smoker?
Assembling a vertical smoker usually takes 30 to 60 minutes. Time depends on the model and your experience. Follow the manufacturer’s instructions carefully for quick and safe assembly.
What Tools Are Needed To Assemble A Vertical Smoker?
Common tools include a screwdriver, wrench, and pliers. Some smokers come with a basic tool kit. Having these tools ready speeds up the assembly process and ensures proper setup.
Can I Assemble A Vertical Smoker Alone?
Yes, most vertical smokers can be assembled solo. However, having a second person helps with heavy parts and alignment. Take your time to avoid mistakes and ensure stability.
How Do I Ensure My Vertical Smoker Is Stable?
Place it on a flat, level surface during assembly. Tighten all bolts and screws securely. Proper stability prevents accidents and improves smoking performance.
Conclusion
Assembling a vertical smoker is simple with clear steps. Follow each part carefully to build it right. Take your time and check every connection. Soon, you will enjoy delicious smoked food at home. Keep your smoker clean and well-maintained for best results.
Enjoy the process and the tasty meals it creates. Ready to cook? Your vertical smoker is now set up!
