
Are you looking to boost the health of your garden or improve your agricultural yield? Accurate soil testing might just be the key you need.
Understanding the nutrients and pH levels in your soil can make all the difference between a flourishing garden and one that struggles to thrive. You might think soil testing is a complex task, but with the right tips, it becomes a straightforward and rewarding process.
Imagine the satisfaction of watching your plants grow healthier and more vibrant, all thanks to a little know-how. Ready to unlock the secrets hidden beneath your feet? Keep reading to discover simple yet effective tips that will empower you to perform accurate soil tests and transform your gardening or farming experience.
Choosing The Right Time
Testing soil at the right time gives accurate results. It helps you understand soil health and nutrient needs.
Picking the correct moment to test depends on seasons and soil moisture. Both affect the soil’s condition.
Seasonal Considerations
Soil tests should match the crop cycle and weather. Testing in the right season shows real soil nutrient levels.
- Test soil before planting to prepare well.
- Late summer or early fall is good after harvest.
- Avoid testing in frozen or very wet soil.
- Test yearly for best results.
Soil Moisture Levels
Soil moisture affects test accuracy. Too wet or too dry soil can change nutrient readings.
| Soil Moisture | Effect on Testing | Recommendation |
|---|---|---|
| Too Wet | Nutrients may be diluted or moved | Wait until soil drains well |
| Too Dry | Hard to collect sample; uneven nutrients | Water soil lightly a day before sampling |
| Ideal Moisture | Accurate nutrient levels | Soil feels like a wrung-out sponge |
Selecting Sampling Locations
Choosing the right spots for soil samples is key for good test results. It helps understand the soil’s true condition.
Samples from poor locations can give wrong data. Careful selection leads to accurate soil analysis.
Identifying Representative Areas
Pick areas that show the usual soil in the field. Avoid places that look different or unusual.
Samples should reflect the whole area, not just small spots. This helps get reliable soil test results.
- Look for uniform crop growth and soil color
- Avoid spots with recent changes like new fertilizer or manure
- Sample several parts of the field for an average reading
Avoiding Contaminated Spots
Stay away from areas that may have chemicals or foreign materials. These can change test results.
Contaminated spots include near roads, old buildings, or places with spills. Do not sample from these zones.
- Do not sample near fences or gates where waste may accumulate
- Avoid spots with visible trash, oil, or paint
- Keep away from areas with heavy machinery traffic
Proper Sampling Techniques
Soil testing starts with taking good samples. Proper sampling gives clear soil results.
Wrong samples can lead to wrong soil advice. Follow simple steps to get the right samples.
Tools Needed For Sampling
You need some tools to take soil samples easily. These tools help get clean, clear samples.
- Soil probe or auger to dig small holes
- Clean bucket to mix soil samples
- Plastic or paper bags to store samples
- Marker to label each sample bag
- Gloves to keep hands clean
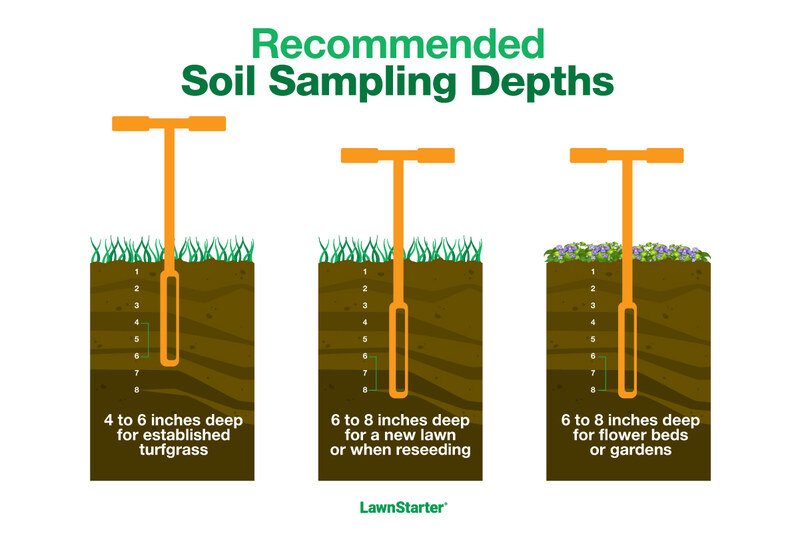
Depth And Number Of Samples
Take samples at the right depth for good testing. Usually, 6 to 8 inches deep works well.
Take many samples from the area to get an average soil picture. More samples mean better results.
- Collect 10 to 15 samples from different spots in one field
- Mix these samples well in a bucket
- Use the mixed soil for testing
- Keep sampling depth consistent for all spots

Credit: www.thedriller.com
Sample Handling And Storage
Soil testing depends on good sample handling and storage. Proper care keeps samples true to the field condition.
Wrong handling can change soil properties. This affects test results and leads to wrong decisions.
Preventing Contamination
Keep soil samples clean to avoid contamination. Use clean tools and containers for each sample.
Do not touch the soil with bare hands. Avoid mixing soil from different spots in one sample.
- Use plastic or metal tools cleaned before sampling
- Collect soil from the correct depth only
- Keep samples away from dust, chemicals, and fertilizers
- Store samples in clean, dry containers
Labeling And Packaging Samples
Label samples clearly to avoid mix-ups. Include date, location, and sample depth on labels.
Use strong, sealed bags or containers. This keeps moisture and dirt out during transport.
- Write labels with waterproof markers
- Place labels inside and outside the container
- Use zip-lock bags or plastic containers with lids
- Keep samples cool and dry until testing
Choosing A Reliable Testing Lab
Soil testing helps you understand the nutrients and health of your soil. Choosing the right lab is important for accurate results.
Not all labs work the same way. You need to check their credentials and services before sending your samples.
Accreditation And Certifications
Look for labs with official accreditation. This shows they meet quality standards. Certified labs follow set rules for testing.
- Check for national or international accreditation
- Verify certifications from recognized soil science bodies
- Ask if the lab uses standard testing methods
- Ensure they have trained and qualified staff
Turnaround Time And Support
Fast results help you act quickly on soil needs. Good labs offer clear timelines and customer support.
| Service | What to Expect |
| Turnaround Time | Usually 1 to 2 weeks |
| Result Format | Clear report with recommendations |
| Customer Support | Available for questions and guidance |

Credit: www.familyhandyman.com
Interpreting Test Results
Soil test results show important details about your soil’s health. Understanding these helps you make smart decisions for your plants.
Look closely at each nutrient value and compare it to ideal levels. This tells you what your soil needs or has in excess.
Key Soil Nutrient Indicators
Focus on nutrients like nitrogen, phosphorus, potassium, pH, and organic matter. Each one affects plant growth differently.
| Indicator | Optimal Range | Effect on Plants |
| Nitrogen (N) | 20-50 ppm | Supports leaf growth and green color |
| Phosphorus (P) | 15-40 ppm | Helps root development and flowering |
| Potassium (K) | 100-200 ppm | Boosts disease resistance and fruit quality |
| pH Level | 6.0-7.0 | Affects nutrient availability |
| Organic Matter | 3-5% | Improves soil structure and moisture |
Adjusting Soil Amendments
Use your test results to decide what soil amendments to add. This keeps your soil balanced and healthy for plants.
- Add nitrogen fertilizer if nitrogen is low
- Apply phosphate to increase phosphorus levels
- Use potash to raise potassium content
- Adjust soil pH with lime or sulfur
- Add compost to boost organic matter
Regular Testing Schedule
Regular soil testing helps farmers and gardeners keep soil healthy. It shows what nutrients soil needs.
Testing soil often gives better results for planting and crop growth. It helps avoid soil problems early.
Frequency For Different Crops
Different crops need soil tested at different times. Some crops use more nutrients than others.
Testing before planting and after harvest is common. Some crops need tests more often for best results.
- Vegetables: test every 1-2 years
- Grains: test every 2-3 years
- Fruits: test every 1-3 years
- Lawns and gardens: test yearly
Monitoring Soil Health Over Time
Regular tests help track soil changes over months and years. This shows if soil health improves or declines.
Keep records of test results. Compare them to see if fertilizer or other changes help soil quality.
- Check nutrient levels regularly
- Watch soil pH for acidity or alkalinity
- Note changes in organic matter content
- Adjust soil care based on test trends

Credit: lawnsynergy.com
Frequently Asked Questions
What Is The Best Time For Soil Testing?
The best time for soil testing is before planting or during early spring. Testing when soil is dry ensures accurate nutrient levels. Avoid testing after heavy rains to prevent skewed results.
How To Collect Soil Samples Correctly?
Collect soil samples from multiple locations in your field. Use a clean tool, remove surface debris, and take samples 6 inches deep. Mix samples well for a representative test.
Why Is Soil Testing Important For Gardening?
Soil testing identifies nutrient deficiencies and pH imbalances. It helps optimize fertilizer use and improves plant health. Accurate testing leads to higher yields and cost savings.
How Often Should Soil Be Tested?
Test soil every 2 to 3 years for optimal results. More frequent testing is needed for intensive farming or new garden beds. Regular tests track nutrient changes over time.
Conclusion
Accurate soil testing helps grow healthy plants and crops. Collect samples from different spots for best results. Use clean tools to avoid mixing soil types. Follow instructions carefully to get clear test data. Test regularly to track soil health over time.
Good soil knowledge saves money and boosts yield. Simple steps lead to better garden or farm care. Start testing today to see the difference yourself.
