
You’ve just bought a premium BBQ tool set, and now it’s time to get it ready for your next cookout. But how do you assemble it quickly and correctly?
If you want your grilling experience to be smooth and enjoyable, knowing how to put your tools together the right way is key. In this guide, you’ll discover simple steps that save you time and prevent mistakes, so you can focus on what really matters—grilling delicious food and impressing your guests.
Keep reading, and you’ll have your BBQ tools ready to go in no time.

Credit: www.cuisinart.com
Choosing The Right Bbq Tool Set
Choosing the right BBQ tool set makes grilling easier and more fun. The right tools help you cook food perfectly and keep you safe. Knowing what to look for saves money and avoids frustration.
Materials And Durability
Pick tools made from strong, rust-resistant materials. Stainless steel is popular for its strength and easy cleaning. Avoid plastic parts that can melt or break in heat. Look for solid handles that won’t bend or crack.
Essential Tools Included
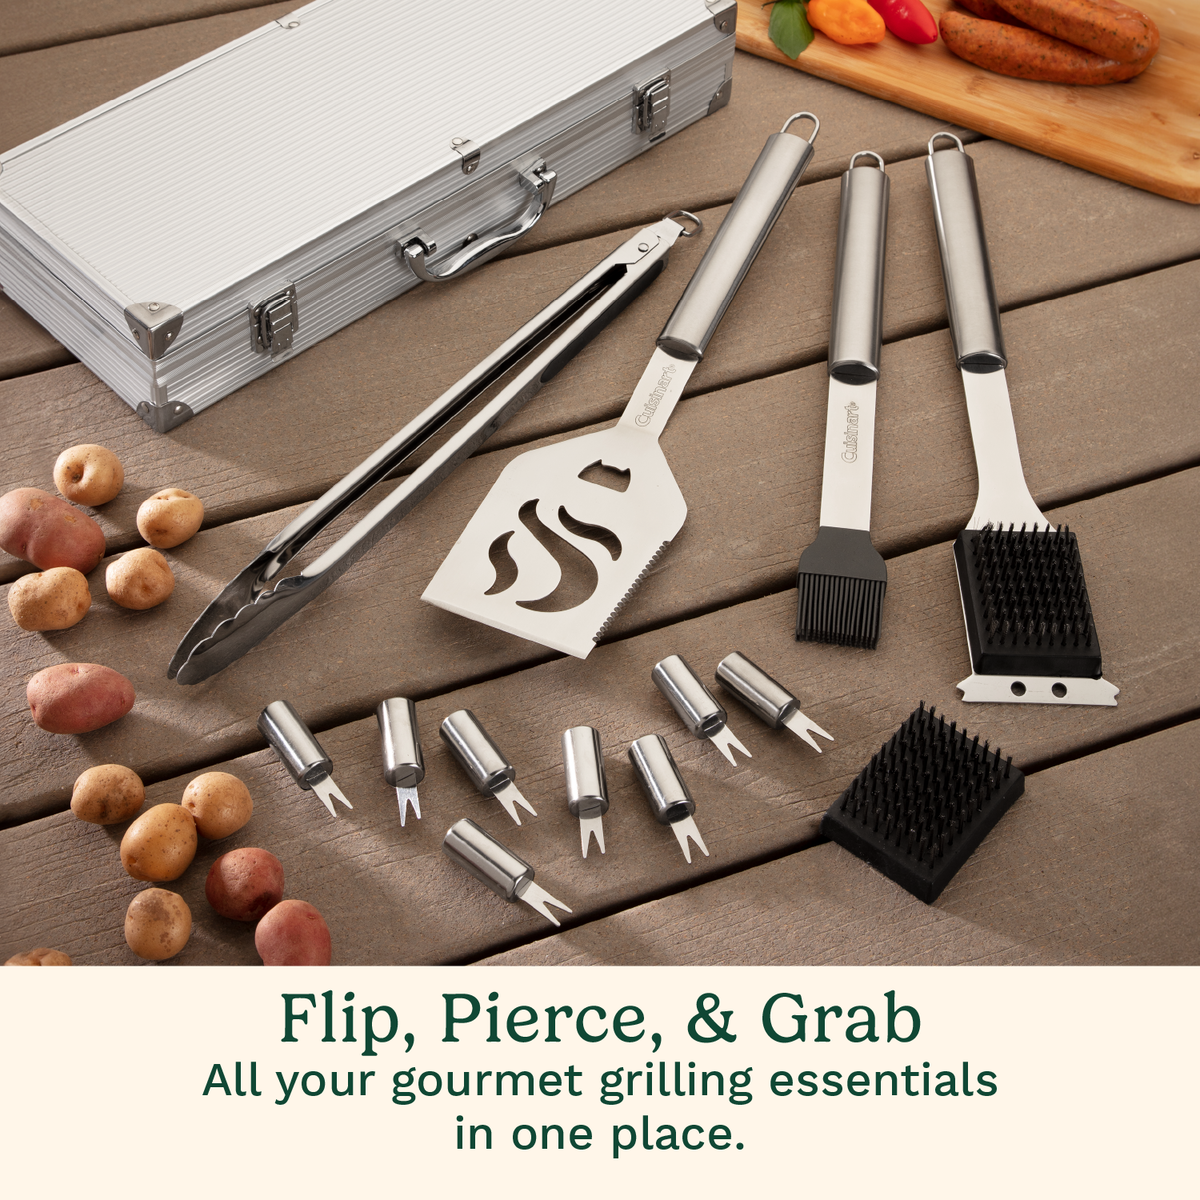
A good BBQ set should have all basic tools. These include:
- Tongs for flipping food
- A spatula for turning burgers
- A fork for lifting meat
- A basting brush for sauces
- A grill cleaning brush
Extra tools like skewers or meat thermometers add value. Make sure the set matches your cooking style and needs.
Ergonomic Design Features
Choose tools with comfortable, non-slip handles. Long handles keep hands safe from heat. Lightweight tools reduce hand fatigue during long grilling sessions. Look for balanced tools that feel good to hold and control.
Preparing Your Workspace
Preparing your workspace is essential before assembling a premium BBQ tool set. A neat, organized area helps you find tools easily. It also makes the assembly process faster and safer. Start by clearing the space and arranging everything you need. A good setup leads to a smooth and enjoyable experience.
Cleaning And Organizing
Clear the surface of dust and dirt. Use a damp cloth to wipe down the area. Remove any clutter that can get in your way. Lay out the BBQ tools on a clean towel or mat. Arrange the tools by size or type for easy access. This helps you keep track of all parts and avoids losing small pieces.
Gathering Additional Supplies
Some tools need extra items for assembly. Collect screwdrivers, wrenches, or pliers if needed. Have a small container for screws and bolts. Keep a soft cloth nearby to handle delicate parts. Check the instruction manual to know what tools are required. Preparing these supplies beforehand saves time and frustration.
Safety Precautions
Wear protective gloves to avoid cuts or scrapes. Ensure good lighting in your workspace. Keep sharp objects away from children and pets. Work on a stable surface to prevent accidents. Take breaks if you feel tired or distracted. Following safety rules protects you and ensures a smooth assembly process.
Unpacking The Tool Set
Unpacking your premium BBQ tool set is the first step towards mastering the grill. It’s more than just opening a box—it’s about preparing your tools so you can cook with confidence and ease. Taking your time here saves frustration later and ensures you’re ready for your next cookout.
Checking For Missing Parts
Before you get excited about grilling, make sure every tool is accounted for. Use the included checklist or manual to verify each item. Missing a spatula or tongs can disrupt your cooking flow, so double-checking now helps avoid last-minute trips to the store.
Lay out all pieces on a clean surface. This helps you spot what’s missing quickly. Have you ever started cooking only to realize you don’t have the right tool? Avoid that by confirming everything is present first.
Identifying Each Tool
Knowing your tools well is key to efficient grilling. Identify each piece by name and function. Your set might include essentials like a grill fork, basting brush, or skewers—each designed for specific tasks.
Spend a moment handling each tool. Feel its weight and grip. This helps you understand how it fits in your cooking style and where it should be stored for quick access during grilling.
Inspecting For Damage
Even premium sets can have defects or damage from shipping. Look closely for bent handles, loose screws, or rust spots. Damaged tools can be unsafe or ineffective, so catching issues early lets you request replacements.
Check the tool’s joints and moving parts to ensure smooth operation. How often have you struggled with a stiff hinge or a loose handle? Avoid this frustration by inspecting each tool thoroughly before your first use.
Credit: www.consumerreports.org
Step-by-step Assembly Process
Assembling a premium BBQ tool set can seem like a daunting task, but with a clear process, it’s a breeze. Whether you’re a seasoned grill master or a novice, understanding each step will ensure your tools are ready for a perfect BBQ experience. Let’s dive into the assembly process to get your BBQ tools ready for action.
Attaching Handles And Grips
Begin by identifying the handles and grips for each tool. These components are vital for ensuring a firm and comfortable hold. Secure each handle by aligning it with the corresponding tool and tightening any screws or fasteners. A good grip is the foundation of effective grilling, so make sure they are firmly attached.
Consider personal comfort when adjusting the grips. Are they too loose or too tight? Adjust them to fit your hand comfortably, ensuring that you can handle each tool with ease and precision.
Securing Tool Components
Next, focus on securing the main components of each tool. This may include tongs, spatulas, or skewers. Ensure that each part is properly aligned and locked into place.
Check for any loose parts and tighten them as needed. A well-secured tool will not only enhance safety but also improve your efficiency while grilling.
Testing Tool Functionality
Once assembled, it’s time to test the functionality of your BBQ tools. Try using each tool as you would during an actual BBQ session. Are the tongs gripping effectively? Does the spatula handle the weight of a burger without bending?
Testing allows you to make necessary adjustments before the big grilling day. You wouldn’t want your tools to fail when you’re flipping that perfect steak, would you?
Reflect on the process and consider any improvements. Did you find a particular step challenging? Share your thoughts with fellow BBQ enthusiasts, as collaboration often leads to new insights and better techniques.
Maintaining Your Bbq Tools
Maintaining your BBQ tools keeps them in top shape and ready for grilling. Proper care prevents rust, damage, and wear. It also helps your tools last longer. Regular upkeep saves money and improves your cooking experience.
Cleaning After Use
Clean your BBQ tools immediately after cooking. Remove grease and food particles with warm, soapy water. Use a soft brush or sponge to avoid scratches. Rinse tools well and dry them completely. Avoid leaving tools wet to stop rust from forming.
Proper Storage Tips
Store your BBQ tools in a dry place. Use a tool rack or case to keep them organized. Keep tools away from moisture and direct sunlight. This protects the metal and handles. Hanging tools helps air circulate and prevents damage.
Regular Maintenance Checks
Inspect your BBQ tools regularly for wear and tear. Check handles for cracks or looseness. Look for rust spots and clean them promptly. Tighten any loose screws or bolts. Replace parts that are broken to keep tools safe and functional.

Credit: www.youtube.com
Troubleshooting Common Issues
Troubleshooting common issues during the assembly of your premium BBQ tool set helps ensure long-lasting use. Some problems may arise from loose parts, rust, or worn components. Addressing these issues early keeps your tools safe and efficient.
Loose Parts Fixes
Loose parts can affect the tool’s stability and safety. Tighten all screws and bolts using the appropriate screwdriver or wrench. Check handles and joints carefully. Use thread-locking glue for added security. Avoid over-tightening to prevent damage to the tools.
Rust Prevention
Rust weakens metal and reduces tool life. Clean your tools after every use with warm water and mild soap. Dry them thoroughly to avoid moisture buildup. Apply a thin layer of cooking oil or mineral oil to metal surfaces. Store tools in a dry place, preferably inside a protective case.
Replacing Worn Components
Worn parts reduce the tool’s effectiveness and can be unsafe. Inspect your tools regularly for signs of wear or damage. Replace damaged handles, grips, or metal parts promptly. Use parts recommended by the manufacturer for the best fit. Keep spare parts handy to avoid delays during grilling.
Frequently Asked Questions
How Do I Organize Tools In A Premium Bbq Set?
Start by sorting tools by function: grilling, flipping, cleaning, and serving. Store them in designated slots or compartments for easy access. Proper organization prevents damage and saves time during BBQ sessions.
What Are Essential Steps To Assemble A Bbq Tool Set?
Begin by unpacking all components and checking for completeness. Follow the manufacturer’s instructions carefully. Attach handles securely, align parts properly, and test for stability before first use.
Can I Customize My Premium Bbq Tool Set?
Yes, many sets allow customization such as adding personalized engravings or interchangeable handles. Customizing improves grip comfort and adds a personal touch to your BBQ gear.
How Do I Maintain And Clean Bbq Tools Properly?
Clean tools after every use with warm soapy water. Dry thoroughly to prevent rust. Regularly oil wooden handles and sharpen blades for longevity and optimal performance.
Conclusion
Assembling your premium BBQ tool set is simple and rewarding. Follow each step carefully for the best results. Having the right tools ready makes grilling easier and more fun. Practice using each tool to gain confidence and skill. Soon, you will enjoy tasty meals with less hassle.
Keep your tools clean and stored properly to last longer. Enjoy your BBQ moments with friends and family. A well-assembled tool set helps create great outdoor cooking experiences.
