
Lighting a charcoal grill might seem simple, but getting it just right can change your entire grilling experience. You want your coals to glow evenly and reach the perfect temperature quickly—without the hassle or harmful chemicals.
If you’ve struggled with slow starts, uneven heat, or frustrating smoke, this guide is made for you. Keep reading, and you’ll learn easy, effective steps to light your charcoal grill like a pro every time. Your next cookout will be easier, faster, and tastier.
Credit: www.hungryhuy.com
Choosing The Right Charcoal
Choosing the right charcoal is a crucial step in lighting your charcoal grill effectively. The type and quality of charcoal you select directly impact the heat, flavor, and overall grilling experience. Knowing what to look for can save you time and frustration, plus deliver better-tasting food.
Types Of Charcoal
You’ll find mainly two types of charcoal: lump charcoal and briquettes. Lump charcoal is made by burning wood in the absence of oxygen, leaving behind pure carbon chunks. It lights quickly and burns hotter, giving you more control over your grill’s temperature.
Briquettes, on the other hand, are made from compressed sawdust and other additives. They burn more evenly and last longer but may produce more ash. Which type suits your cooking style? If you prefer quick and hot fires, lump charcoal might be your best bet.
Quality Matters
Not all charcoal is created equal. High-quality charcoal burns cleaner and produces less ash, which makes it easier to maintain a steady temperature. I once used low-grade charcoal that smoked too much and left an unpleasant taste on my grilled chicken.
Look for charcoal with minimal fillers and additives. Check the packaging or ask your local supplier about the source. Hardwood charcoal tends to be a better choice, offering a natural smoky flavor without chemicals.
Amount To Use
The amount of charcoal you use depends on the size of your grill and the cooking time. Using too little means your fire might die out quickly; too much can cause flare-ups and wasted fuel. A good rule of thumb is to fill the charcoal grate with a single, even layer for direct grilling.
For longer cooking, add charcoal gradually to maintain heat. Have you ever run out of charcoal mid-cook? Planning the right amount upfront helps avoid that frustrating scenario and keeps your food cooking evenly.
Preparing The Grill
Preparing the grill before lighting charcoal is key for a smooth cooking experience. A clean, well-arranged grill ensures even heat and better flavor. Proper vent settings help control airflow and temperature. Spend time on these steps to get the best results from your charcoal grill.
Cleaning The Grill
Remove old ashes and leftover charcoal from the grill. Use a wire brush to scrub the grates until they are free of debris. Clean grates help prevent food from sticking and improve heat distribution. Wipe the inside of the grill with a damp cloth to clear dirt and grease.
Arranging The Grate
Place the cooking grate back into the grill securely. Check that it sits evenly and does not wobble. Arrange the charcoal grate or basket below to hold the charcoal properly. Positioning the grates well allows air to flow and heat to spread evenly across the grill.
Vent Settings
Open the bottom vents fully to allow air in and fuel the fire. Keep the top vents open to let smoke and heat escape. Adjust vent openings during cooking to control the grill’s temperature. More air means hotter flames, less air cools the fire down.
Lighting Methods
Lighting your charcoal grill correctly sets the stage for a successful cookout. Choosing the right lighting method affects how quickly your coals reach the ideal temperature and how safe the process is. Each technique has its own benefits and challenges, so understanding them helps you pick what fits your style and equipment.
Using Lighter Fluid
Lighter fluid is a popular choice because it’s quick and easy. You simply pour it over your charcoal, wait a minute to let it soak in, and then light it. Be cautious: avoid adding fluid to hot coals to prevent dangerous flare-ups.
One tip I learned the hard way is to use just enough fluid to dampen the coals, not soak them. Too much fluid can leave a chemical taste in your food. Also, let the fire burn until the flames die down and the coals turn gray before cooking.
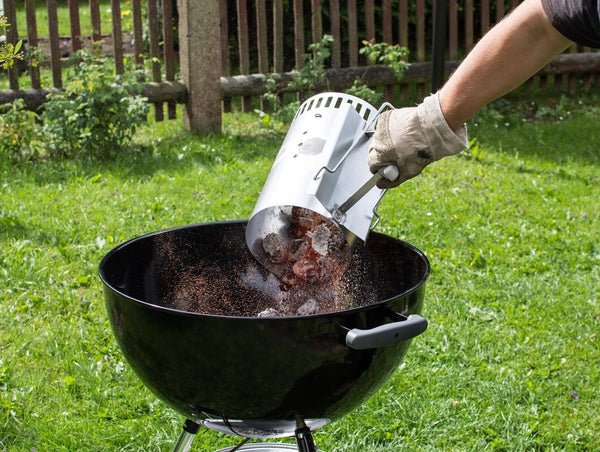
Chimney Starter Technique
The chimney starter is a favorite among seasoned grillers for its efficiency and safety. It’s a metal cylinder that holds your charcoal while allowing air to circulate from the bottom, speeding up ignition. Simply place crumpled newspaper or natural fire starters under the chimney, light them, and wait 10-15 minutes.
You’ll know it’s ready when the top coals are covered in gray ash. This method avoids chemicals altogether and gives you an even, hot bed of coals. If you’ve ever struggled with uneven heat, this technique could be your solution.
Electric Charcoal Starter
Electric starters offer a clean, hands-off way to ignite your charcoal. Just place the heating element inside the pile of coals, plug it in, and wait for about 8-12 minutes. When the coals start glowing, remove the starter carefully and spread out the coals.
This method is especially handy when you want to avoid lighter fluid and don’t want to fuss with paper or fire starters. Have you tried an electric starter before? It can save you time and mess, especially during busy grilling days.
Natural Fire Starters
Natural fire starters are an eco-friendly way to light your grill without chemicals. These include items like wood shavings, wax-coated sawdust cubes, or even homemade starters made from egg cartons and dryer lint. Place them under your charcoal and light as you would with newspaper.
They burn steadily and help ignite the charcoal evenly. If you’re concerned about taste or safety, natural starters are a great choice. Do you enjoy experimenting with DIY solutions? These starters add a bit of craft to your grilling routine.

Credit: ddrbbqsupply.com
Building The Fire
Start by arranging charcoal in a pile inside the grill. Use lighter fluid or a chimney starter to ignite the coals evenly. Wait until the charcoal turns gray with ash before cooking.
Building the Fire To master the art of grilling, understanding how to build your fire is crucial. A well-built fire ensures even cooking and enhances the flavor of your food. It can make the difference between a successful barbecue and a disappointing one.Stacking Charcoal For Airflow
A good fire starts with proper stacking. Arrange your charcoal in a pyramid shape. This not only maximizes airflow but also helps the coals ignite faster. Why is airflow important? It fuels the fire, ensuring that your charcoal burns evenly. Avoid packing the charcoal too tightly together, as it can suffocate the fire.Lighting The Fire Safely
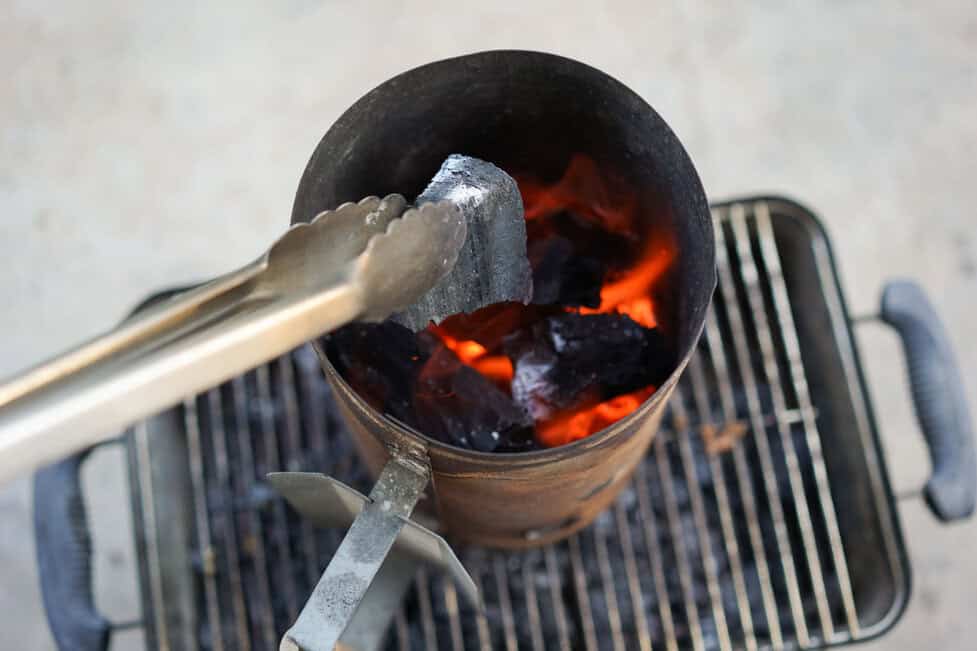
Safety should always be a priority. Use a chimney starter or lighter cubes to ignite the charcoal. This method reduces the need for lighter fluid, which can impart unwanted flavors to your food. Maintain a safe distance while lighting. Always have a fire extinguisher or a bucket of sand nearby. It’s better to be prepared for any unexpected flare-ups.Waiting For Coals To Ash Over
Patience is key at this stage. Wait until the charcoal turns gray and ashy before cooking. This usually takes about 15-20 minutes. Why wait for the ashy look? It indicates that the charcoal is at the right temperature for grilling. Jumping the gun can result in uneven cooking and burnt food. What’s your favorite method for building a fire? Each griller has their unique approach—share yours and maybe discover a new technique!Managing Heat Levels
Managing heat levels on a charcoal grill is essential for cooking food perfectly. Controlling the temperature lets you grill different types of food with ease. Proper heat management avoids burning or undercooking. It also helps use charcoal efficiently and keeps your grill ready for longer cooking sessions.
Adjusting Air Vents
Air vents control the flow of oxygen inside the grill. Open vents increase oxygen, making the fire burn hotter. Closing vents reduces oxygen, cooling the fire down. Adjust vents slowly to find the right temperature. Watch the smoke and flames to guide you. Small changes in vent position can change heat quickly.
Creating Hot And Cool Zones
Make areas with different heat levels on your grill. Pile more charcoal on one side for a hot zone. Leave the other side with fewer coals for a cool zone. Use the hot zone to sear meat fast. Move food to the cool zone to finish cooking without burning. This method gives more control over grilling.
Adding More Charcoal
Add charcoal to keep the fire strong during long cooking. Use pre-lit coals to avoid big temperature drops. Spread new charcoal evenly to keep heat balanced. Add charcoal little by little, not all at once. This keeps the temperature steady and prevents flare-ups. Always have extra charcoal nearby for quick heat boosts.
Safety Tips
Lighting a charcoal grill can be exciting, but safety should always come first. Knowing how to manage fire and tools properly helps you avoid accidents and enjoy your grilling experience without worry. Let’s dive into key safety tips that keep you and those around you safe while you cook.
Handling Fire Safely
Always light your charcoal in a well-ventilated outdoor space. Smoke and fumes can build up quickly if you grill indoors or in an enclosed area, posing serious health risks.
Keep a spray bottle of water nearby to control any small flare-ups. It’s surprising how quickly a small spark can turn into a bigger flame if not managed.
Never leave your grill unattended while the coals are burning. Fires can spread fast, and staying alert means you can react immediately if something goes wrong.
Proper Tools To Use
Use long-handled lighters or matches designed specifically for grilling. These keep your hands safely away from the flames and heat.
Invest in heat-resistant gloves to protect your hands when adjusting vents or moving hot coals. I once underestimated the heat and ended up with a painful burn that could have been avoided.
Always have a sturdy pair of tongs or a charcoal rake on hand. These tools let you move hot coals safely without risking burns or dropping embers outside the grill.
Avoiding Common Mistakes
Don’t use gasoline or other flammable liquids to ignite your charcoal. They can cause dangerous flare-ups and explosions.
Be cautious with lighter fluid; only use the amount recommended on the label and wait until it soaks in before lighting. Rushing this step often leads to uncontrollable flames.
Make sure your grill is on a stable, non-flammable surface. Placing it on dry grass or wooden decks without protection can easily lead to accidental fires.
Have you ever thought about what you’d do if a fire got out of control? Preparing a fire extinguisher or a bucket of sand nearby can save you a lot of stress and damage.
Maintaining Your Grill
Keeping your charcoal grill in top shape is just as important as lighting it properly. A well-maintained grill not only lasts longer but also gives you better-tasting food every time. You might be surprised how a little care after each cookout can make your next grilling session smoother and more enjoyable.
Cleaning After Use
Right after you finish grilling, let the coals burn out completely and the grill cool down. Use a stiff wire brush to scrape off leftover food and ash from the grates. This simple step prevents buildup that can affect heat distribution and flavor.
Empty the ash catcher or tray regularly to avoid rust and poor airflow. If you notice stubborn residue, try soaking the grates in warm soapy water before scrubbing again. Have you ever had flare-ups caused by old grease? Cleaning helps you avoid that problem.
Storing Charcoal Properly
Charcoal must stay dry to light easily and burn well. Store your charcoal in a sealed container or a cool, dry place away from moisture and humidity. If charcoal gets damp, it won’t catch fire efficiently and can produce unpleasant smoke.
Consider buying charcoal in smaller quantities if you don’t grill often. This way, you won’t risk having a big bag sitting unused and absorbing moisture. What’s your experience with stale charcoal ruining a grilling day?
Grill Maintenance Tips
Check your grill’s parts regularly—look for rust, loose screws, or damaged components. Wipe down the exterior with a mild detergent and water to keep it looking clean and prevent corrosion. Lubricate moving parts like hinges to keep them working smoothly.
Cover your grill with a weatherproof cover when it’s not in use. This protects it from rain, dust, and sun damage. Have you ever left your grill uncovered only to find it less reliable next season? Taking a few extra minutes to maintain your grill pays off in performance and lifespan.

Credit: food52.com
Frequently Asked Questions
How Long Does It Take To Light A Charcoal Grill?
Lighting a charcoal grill usually takes 10-20 minutes. Use a chimney starter for faster ignition. Wait until the coals are covered with gray ash before cooking.
What Is The Best Method To Light Charcoal Quickly?
Using a chimney starter is the best way to light charcoal quickly. It ensures even heat without lighter fluid. Simply fill it with charcoal, place newspaper underneath, and light it.
Can I Use Lighter Fluid Safely On A Charcoal Grill?
Yes, but use lighter fluid sparingly and safely. Apply it before lighting, never on hot coals. Avoid chemical tastes by allowing the fluid to burn off completely before cooking.
How Do I Know When Charcoal Is Ready For Grilling?
Charcoal is ready when covered with gray-white ash. This usually takes 15-20 minutes. At this point, the coals are hot and ideal for grilling.
Conclusion
Lighting a charcoal grill is easy with the right steps. Start with dry charcoal and good airflow. Use lighter fluid carefully or a chimney starter for safety. Let the coals turn gray before cooking. This helps your food cook evenly and taste great.
Practice makes perfect, so try these tips often. Enjoy your grilling time and tasty meals outdoors.
