
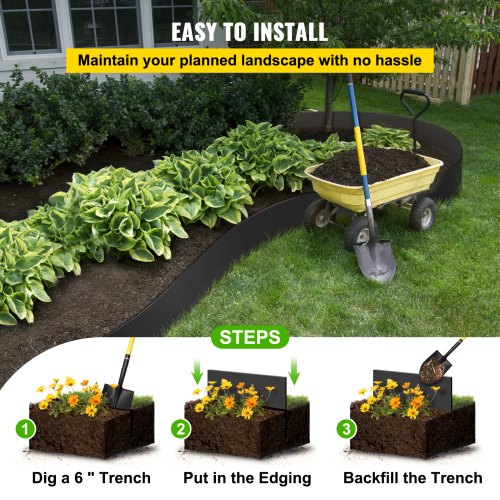
Are you ready to give your garden a clean, polished look without spending hours on complicated projects? Installing flexible garden edging is one of the easiest and most effective ways to define your flower beds, paths, or lawn borders.
With the right steps, you can create smooth curves and sharp lines that make your outdoor space stand out. In this guide, you’ll discover simple tips and tricks to install flexible garden edging quickly and confidently—no special tools or skills needed.
Keep reading, and you’ll soon have a garden that looks neat, professional, and just the way you want it.
Choosing Flexible Garden Edging
Choosing the right flexible garden edging is key to defining your garden’s style and function. The material you pick impacts durability, ease of installation, and the overall look of your garden borders. Taking time to evaluate your garden’s needs helps you avoid costly mistakes and ensures your edging lasts for years.
Types Of Flexible Edging Materials
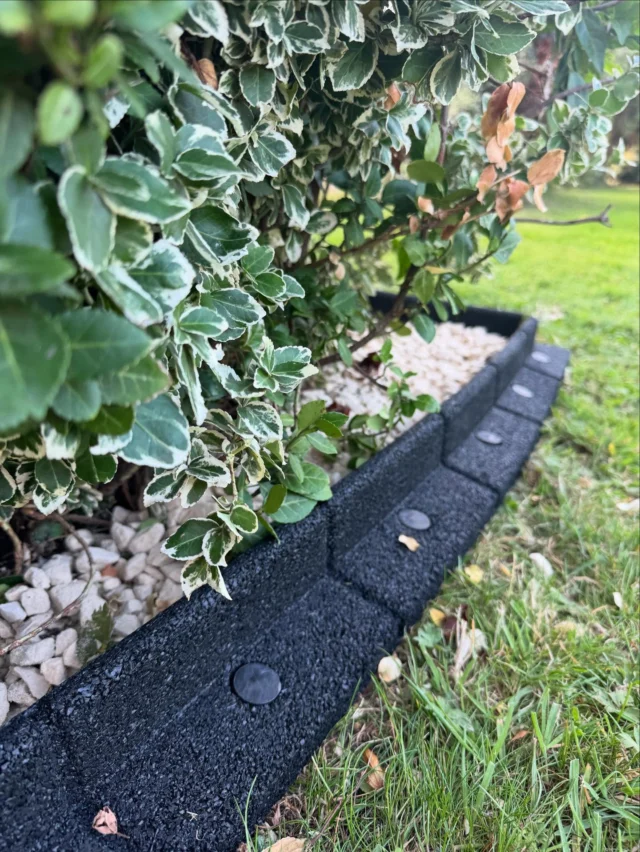
Flexible garden edging comes in various materials, each with unique benefits. Plastic edging is lightweight, affordable, and easy to shape around curves. Rubber edging, often made from recycled tires, offers durability and a soft touch, making it safe for kids and pets.
Metal edging, such as aluminum or steel, provides a sleek, modern look and can withstand harsh weather. Wood-based options, like composite or treated timber strips, blend naturally with garden elements but may require more maintenance. Think about the climate where you live and how much wear your garden gets before choosing a material.
Measuring Your Garden Borders
Accurate measurement is crucial for a smooth installation. Walk the perimeter of your garden beds with a measuring tape and note down the lengths of all straight and curved sections. Remember to include extra length for overlaps or adjustments.
Sketch a simple map of your garden borders and mark measurements on it. This visual guide helps when purchasing edging material and planning the layout. Have you ever started a garden project only to find you ran out of materials halfway? Measuring prevents that frustration.
Tools Needed For Installation
You don’t need many tools to install flexible garden edging, but having the right ones makes the job easier. A garden spade or edging tool helps create a neat trench for the edging to sit in. A mallet or rubber hammer allows you to gently tap the edging into place without damaging it.
Other handy tools include a tape measure, garden gloves, and stakes to hold the edging steady during installation. If your edging requires cutting, sharp garden shears or a utility knife will do the job. Gathering these tools before you start saves time and keeps your project flowing smoothly.
:max_bytes(150000):strip_icc()/spr-easy-flex-no-dig-adirondak-landscape-edging-jena-wilson-06-during-a26e223e1e674715855806d858592d8c.jpeg)
Credit: www.thespruce.com
Preparing The Garden Area
Preparing the garden area is the first important part of installing flexible garden edging. It makes sure the edging fits well and looks neat. Proper preparation helps the edging stay strong and last longer. Take time to ready the space before placing the edging.
Clearing The Border Space
Remove all plants, weeds, and debris along the edge. Clear a path wide enough for the edging material. Use a garden fork or hand trowel to dig out roots. A clean space helps the edging sit firmly in the ground. It also prevents plants from pushing the edging out later.
Marking The Edging Line
Mark the exact line where the edging will go. Use a garden hose or string to lay out a smooth curve or straight line. Check the shape from different angles to make sure it looks good. Mark the line with spray paint or small flags. This guide keeps the edging even and tidy.
Leveling The Ground
Use a shovel to remove bumps and fill holes along the marked line. The ground should be flat and even. Press the soil down with your foot or a tamper to firm it up. A level base stops the edging from wobbling or leaning. Smooth soil helps the edging fit tightly and hold its shape.
Installing The Edging
Begin by digging a shallow trench along your garden edge. Press the flexible edging into the trench, shaping it as needed. Secure it with stakes to keep the border neat and tidy.
Installing flexible garden edging can enhance your garden’s look. It defines borders and keeps plants neat. This guide will help you install edging with ease.Cutting The Edging To Size
Measure the garden area where you’ll place the edging. Use a tape measure for accuracy. Mark the measurements on the edging material. Use a sharp utility knife or garden shears to cut. Ensure straight cuts for a neat finish. Double-check your measurements before cutting.Shaping The Edging Around Curves
Plan the path for curves in your garden. Lay the edging along the desired path. Bend the edging carefully to fit the curves. Secure curves gently to prevent kinks. Use stakes if needed to hold curves in place. Adjust until the edging follows the curve smoothly.Securing The Edging In Place
Position the edging in the trench you prepared. Press down firmly to set the edging. Use garden stakes to secure it in place. Place stakes every few feet for stability. Hammer stakes gently to avoid damaging the edging. Check to ensure the edging is level with the ground. Fill in gaps with soil to complete the setup.Finishing Touches
The finishing touches complete the look of your flexible garden edging. These final steps secure the edging in place and enhance your garden’s overall appearance. Proper finishing keeps the edges neat and long-lasting. Follow these tips to ensure a polished and durable garden border.
Backfilling And Compacting Soil
After placing the edging, backfill the trench with soil. Fill the space between the edging and surrounding ground evenly. Use your hands or a small tool to press the soil firmly. Compacting prevents the edging from shifting over time. Ensure the soil is level with the garden bed and lawn.
Adding Mulch Or Decorative Stones
Add mulch or decorative stones next to the edging. Mulch helps retain moisture and controls weeds. Stones provide a clean, polished look and improve drainage. Spread a 2-3 inch layer evenly for best results. Choose materials that match your garden style and colors.
Maintaining Your Garden Edging
Check your garden edging regularly for any movement or damage. Remove weeds growing near the edging to keep it tidy. Refill soil or mulch as needed to maintain a neat border. Clean the edging surface occasionally to prevent dirt buildup. Proper care will keep your garden edges sharp and attractive.
Troubleshooting Common Issues
Troubleshooting common issues with flexible garden edging can save you time and keep your garden looking neat. These problems often arise from natural wear, soil shifts, or improper installation. Addressing them early helps maintain the clean lines and structure you want in your garden.
Fixing Loose Edging
Loose edging is a frequent problem, especially after heavy rain or foot traffic. Check if the stakes holding the edging are still firmly in the ground.
If you find any loose stakes, push them deeper or replace them with longer ones for better grip. You can also add more stakes at closer intervals to keep the edging stable.
Have you noticed some sections pulling away from the garden bed? Use a rubber mallet to gently tap the edging back into place without damaging it.
Dealing With Soil Erosion
Soil erosion near your edging can cause gaps and uneven surfaces. To fix this, add fresh soil or mulch behind the edging to fill any low spots.
Make sure the soil is compacted well but avoid over-packing, which can push the edging out. Installing a drip line or soaker hose can reduce water runoff that causes erosion.
Think about planting ground cover or low-growing plants near the edging to hold the soil better. Wouldn’t it be great to combine function and beauty in your garden?
Replacing Damaged Sections
Flexible edging can crack or break over time, especially in extreme weather. Identify the damaged sections and remove them carefully without disturbing the surrounding area.
Measure the length needed and cut a new piece of edging to fit. Attach it securely using connectors or stakes designed for your edging type.
Keep some extra edging material on hand before starting your project. It saved me hours once when unexpected breaks happened during installation.
:max_bytes(150000):strip_icc()/spr-easyflex-no-dig-landscape-edging-kit-laura-hard-04-b601fc0708bc4522930427eca7d4168c.jpeg)
Credit: www.thespruce.com
Credit: www.vevor.com
Frequently Asked Questions
What Tools Are Needed To Install Flexible Garden Edging?
You need a spade, hammer, measuring tape, garden gloves, and edging stakes. These tools help create a precise, secure installation. Using the right tools ensures the edging stays in place and looks neat. Preparation is key for a successful garden edging project.
How Do I Prepare The Ground For Garden Edging?
Start by clearing grass and weeds along the desired edging line. Dig a shallow trench about 3-4 inches deep to fit the edging. This creates a stable base and prevents shifting. Proper ground prep ensures long-lasting, clean garden borders.
Can Flexible Garden Edging Be Curved Or Shaped?
Yes, flexible garden edging bends easily to form curves or straight lines. This adaptability suits various garden designs and layouts. Its flexibility allows creative, custom borders without damaging the material. It’s ideal for flower beds and pathways.
How Do I Secure Flexible Garden Edging Firmly?
Use metal or plastic stakes every 12-18 inches along the edging. Hammer the stakes through the edging into the ground for a tight hold. Proper securing prevents movement from weather or foot traffic. Firm installation maintains garden neatness over time.
Conclusion
Installing flexible garden edging keeps your garden neat and tidy. It helps separate grass from flower beds easily. The process is simple and requires few tools. You can bend the edging to fit any shape you want. This makes your garden look clean and organized.
Regular maintenance keeps the edging strong and long-lasting. Enjoy the beauty and order it brings to your outdoor space. Give your garden a fresh, polished look with flexible edging today.
