
Are you struggling to know if your digital temperature controller is working correctly? Checking your device doesn’t have to be complicated or confusing.
Whether you use it for home, work, or a special project, understanding how to test and read your controller can save you time and avoid costly mistakes. In this guide, you’ll learn simple, clear steps to check your digital temperature controller quickly and confidently.
Keep reading, and you’ll soon feel in control of your device like never before.
Choosing The Right Tools
Choosing the right tools is crucial when you want to check your digital temperature controller accurately. Using improper equipment can lead to false readings and confusion. Before you start testing, make sure you have reliable and precise tools at hand to get the job done effectively.
Essential Equipment For Testing
To test a digital temperature controller, you need a few basic tools that allow you to measure temperature and electrical signals properly. A stable power supply is important to keep the controller running during tests. Additionally, tools like insulated screwdrivers and wire strippers help you safely connect and adjust components.
Don’t overlook the importance of a clean workspace and good lighting. These simple conditions prevent mistakes and make it easier to spot any issues. Have a notebook or digital device ready to record your findings for comparison and troubleshooting later.
Calibrated Thermometers And Multimeters
Accurate temperature measurement is key to checking if your controller responds correctly. Using a calibrated thermometer ensures your temperature readings are trustworthy. Calibration certificates or recent calibration dates give you confidence that the thermometer hasn’t drifted from the standard.
Multimeters also play a vital role. They help you measure voltage, current, and resistance in your controller’s circuitry. Make sure your multimeter is digital and properly calibrated to avoid misleading results.
Think about how often you check your tools’ calibration. If you rely on inaccurate instruments, how can you trust your controller’s performance? Regular calibration keeps your testing precise and your results meaningful.

Credit: manuals.plus
Preparing The Controller
Preparing the digital temperature controller is key before checking its functions. This step ensures accurate readings and protects the device. Proper preparation helps avoid errors and extends the controller’s life.
Powering Up Safely
Start by connecting the controller to a suitable power source. Use the recommended voltage to prevent damage. Avoid turning on the device near water or damp areas.
Check all wiring connections before powering up. Loose wires can cause short circuits or faulty readings. Use insulated tools to handle electrical parts safely.
Setting Initial Parameters
Set basic parameters to match your application needs. Input the desired temperature range and sensor type first. Confirm that the controller’s display matches the set values.
Adjust alarm limits to notify you of temperature changes. Use simple steps in the menu to avoid mistakes. Save all settings before moving on to testing.
Performing Basic Function Tests
Performing basic function tests on your digital temperature controller is essential to ensure it operates reliably and accurately. These tests help you spot any issues early, saving you from potential equipment damage or process errors. Simple checks like verifying the display and sensor connections can give you confidence that your controller is ready to manage temperature precisely.
Checking Display Accuracy
Start by comparing the temperature shown on the controller’s display with a trusted thermometer. Place both sensors in the same environment and wait a few minutes for the readings to stabilize.
If the readings differ by more than a degree or two, your controller’s display might need recalibration or there could be a sensor issue. Have you noticed unexpected temperature jumps on your display? This often indicates a loose connection or interference that needs fixing before relying on the readings.
Verifying Sensor Connections
Inspect the wiring from the sensor to the controller carefully. Make sure all connectors are firmly plugged in and that no wires are damaged or corroded.
Loose or faulty sensor connections can cause erratic temperature readings or prevent the controller from functioning at all. Have you checked if the sensor cable is properly shielded from electrical noise? Even small electrical disturbances can affect the accuracy of your controller.
Performing these basic tests regularly ensures your digital temperature controller works as it should, giving you peace of mind and better control over your processes.

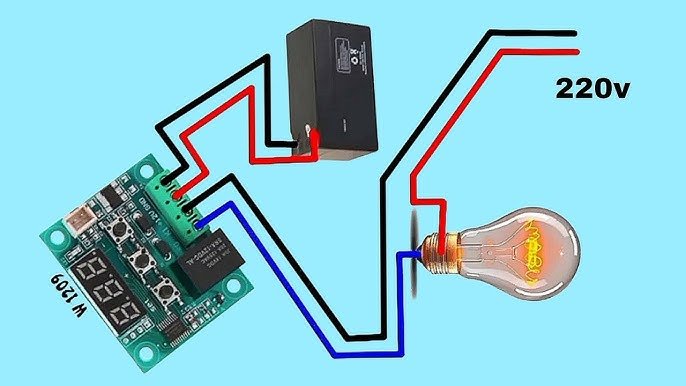
Credit: www.ebay.com
Calibrating The Temperature Sensor
Calibrating the temperature sensor ensures accurate readings on a digital temperature controller. Use a reliable reference thermometer to compare and adjust the sensor’s output for precise control. This process helps maintain consistent temperature settings.
Calibrating a temperature sensor in your digital temperature controller is a crucial step to ensure accurate readings and optimal performance. If you’ve ever wondered why your device might not be reflecting the temperature you expect, calibration could be the answer. It’s a task that requires precision but can be easily managed with the right approach. Let’s walk through the process to enhance your understanding and skills.Using Reference Temperatures
To begin with, you’ll want to have a reliable reference temperature. This could be a high-quality thermometer or a known substance with a stable temperature point, like ice water. Using a reference allows you to compare and adjust the sensor’s reading accurately. Place your temperature sensor in the reference environment. Does the reading match your reference? If not, it’s time to recalibrate. This process ensures that your sensor is providing accurate data, which is essential for applications where precision is key.Adjusting Calibration Settings
Once you’ve identified any discrepancies, you can adjust the calibration settings on your digital temperature controller. Check the device’s manual to locate the calibration settings, often accessible through the menu. Carefully adjust the settings to align the sensor’s reading with your reference temperature. This might require small tweaks, so patience is essential. Are you worried about making mistakes? Don’t be—most controllers allow you to reset to factory settings if needed. Calibration isn’t just a one-time task. Regular checks are important, especially in environments where temperature accuracy is critical. Think about the implications of inaccurate readings in your specific context. Could it affect product quality or energy efficiency? Taking these steps seriously can make a significant difference.Testing Response And Stability
Testing the response and stability of your digital temperature controller is key to ensuring it performs accurately over time. This process helps you catch delays or fluctuations that could affect your system’s efficiency. Let’s focus on how you can monitor temperature changes and confirm consistent readings effectively.
Monitoring Temperature Changes
Start by applying a known temperature change near the sensor, such as placing it in ice water and then moving it to warm water. Watch how quickly the controller’s display adjusts to the new temperature. A slow or lagging response could indicate sensor issues or controller calibration problems.
Try to note the time it takes for the reading to stabilize after each change. Rapid shifts followed by steady readings suggest good sensor responsiveness. If the numbers jump erratically or take too long to settle, you may need to recalibrate or replace components.
Ensuring Consistent Readings
To verify stability, keep the controller in a stable environment and observe the temperature display over a longer period. The reading should remain steady without random spikes or drops. Minor fluctuations are normal, but large swings can signal electrical noise or sensor faults.
Check multiple times across different temperature ranges to confirm consistent performance. If you notice persistent inconsistency, inspect wiring connections and sensor placement. Sometimes, even small adjustments in sensor position can improve reliability significantly.
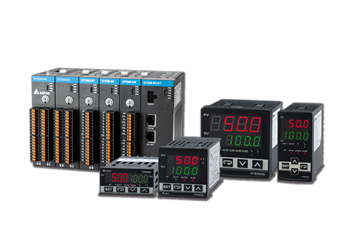
Credit: www.deltaww.com
Troubleshooting Common Issues
Troubleshooting your digital temperature controller doesn’t have to be a headache. Many common issues are easy to spot and fix once you know what to look for. Understanding typical problems can save you time and keep your system running smoothly.
Identifying Faulty Sensors
Is your temperature reading off or fluctuating wildly? Faulty sensors are often the culprit. Start by visually inspecting the sensor for any damage or corrosion.
Next, check the wiring connections. Loose or broken wires can cause inaccurate readings or no signal at all.
If the sensor looks fine, test it with a multimeter to verify its resistance matches the expected range. Sensors that fail this test should be replaced immediately.
Resetting The Controller
Sometimes, your controller might freeze or behave unpredictably. Resetting it can clear minor glitches.
Locate the reset button or power cycle the unit by unplugging it for about 30 seconds. This simple action often restores normal operation.
However, if issues persist after resetting, double-check your settings and sensor connections. Are you sure the controller’s configuration matches your system’s requirements?
Maintaining Accuracy Over Time
Maintaining the accuracy of a digital temperature controller is essential for reliable performance. Over time, small errors can build up and affect readings. Regular care helps keep the device precise and extends its life.
Simple steps can prevent drift and ensure consistent temperature control. Pay attention to calibration and cleanliness. Both play a key role in maintaining accuracy.
Regular Calibration Schedule
Calibration compares the controller’s readings to a known standard. It corrects any differences and keeps measurements accurate.
- Set a fixed schedule for calibration, such as every 3 to 6 months.
- Use a trusted reference thermometer or calibration device.
- Record calibration results to track changes over time.
- Adjust the controller settings as needed after each calibration.
- Follow the manufacturer’s calibration guidelines closely.
Regular calibration prevents large errors and maintains system reliability.
Cleaning And Inspection Tips
Dust, dirt, and moisture can affect sensor performance and display clarity. Regular cleaning ensures the controller works well.
- Turn off power before cleaning the device.
- Use a soft, dry cloth to wipe the surface and display.
- Check sensor probes for dirt or corrosion and clean gently.
- Inspect wiring and connections for damage or looseness.
- Keep the device in a dry, dust-free environment if possible.
Routine inspection helps spot issues early and keeps accuracy high.
Frequently Asked Questions
How Do I Check A Digital Temperature Controller?
To check a digital temperature controller, first power it on and connect the sensor. Verify the display shows the current temperature. Test the setpoint by adjusting it and observing if the controller responds correctly to temperature changes.
What Tools Are Needed To Test A Temperature Controller?
You need a multimeter, a temperature sensor or probe, and a power source. These tools help verify the controller’s accuracy, sensor function, and electrical connections safely and effectively.
How To Calibrate A Digital Temperature Controller?
Calibration involves comparing the controller’s reading with a known accurate thermometer. Adjust the controller settings if there’s a difference. Follow the manufacturer’s instructions for precise calibration steps and ensure accurate temperature control.
Can I Test A Temperature Controller Without A Sensor?
No, the sensor is essential as it provides temperature data to the controller. Without it, the controller cannot measure or regulate temperature accurately.
Conclusion
Checking a digital temperature controller is simple and important. Start by reading the user guide carefully. Always look for clear display readings and stable settings. Test the controller with a known temperature source. Make sure the device responds quickly and accurately.
Regular checks help avoid problems later. Keep your controller clean and well-maintained. This saves time and prevents errors. Following these steps ensures your temperature stays just right. Easy, quick, and effective.
