
Are you ready to enjoy delicious grilled meals anywhere, anytime? Knowing how to assemble your folding grill quickly and easily can make all the difference.
Whether you’re heading out for a camping trip, a beach day, or a backyard barbecue, having your grill set up in minutes means more time for fun and less time struggling with complicated parts. In this guide, you’ll discover simple, step-by-step instructions that anyone can follow.
Keep reading, and you’ll be firing up your folding grill like a pro in no time!

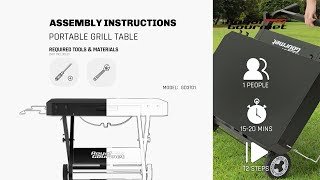
Credit: www.amazon.com
Tools Needed
Before you start assembling your folding grill, gathering the right tools is essential. Having everything at hand saves time and spares you frustration. It also ensures a smoother assembly process, letting you focus on what matters—getting your grill ready for the next cookout.
Basic Hand Tools
Most folding grills require common hand tools. A screwdriver set with both flathead and Phillips heads often covers all screws you’ll encounter. You’ll also want a pair of pliers for gripping and bending small parts.
Don’t underestimate the power of a good wrench or adjustable spanner. These come in handy for tightening bolts securely without damaging the metal. If you’re like me, having these tools ready made the assembly feel less like a chore and more like a quick fix.
Measuring And Alignment Tools
Getting the grill parts aligned perfectly can be tricky without the right tools. A tape measure helps ensure everything fits just right. You might also want a small level to keep the grill base even on any surface.
Have you ever started assembling something only to find it wobbly? A level saves you from that headache. It’s a small investment that pays off with a stable, safe grill.
Additional Helpful Items
Sometimes you’ll need extra items like a rubber mallet to gently tap parts into place without scratching them. Gloves protect your hands from sharp edges and hot surfaces later on. And don’t forget a clean cloth for wiping down parts before assembly.
These extras might seem minor but think of them as your safety net. They make the process smoother and protect you and your new grill during setup.
Credit: collegeofems.com
Unboxing And Parts Check
Opening your folding grill box for the first time is an exciting moment. But before you rush into assembling, taking a careful look at every part matters. This initial check helps avoid frustration later and ensures your grill works perfectly.
Inspect The Packaging For Damage
Start by examining the box for any dents, tears, or wet spots. Damage to the packaging can hint at potential issues inside. If you notice anything unusual, document it with photos before opening.
Lay Out All Components Clearly
Once the box is open, spread all parts on a clean surface. Seeing everything side by side helps you understand how pieces fit together. It also makes missing parts more obvious.
Identify Each Part Using The Manual
Grab the instruction manual and compare each piece with the parts list. Make sure you have essentials like the grill grate, legs, handles, and screws. Missing even a small bolt can delay your setup.
Check For Quality And Defects
Look closely at each item for scratches, bends, or rust. Folding grills often fold and unfold, so smooth hinges and solid joints are crucial. If any part feels flimsy or damaged, contact the seller before proceeding.
Organize Tools And Accessories
Sometimes, the grill kit includes tools or extra accessories like a cleaning brush or carrying case. Keep these handy—they’ll come in useful during assembly and future grilling sessions. Are you ready to start building with confidence?
Setting Up The Frame
Setting up the frame of your folding grill is the foundation for a safe and enjoyable grilling experience. A sturdy frame ensures stability while cooking, so it’s important to pay close attention during this stage. Let’s break down the process into manageable parts to help you get your grill ready quickly and securely.
Unfolding The Base
Start by placing the grill on a flat surface. This prevents wobbling and makes unfolding easier.
Gently pull the base apart, allowing it to open fully until you hear a click or feel it lock into place. This click means the frame is stable enough to support the grill top and cooking tools.
If you struggle with stiffness, avoid forcing it. Instead, try applying light pressure evenly across both sides. Have you noticed some models have smoother mechanisms? Choosing the right one can save you effort every time you set up.
Securing The Legs
Once the base is unfolded, focus on the legs. Most folding grills have legs that either snap or screw into place.
Make sure each leg is firmly locked. Give them a gentle shake to check for any movement. Loose legs might cause accidents or uneven cooking surfaces.
Some grills offer adjustable legs—great if you’re cooking on uneven ground. Have you tried adjusting leg height outdoors? It can make a big difference in comfort and grill stability.
Attaching The Grill Surface
Attaching the grill surface involves aligning it with the frame and securing it with screws. Ensure the surface is stable and locked in place before use. This step is crucial for safe and efficient grilling.
Attaching the grill surface is a crucial step in assembling your folding grill. This ensures even cooking and stability during grilling. Follow these simple steps to secure the grill surface effectively.Positioning The Grates
First, identify the front and back of the grill. Align the grates with the grill’s edges. Ensure they sit evenly across the frame. This prevents uneven cooking and keeps food from falling through. Place the grates gently on the support bars. Check that they cover the entire grilling area. A well-positioned grate ensures optimal heat distribution.Locking Mechanisms
Find the locking clips on the sides of the grill. These clips secure the grates in place. Slide the clips over the grate edges. Ensure the clips are tightly fastened. This prevents the grates from shifting during use. Test the stability by lightly pressing on the grates. If the grates move, adjust the clips again. Properly locked grates provide a safe grilling experience. Always double-check before lighting the grill.Connecting Fuel Components
Connecting fuel components is a key part of assembling a folding grill. Proper connection ensures safe and efficient cooking. This step involves setting up the charcoal tray or attaching gas lines, depending on the grill type. Careful handling and correct installation prevent leaks and hazards.
Installing Charcoal Tray
Start by placing the charcoal tray inside the grill body. Make sure it fits snugly and sits flat. The tray holds charcoal for heat generation. Check for any sharp edges that may damage the tray or charcoal. Use gloves to protect your hands during installation. Secure the tray with any clips or screws provided. This keeps the tray stable during cooking.
Attaching Gas Lines (if Applicable)
Locate the gas connection points on the grill and fuel source. Connect the gas hose firmly to both ends. Use a wrench to tighten connections, but avoid over-tightening. Check the hose for cracks or damage before attaching. Apply soapy water to connections and watch for bubbles to detect leaks. Always perform a leak test before lighting the grill. Follow the manufacturer’s guidelines for safe gas line installation.
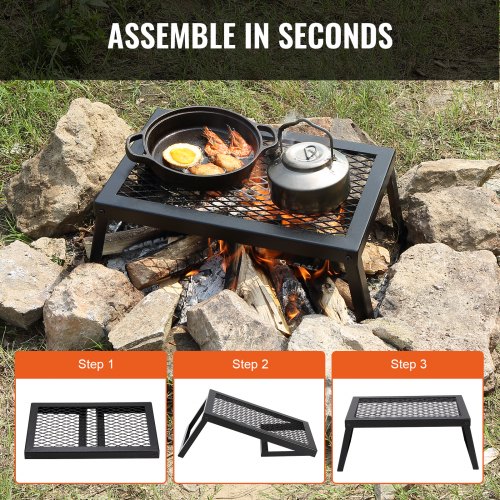
Credit: www.vevor.com
Final Adjustments
Final adjustments ensure your folding grill works safely and efficiently. This stage focuses on making small changes that improve grilling performance. Proper setup prevents accidents and guarantees even cooking. Take time to check key areas before use.
Leveling The Grill
Place the grill on a flat surface. Uneven ground can cause instability and uneven cooking. Adjust the legs or base until the grill sits perfectly level. Use a small spirit level or a simple eye check to confirm. A balanced grill keeps food from sliding and heat distribution steady.
Checking Stability
Test the grill’s steadiness by gently shaking it. The grill should not wobble or tip easily. Tighten all screws and hinges if needed. Make sure all locking mechanisms are secure. A stable grill reduces risks and helps maintain consistent heat during cooking.
Safety Tips
Safety should be your top priority when assembling a folding grill. Handling metal parts and working near heat sources can lead to accidents if you’re not careful. Taking a few simple precautions can keep your grill setup smooth and injury-free.
Wear Protective Gear
Always wear gloves to protect your hands from sharp edges and hot surfaces. Eye protection is also important in case small parts spring loose during assembly. I learned this the hard way when a tiny spring flew into my eye—so don’t skip the goggles.
Choose A Stable Surface
Set up your grill on a flat, stable surface to prevent it from tipping over during assembly. Avoid uneven ground or slippery floors that can cause falls. A steady base makes handling heavy parts safer and easier.
Check For Damaged Parts
Inspect all components before you start. Bent or broken pieces can cause the grill to collapse or malfunction. I once ignored a slightly warped leg, which led to a dangerous wobble when the grill was in use.
Keep Children And Pets Away
Grill assembly often involves sharp tools and heavy parts. Keep kids and pets at a safe distance to avoid distractions and accidents. Have you ever been interrupted mid-assembly? It’s a recipe for mistakes.
Follow Manufacturer Instructions Carefully
Don’t guess or rush through the assembly steps. Manufacturer guides are designed to keep you safe and ensure the grill works properly. Skipping a step might seem quicker but can lead to unstable setups or injuries.
Secure All Locks And Hinges
Double-check that all locks and hinges are firmly in place before lighting the grill. Loose parts can cause the grill to fold unexpectedly. Think about how a sudden collapse could ruin your cookout or cause burns.
Maintain Clear Workspace
Keep your area organized and free of clutter. This reduces the chance of tripping or losing small parts. Have you ever dropped a tiny screw and spent ages searching? It’s frustrating and wastes valuable time.
Maintenance And Storage
Keeping your folding grill in top shape requires regular maintenance and smart storage. These simple habits will extend its life and keep it ready for your next cookout. Neglecting this care can lead to rust, sticking, and even damage to the grill’s folding mechanism.
Cleaning After Each Use
Cleaning your grill right after cooking makes a huge difference. Hot grills are easier to scrape off with a wire brush, removing stuck-on food before it hardens.
Use warm soapy water and a sponge to wipe down all surfaces once the grill cools. Avoid harsh chemicals that can damage the metal or paint.
- Remove grease and food particles thoroughly
- Dry the grill completely to prevent rust
- Check for any loose screws or parts while cleaning
Protecting The Grill From Rust
Moisture is the enemy of metal grills, especially folding ones with joints and hinges. After cleaning, apply a light coat of cooking oil on the grill grates to create a protective barrier.
Store the grill in a dry place or use a waterproof cover if it stays outdoors. Have you noticed rust spots starting to form? Address them immediately with a rust remover or fine steel wool.
Proper Folding And Storage Techniques
Folding your grill carefully protects its parts and maintains smooth operation. Make sure the grill is completely cool and clean before folding it.
Store the grill in an upright position if possible to avoid pressure on the hinges. Use a sturdy storage bag or box to keep dust and moisture away during off-season.
- Keep all accessories together to avoid losing them
- Check the folding joints regularly for any stiffness
- Consider adding silica gel packs to absorb moisture inside the storage bag
Frequently Asked Questions
How Long Does It Take To Assemble A Folding Grill?
Assembling a folding grill typically takes 15 to 30 minutes. Time varies by model and your experience. Clear instructions help speed up the process. Ensure all parts are present before starting for efficiency.
What Tools Are Needed To Assemble A Folding Grill?
Most folding grills require basic tools like screwdrivers or wrenches. Some models come with necessary tools included. Check the manual before starting. Using the right tools ensures a secure and safe assembly.
Can I Assemble A Folding Grill Alone?
Yes, you can assemble a folding grill alone. However, having a helper may speed up the process. Follow instructions carefully and work on a flat surface. Patience and attention to detail are key for success.
How Do I Maintain My Folding Grill After Assembly?
Clean your folding grill after every use to prevent buildup. Store it in a dry place to avoid rust. Check screws and joints regularly and tighten if needed. Proper maintenance extends the grill’s lifespan and performance.
Conclusion
Assembling a folding grill is simple and quick with clear steps. Follow the instructions carefully and take your time. Check that all parts fit well before use. Keep the grill clean and dry after each use. This helps it last longer and work better.
Enjoy cooking outdoors with your easy-to-use folding grill. Practice makes perfect—soon, assembly will feel natural. Happy grilling!
