
Is your deck box lock stuck, broken, or just not working like it used to? You’re not alone, and fixing it doesn’t have to be a headache.
Replacing your deck box lock can be quick, simple, and save you from worrying about keeping your outdoor items safe. In this guide, you’ll find easy steps that anyone can follow, even if you’ve never done it before. Keep reading, and you’ll have your deck box secure again in no time.
Credit: www.homedepot.com
Tools And Materials Needed
Before you start replacing your deck box lock, gather the right tools and materials. Having everything ready saves time and prevents frustration. Plus, it makes the job smoother and safer.
Basic Tools You’ll Need
- Screwdriver:Most deck box locks use screws. A Phillips or flat-head screwdriver will do the job.
- Drill:Sometimes screws are stuck or hard to remove. A drill with the right bit helps loosen them quickly.
- Pliers:Handy for gripping and twisting, especially if the lock parts are tight or rusty.
- Measuring Tape:To measure the lock size and ensure your replacement fits perfectly.
Materials To Replace The Lock
- Replacement Lock:Choose a lock designed for deck boxes or outdoor use. It should be weather-resistant and sturdy.
- Screws or Bolts:Sometimes the old screws wear out or don’t fit the new lock. Keep some extra screws handy.
- Lubricant Spray:WD-40 or a similar product helps loosen old screws and keeps the lock mechanism smooth.
- Protective Gloves:Protect your hands from sharp edges and rough surfaces during the work.
Optional But Helpful Supplies
- Masking Tape:Use it to mark screw positions before removing the old lock. It keeps things aligned when installing the new one.
- Cleaning Cloth:Clean the area around the lock before fitting the new one. Dirt and debris can affect how well the lock fits and works.
- Small Container:Keep screws and small parts organized so nothing gets lost.
Do you have all these tools ready? If not, it might be worth a quick trip to the hardware store. Preparing your workspace and tools upfront always makes the replacement faster and less stressful.

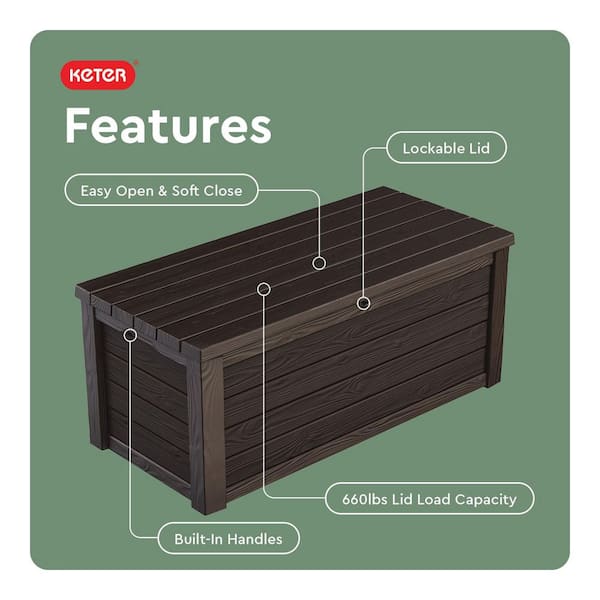
Credit: www.amazon.ca
Removing The Old Lock
Removing the old lock from your deck box is the first important step before installing a new one. It may seem straightforward, but understanding exactly what you’re dealing with can save you time and frustration. Let’s break down the process to make it easier for you to handle.
Locating The Lock Components
Start by opening the deck box and examining the lock area closely. Most deck box locks consist of a latch on the outside, a locking mechanism inside, and screws that hold everything in place.
Look for these parts:
- The exterior lock cylinder or latch
- The interior locking mechanism
- Screws or bolts attaching the lock to the box
Sometimes, the lock components are hidden behind a panel or cover, so check carefully for any removable pieces. Have you noticed if your lock has any extra protective covers or weather seals? Removing those first can make the process smoother.
Unscrewing And Detaching The Lock
Once you’ve identified the screws or bolts, grab the appropriate screwdriver or wrench. It’s common to find Phillips head screws, but some locks might use hex bolts or even security screws.
Keep the screws in a safe place; you might need them later or as a reference for the new lock. Loosen all screws completely before trying to pull the lock apart to avoid damaging the deck box.
If the lock feels stuck after unscrewing, gently wiggle or use a flat tool to pry it loose. Be careful not to scratch or damage the surface. Have you ever come across a lock that seemed glued or rusted? A little WD-40 or lubricant can help free stubborn parts.
Choosing The Right Replacement Lock
Choosing the right replacement lock for your deck box is important. The right lock keeps your belongings safe and fits perfectly. Not all locks work with every deck box. Knowing the types and how to measure helps you find the best match. This guide will help you pick a lock that fits well and works smoothly.
Types Of Deck Box Locks
Deck box locks come in different styles. Each style offers different levels of security and ease of use. Here are common types:
- Padlock:Simple and easy to use. Works with a latch or hasp.
- Cam Lock:Fits directly into a hole on the box. Turns to lock.
- Keyed Lock:Requires a key to open. Offers moderate security.
- Combination Lock:Uses a number code instead of a key.
Choose a type based on your security needs and deck box design.
Measuring For Compatibility
Measure your deck box before buying a new lock. Accurate size ensures easy installation and proper fit.
Here are key measurements to take:
- Width and height of the existing lock or hole
- Thickness of the deck box lid or wall where the lock fits
- Distance between mounting holes, if applicable
- Clearance needed for the lock to open fully
Use a ruler or tape measure for precise numbers. Compare these to the replacement lock’s specifications. This prevents buying a lock that does not fit or work well.
Installing The New Lock
Begin by removing the old lock carefully to avoid damage. Align the new lock properly and secure it with screws for a tight fit. Test the lock to ensure it works smoothly before closing the deck box.
Installing a new lock on your deck box ensures security and peace of mind. It’s a straightforward task that can be accomplished with basic tools. Follow these steps to install the new lock effectively.Aligning The Lock Components
Start by gathering all lock components. Place the lock cylinder into the designated hole on your deck box. Ensure the cylinder is flush with the surface. This alignment is crucial for smooth operation. Check if the locking mechanism fits properly. Adjust it if necessary to avoid any future issues. Ensure all components are aligned before securing them.Securing The Lock In Place
Once aligned, secure the lock with screws. Use a screwdriver to tighten each screw firmly. Make sure the lock does not wobble or shift. Test the lock by turning the key. It should move smoothly without resistance. If it feels stiff, adjust the screws slightly. Check that the lock operates correctly. This ensures long-term security for your deck box.Testing The New Lock
Testing the new lock is a key step after installation. It ensures the lock works smoothly and secures your deck box properly. Proper testing avoids future problems and saves time. Take a few moments to check every function of the lock carefully.
Checking Lock Functionality
Start by inserting the key into the lock. Turn the key gently to see if the lock opens easily. Listen for a clear click sound when it unlocks. Try locking it again to confirm the mechanism works both ways.
Next, test the lock handle or latch. It should move without resistance. Check that the deck box lid stays firmly closed when locked. Open and close the lock multiple times to confirm consistent performance.
Troubleshooting Common Issues
If the lock feels stiff or hard to turn, do not force it. Check for any debris blocking the keyhole or latch. Clean out dirt or dust with a soft brush or compressed air.
Make sure the lock aligns well with the strike plate on the box. Misalignment can cause jamming or failure to lock. Adjust the lock or strike plate position if needed.
For key problems, verify you are using the correct key. Duplicate keys may not always work perfectly. If the key is bent or worn, replace it for smooth operation.

Credit: www.familyhandyman.com
Maintenance Tips For Long-lasting Security
Maintaining your deck box lock ensures lasting security and smooth operation. Simple care steps keep the lock working well and prevent damage. Regular attention reduces the chance of needing a full replacement soon.
Regular Cleaning
Clean the lock area often to remove dirt and debris. Use a soft cloth and mild soap with water. Avoid harsh chemicals that can damage the lock’s finish. Dry the lock completely to stop rust and corrosion from forming. Remove any leaves or dust around the lock to keep it clear.
Lubricating Lock Mechanism
Apply a small amount of lubricant to the lock’s moving parts. Use graphite powder or silicone spray for best results. Avoid oil-based lubricants that attract dirt and grime. Work the key in and out after lubrication to spread it evenly. Repeat this process every few months for smooth locking action.
Frequently Asked Questions
How Do I Remove An Old Deck Box Lock?
First, unlock the deck box if possible. Use a screwdriver to remove screws holding the lock. Gently pull out the old lock from the panel. Keep screws safe for the new lock installation.
What Tools Are Needed To Replace A Deck Box Lock?
You typically need a screwdriver, replacement lock, and possibly pliers. A drill might be required if new holes must be made. Always check your deck box lock type before gathering tools.
Can I Replace A Deck Box Lock Without Removing The Box?
Yes, often you can replace the lock while the box stays in place. Open the box lid fully for easy access to screws. Work carefully to avoid damaging the box or lock mechanism.
How Do I Choose The Right Replacement Lock For My Deck Box?
Measure the existing lock’s dimensions and check compatibility. Choose a lock designed for outdoor use to resist weather. Verify the locking mechanism type matches your current deck box lock.
Conclusion
Replacing a deck box lock is simple with the right steps. Choose a lock that fits your box well. Use basic tools to remove the old lock carefully. Install the new lock by following the instructions. Test the lock to make sure it works smoothly.
This small fix keeps your belongings safe and secure. Regular checks help avoid future problems. Now, you can protect your deck box with confidence.
