
If you want to create a beautiful pond in your garden, installing a flexible pond liner is one of the most important steps. But maybe you’re wondering how to do it right without wasting time or money.
You’re in the right place. This guide will walk you through each simple step, so you can install your pond liner quickly and confidently. By the end, you’ll know exactly how to protect your pond and keep it looking great for years.
Let’s get started!

Credit: www.bpmgeomembrane.com
Choosing The Right Pond Liner
Choosing the right pond liner is a crucial step that affects the longevity and appearance of your pond. The liner acts as a barrier, keeping water in and preventing leaks. Picking the correct type and size will save you time, money, and frustration during installation and maintenance.
Types Of Flexible Liners
There are several types of flexible pond liners available, each with its own strengths and weaknesses. The most common options include:
- EPDM (Ethylene Propylene Diene Monomer):Known for its durability and flexibility, EPDM liners resist UV rays and temperature changes well.
- PVC (Polyvinyl Chloride):A lightweight and affordable option, but less resistant to punctures and UV damage over time.
- Butyl Rubber:Highly durable and flexible, often used in larger ponds. It’s more expensive but lasts longer than PVC.
- HDPE (High-Density Polyethylene):Extremely tough and puncture-resistant, but less flexible, which can make installation trickier.
Think about your pond’s location and how much wear the liner will face. Will it be exposed to sharp rocks or roots? This can help you narrow down your choice.
Material Considerations
Not all liners are created equal when it comes to material quality. Thickness matters a lot—thicker liners offer better durability but can be harder to handle.
Consider a liner that is at least 30 mil thick for small to medium ponds, while larger ponds might need 45 mil or thicker. Check for UV resistance and flexibility too.
Remember that some materials release odors or chemicals initially. If your pond will host fish or plants, look for non-toxic, fish-safe liners to keep the ecosystem healthy.
Sizing Your Pond Liner
Getting the size right is often overlooked but vital. Measure the length, width, and depth of your pond carefully.
Add extra length and width to cover the pond edges and allow for overlaps. A good rule of thumb is to add 12 to 24 inches on all sides.
Don’t forget to account for slopes or shelves inside the pond. Proper sizing reduces wrinkles and prevents water from seeping underneath the liner.
Have you ever dealt with a pond liner that was too small or too large? How did it affect your project? Your experience can guide you in choosing the perfect fit this time.
Preparing The Pond Site
Preparing the pond site is a vital part of installing a flexible pond liner. Proper preparation ensures the liner fits well and lasts longer. It also prevents leaks and damage. Taking time at this stage saves effort later and creates a beautiful pond.
Site Selection Tips
Choose a flat area with good sunlight. Avoid places near large trees to reduce leaf fall. Look for a spot away from underground roots. Check for proper drainage to prevent water pooling around the pond.
Excavating The Pond Area
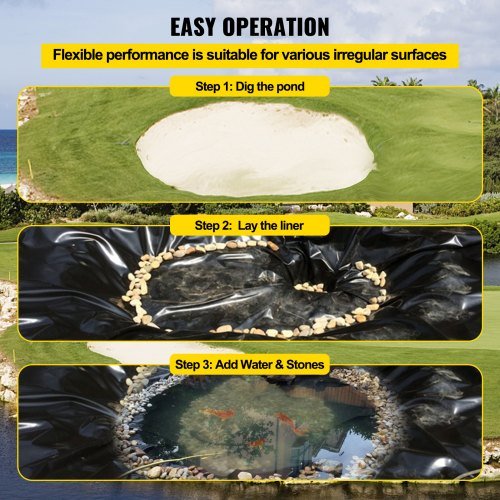
Mark the pond shape on the ground using rope or spray paint. Dig the pond to the desired depth with smooth, even walls. Create shelves or steps if you want plants or fish. Remove excess soil and keep the edges neat.
Removing Sharp Objects
Clear the pond base of rocks, roots, and sticks. Use a rake or your hands to find small sharp pieces. Spread a layer of sand or underlayment fabric for extra protection. This layer cushions the liner and stops punctures.
Installing The Underlayment
Installing the underlayment is a crucial step in setting up your flexible pond liner. It acts as a protective barrier, ensuring the liner stays intact against the rough ground beneath. Skipping this step can lead to tears and leaks, which will cost you time and money to fix later.
Purpose Of Underlayment
The underlayment cushions the pond liner and prevents punctures from sharp stones, roots, or debris. It also helps to distribute the weight evenly, reducing stress on the liner material. Think of it as a safety net that extends the life of your pond.
Without underlayment, even small sticks or rocks can cause damage over time. Have you ever wondered why some pond liners fail prematurely? This step often holds the answer.
Placing The Underlayment
Start by clearing the pond area of sticks, stones, and roots. Lay the underlayment smoothly inside the excavated hole, making sure it covers all corners and slopes. Overlap any seams by at least 6 inches to avoid gaps that could expose the liner to sharp objects.
Work patiently to avoid wrinkles or folds, as these can create weak spots. If your pond has irregular shapes, cut the underlayment carefully to fit snugly. Remember, a well-placed underlayment means less chance of damage down the line.
Securing The Edges
Once the underlayment is in place, secure the edges by folding them over and anchoring with stakes or rocks. This prevents the material from shifting during liner installation or heavy rain. If left loose, the underlayment can bunch up, making the liner installation tricky and uneven.
Make sure the edges extend beyond the pond perimeter by a few inches to protect the liner from soil and sharp objects outside the pond. Are you ready to protect your pond liner with this simple yet effective step?

Credit: www.pond-planet.co.uk
Laying The Pond Liner
Laying the pond liner properly is crucial for ensuring your pond remains watertight and durable. This step sets the foundation for your entire pond project. Taking your time here will save you from leaks and damage later on.
Positioning The Liner
Start by carefully unrolling the liner over the shaped pond area. Make sure the liner extends beyond the edges by at least 12 inches all around. This extra material allows for secure anchoring and adjustments.
Check if the liner fits the contours without stretching too much. If you notice tight spots, gently reposition the liner to avoid unnecessary tension, which could cause tears. Have a helper assist you—lining up a large sheet alone can be tricky.
Smoothing Out Wrinkles
Wrinkles in the liner can cause stress points and affect how water settles. Smooth them out by gently pulling and adjusting the liner toward the edges. Use your hands or a soft broom to push out small folds.
Don’t aim for a perfectly flat surface right away; some wrinkles will disappear once the pond fills with water. However, large folds should be minimized to prevent damage. Have you noticed how wrinkles disappear as water weight settles in your own pond?
Folding And Tucking Edges
Once the liner is positioned and smoothed, fold the excess material neatly around the pond edges. Tuck the folds under rocks, soil, or edging materials to keep the liner secure and hidden. This step protects the liner from wind lifting it and animals disturbing it.
Be careful not to create sharp creases during folding—soft curves reduce the risk of liner cracking. Consider adding a layer of sand or underlay beneath the edges for extra protection. How will you secure your liner edges to ensure longevity?
Securing The Pond Liner
Securing the pond liner is key to a durable and leak-free pond. The liner must stay in place despite water pressure and weather changes. Proper securing also helps the pond look natural and neat. Follow these steps to keep the liner stable and attractive.
Adding Rocks And Gravel
Place rocks and gravel along the edges of the pond liner. This holds the liner firmly against the ground. Use smooth river rocks or small gravel to avoid tearing the liner. Spread them evenly to prevent shifting. Rocks add weight and protect the liner from wind and animals.
Trimming Excess Material
Cut off extra liner beyond the pond edge, leaving a few inches to secure. Use sharp scissors or a utility knife for clean cuts. Be careful not to cut too close to the water. Excess material can cause wrinkles or folds. Trimmed liner looks tidy and helps avoid tripping hazards.
Creating A Natural Edge
Cover the secured liner edge with soil or mulch to blend with the landscape. Plant native grasses or small plants along the edge for a soft, natural look. This hides the liner and prevents erosion. A natural edge also attracts wildlife and improves pond health.
Filling The Pond
Filling the pond is a key stage in installing a flexible pond liner. This step sets the foundation for a stable and leak-free pond. Filling must be slow and careful to protect the liner and the pond’s shape. Proper filling ensures the liner fits perfectly and lasts longer.
Gradual Water Filling
Fill the pond slowly to avoid shifting the liner. Use a hose with low water pressure. Let water spread evenly over the liner surface. This prevents wrinkles and folds. Pause often to let the liner settle. Watch how the liner adjusts to the water weight.
Checking For Leaks
Look carefully for any signs of water escaping. Pay attention to edges and seams where leaks are common. Use your hand or a dry cloth to feel for damp spots. Mark any leaks with chalk or tape. Early detection saves time and effort later.
Adjusting The Liner
Make small shifts to the liner as the pond fills. Smooth out wrinkles to avoid damage. Pull liner edges tight but do not stretch too much. Use tools like a soft broom to help spread the liner. Keep the liner evenly placed along the pond floor and walls.
Finishing Touches
Finishing touches are what transform your pond from a simple water feature into a vibrant, lively space. These final steps add character and balance to the environment, making your pond inviting for both you and local wildlife. Let’s look at how you can enhance your pond with plants, water features, and proper maintenance.
Adding Aquatic Plants
Aquatic plants do more than beautify your pond—they improve water quality and provide shelter for fish and frogs. Consider adding a mix of floating plants like water lilies and submerged plants like hornwort to keep the ecosystem healthy.
Choose plants that match your pond’s size and depth. You don’t want plants that will overcrowd the space or die off quickly. Have you thought about how these plants can affect the oxygen levels in your pond?
Installing Water Features
Water features such as fountains or waterfalls add soothing sounds and movement, which help prevent stagnant water. Installing a simple fountain pump can keep your pond aerated and visually appealing.
Make sure the pump size matches your pond capacity to avoid excessive splashing or inadequate flow. What kind of water feature would you enjoy watching or listening to every day?
Maintaining Your Pond
Regular maintenance keeps your pond clear and functioning properly. Skim debris off the surface, check the water level, and clean filters to avoid algae buildup and unpleasant odors.
Set a schedule that fits your lifestyle—weekly checks can make a big difference. How much time are you willing to invest to keep your pond thriving?

Credit: abax-steel.com
Frequently Asked Questions
What Tools Are Needed To Install A Flexible Pond Liner?
You need a shovel, utility knife, tape measure, underlayment fabric, and a roller. These tools help prepare and secure the liner properly.
How Do You Prepare The Pond Site Before Liner Installation?
Clear debris, remove sharp objects, and level the pond base. Lay underlayment to protect the liner from punctures and uneven surfaces.
Can Flexible Pond Liners Be Cut To Fit Any Shape?
Yes, flexible liners can be trimmed with a utility knife. Cut carefully to fit the pond shape while leaving extra material for adjustments.
How Do You Secure Edges Of A Flexible Pond Liner?
Anchor edges with rocks, soil, or liner edging strips. Ensure the liner overlaps the pond rim to prevent water leakage and liner movement.
Conclusion
Installing a flexible pond liner takes some care and patience. Prepare the ground well to avoid sharp objects. Lay the liner smoothly to prevent wrinkles or leaks. Secure the edges tightly to keep the liner in place. Regular checks help spot any damage early.
With these steps, your pond will hold water well. Enjoy a beautiful and lasting water feature. Simple actions lead to great results. Ready to start your pond project?

