
Are you ready to unlock the full flavor of your next barbecue? Knowing how to assemble your smoker correctly is the first step to smoking mouth-watering meats and delicious dishes right at home.
Don’t worry if you’ve never done it before—this guide will walk you through each step clearly and simply. By the end, you’ll feel confident setting up your smoker like a pro and impressing your friends and family with perfect, smoky flavors every time.
Keep reading to discover the easy steps that will turn your smoker into your new best cooking tool.

Credit: www.youtube.com
Choosing The Right Smoker
Choosing the right smoker sets the foundation for your smoking experience. It affects the flavor, cooking time, and ease of use. Understanding what suits your needs helps you avoid frustration and enjoy every smoky bite.
Types Of Smokers
Smokers come in different styles, each with unique benefits. Offset smokers offer authentic smoky flavor but require more attention to maintain temperature. Pellet smokers automate temperature control, making them beginner-friendly and consistent.
Consider vertical water smokers if you want moist, tender meat with minimal effort. Electric smokers provide convenience and steady heat, perfect for those who want to set it and forget it. What kind of cooking experience do you want to have?
Material And Build Quality
The smoker’s material affects heat retention and durability. Stainless steel models resist rust and last longer, especially if you plan to leave your smoker outdoors. Cast iron holds heat well but can be heavy and requires maintenance to prevent rust.
Look for thick walls and solid welds; flimsy construction leads to heat loss and uneven cooking. A well-built smoker feels sturdy when you move it. How much wear and tear will your smoker have to withstand?
Size And Capacity Considerations
Think about how much food you usually smoke. Small smokers fit well on patios and are great for occasional use or small families. Larger smokers handle big batches but need more space and fuel.
Don’t buy the biggest smoker just because it’s available. A smoker too large for your needs can waste fuel and take longer to heat. Match the size to your typical cooking load for the best results.
Essential Tools And Accessories
Having the right tools and accessories on hand makes assembling your smoker a smooth and even enjoyable task. Without them, you might find yourself stuck, frustrated, or worse—damaging key parts. Let’s look at what you really need to get your smoker up and running efficiently.
Basic Assembly Tools
Start with a reliable set of screwdrivers, both flathead and Phillips. These are essential for almost every smoker model.
A socket wrench set speeds up the process, especially for tightening bolts securely. You’ll want adjustable pliers too, which help hold parts steady without slipping.
Don’t overlook a rubber mallet—it allows gentle tapping without denting metal. Having a tape measure nearby ensures everything lines up correctly.
Recommended Accessories
Magnetic trays or small containers keep screws and nuts organized and prevent them from rolling away. You’ll thank yourself later.
Consider a workbench mat or old towel to protect your smoker’s finish while you work. It’s a small step that saves time on cleanup.
Having a flashlight or headlamp is surprisingly helpful, especially if you’re assembling in a dim garage or during the evening.
Safety Gear
Always wear gloves to protect your hands from sharp edges or hot spots during assembly. It’s easy to underestimate this step until you feel a nasty scrape.
Safety glasses shield your eyes from flying debris or accidental sparks. Even if the assembly seems simple, protecting your vision is critical.
Don’t forget to wear closed-toe shoes. Dropping a heavy part or tool on your foot can quickly turn a fun project into a painful one.
Preparing Your Workspace
Preparing your workspace is the first crucial step in assembling your smoker. A well-organized and suitable area not only makes the assembly smoother but also ensures your safety throughout the process. Taking the time to set up your workspace properly can save you frustration and potential hazards later on.
Selecting A Suitable Location
Choose a flat, stable surface to assemble your smoker. Avoid uneven ground to prevent parts from tipping over or rolling away. A driveway or a spacious patio works great because you need enough room to spread out all the components and tools.
Think about how close the location is to your cooking area. You don’t want to drag a heavy smoker too far once it’s assembled. Also, consider access to power if your smoker has electric parts, but keep it far enough from the house to avoid smoke issues.
Cleaning And Organizing
Clear the area of any debris, dirt, or objects that could interfere with your work. A clutter-free space helps prevent losing small pieces, like screws or bolts, which are easy to misplace. Lay down a tarp or cardboard to protect both the smoker parts and the surface beneath.
Sort out your tools and smoker parts before you begin. Group similar items together and keep the instructions nearby for quick reference. Having everything within arm’s reach can drastically cut down on your assembly time.
Ensuring Proper Ventilation
Proper airflow is essential when assembling a smoker, especially if you plan to do any test runs or adjustments with fire involved. Choose a location outdoors or in a well-ventilated garage with open doors and windows. This prevents dangerous smoke buildup and keeps fresh air flowing.
Ask yourself: Is there enough space around the smoker for air to circulate freely? Avoid tight corners or enclosed spaces. Good ventilation also protects you from inhaling dust or fumes from the smoker’s materials during assembly.

Credit: www.youtube.com
Step-by-step Assembly Guide
Assembling your smoker might seem like a daunting task. But with this step-by-step guide, you can do it with ease. Follow these simple steps to assemble your smoker efficiently and enjoy cooking in no time.
Unpacking And Inventory Check
Start by unpacking the smoker components carefully. Check each part against the inventory list. Ensure you have all necessary items before you proceed. Missing parts can cause frustration later.
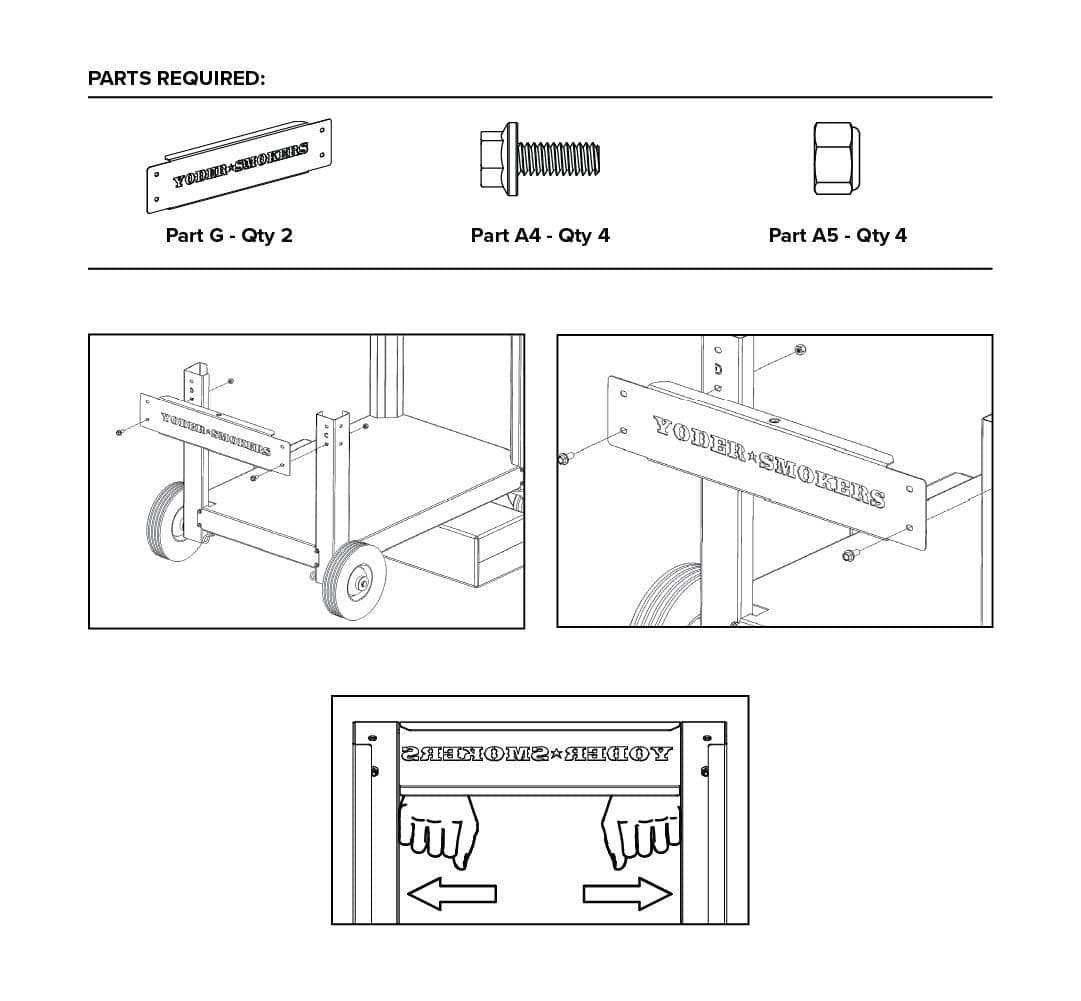
Assembling The Main Body
Begin with the main body of the smoker. Align the base and the main chamber. Secure them with screws provided in the kit. Check for stability after tightening all screws.
Installing The Grates And Racks
Place the grates inside the smoker. Ensure they sit firmly on the supports. Install racks by sliding them into the designated slots. Make sure they are level and secure.
Attaching The Smoke Box And Chimney
Locate the smoke box and chimney parts. Attach the smoke box to the side of the main chamber. Secure it with bolts. Mount the chimney on top of the smoker. Tighten it properly to avoid smoke leaks.
Securing Doors And Handles
Attach the doors to the front of the smoker. Use hinges and screws to secure them tightly. Fix handles on both doors for easy access. Ensure all latches are functional and secure.
Seasoning Your Smoker
Seasoning your smoker is a key step before cooking your first meal. It prepares the metal surface and improves the flavor of your food. Proper seasoning protects the smoker from rust and prevents unwanted odors.
Why Seasoning Matters
Seasoning creates a protective layer inside the smoker. It stops rust from forming on metal parts. This layer also seals tiny holes and cracks. Food tastes better because the smoker won’t release bad smells. It helps your smoker last longer with regular use.
Seasoning Process
Start by cleaning the smoker with warm water and soap. Dry it well to avoid moisture. Next, coat the inside with cooking oil. Use a high smoke point oil like canola or vegetable oil. Heat the smoker to about 250°F (120°C) and keep it there for 2 hours. This burns the oil into a hard, protective layer. Let the smoker cool slowly after seasoning. Repeat the process two to three times for best results.
Maintenance Tips
- Clean your smoker after each use to remove ash and grease.
- Apply a thin layer of oil to the metal parts regularly.
- Store your smoker in a dry place to avoid rust.
- Check for chips or scratches and re-season if needed.
- Keep the smoker covered to protect it from rain and dust.
Troubleshooting Common Issues
Troubleshooting is a crucial part of assembling and maintaining your smoker. Even the best smokers can face issues that affect performance and flavor. Understanding common problems helps you fix them quickly and keep your cooking on track.
Fixing Airflow Problems
Airflow controls the temperature and smoke quality inside your smoker. If smoke isn’t flowing well, your food may cook unevenly or taste bitter.
Check for blockages in the vents or dampers. Sometimes, grease buildup or ash can clog these parts. Cleaning them regularly improves airflow and keeps the smoke moving smoothly.
Have you noticed smoke leaking from unexpected places? Tighten any loose seals or replace worn gaskets to prevent air leaks. Proper airflow means better temperature control and tastier results.
Handling Rust And Corrosion
Rust can weaken your smoker and affect its heat retention. It often appears if the smoker is left outside in damp conditions without protection.
Scrape off rust spots gently using a wire brush or sandpaper. Then, apply high-temperature paint or a rust-resistant coating designed for smokers.
Prevent rust by storing your smoker under cover or using a waterproof cover. Small maintenance steps save you from costly repairs later. How often do you inspect your smoker for rust?
Adjusting Temperature Control
Maintaining steady temperature is key for perfect smoking. If your smoker temperature fluctuates wildly, first check if the vents are open or closed properly.
Use a reliable thermometer to monitor internal heat. If your built-in thermometer is inaccurate, consider adding a digital probe for more precise readings.
Adjust your fuel source carefully—too much charcoal or wood can cause spikes, while too little can drop the temperature. Practice makes perfect when learning to balance heat. What’s your go-to method for keeping temps steady?
Tips For Perfect Bbq Setup
Setting up your smoker properly ensures tasty and consistent BBQ results. Small adjustments can make a big difference. Focus on fuel, smoke, and cleanliness for the best experience.
Optimizing Fuel Usage
Use dry, quality wood or charcoal for longer burn times. Avoid overloading the smoker with fuel. Keep fuel at a steady level to maintain a consistent temperature. Check fuel regularly to prevent temperature drops. Arrange fuel for even heat distribution.
Managing Smoke Levels
Control airflow to adjust smoke inside the smoker. Use dampers or vents to regulate oxygen supply. Thin, blue smoke gives the best flavor; thick, white smoke can taste bitter. Add wood chips gradually to avoid excess smoke. Keep the smoker closed as much as possible.
Cleaning After Use
Clean your smoker after each session to keep it ready. Remove ashes and leftover fuel from the firebox. Wipe down cooking grates with a brush or cloth. Empty grease traps and clean drip pans. Regular cleaning prevents buildup and improves smoke taste.

Credit: www.youtube.com
Frequently Asked Questions
How Long Does It Take To Assemble A Smoker?
Assembling a smoker usually takes 30 to 60 minutes. Time depends on the model and your experience. Following the manual carefully speeds up the process. Having all tools ready before starting helps ensure smooth assembly.
What Tools Are Needed To Assemble A Smoker?
Most smokers require basic tools like screwdrivers, wrenches, and pliers. Some models may need Allen keys or a socket set. Check the instruction manual for specific tools to avoid delays during assembly.
How Do I Ensure My Smoker Is Assembled Safely?
Read the manual thoroughly before starting. Assemble on a flat, stable surface. Tighten all screws and bolts securely. Avoid forcing parts together to prevent damage. Double-check connections before first use to ensure safety.
Can I Assemble A Smoker Alone Or Need Help?
You can assemble most smokers alone if you have basic skills. However, having a helper can make the process faster and easier. Assistance is especially useful for lifting heavy parts or aligning components.
Conclusion
Assembling a smoker is simple with clear steps. Take your time and follow the instructions carefully. Check all parts before starting to avoid mistakes. Use basic tools and work on a clean surface. Once assembled, test it safely to ensure it works well.
Enjoy the process and get ready for great smoked food. Practice makes perfect, so don’t rush. Soon, you will feel confident using your smoker. Happy cooking!
