
Are you tired of guessing whether your meat is cooked just right? Using a meat thermometer can take all the stress out of cooking and make sure your meals are safe and delicious every time.
But do you know how to check the temperature correctly? You’ll learn simple steps to use your meat thermometer like a pro. By the end, you’ll feel confident that your meat is cooked perfectly, juicy, and safe to eat. Keep reading, and say goodbye to overcooked or undercooked meals forever!
Choosing The Right Meat Thermometer
Choosing the right meat thermometer is key to cooking your meat perfectly every time. It’s not just about picking the first one you see; you want a tool that matches your cooking style and gives you accurate readings quickly. Think about how you cook and what features will make checking temperatures easier and more reliable for you.
Types Of Meat Thermometers
There are several types of meat thermometers to choose from, each with its own use and benefits. Instant-read thermometers are popular because they give you a quick temperature reading in seconds. Probe thermometers, on the other hand, can stay in the meat while it cooks, which is great for slow roasts or grilling.
Digital thermometers are easy to read and often come with additional features like timers or alerts. Dial or analog thermometers don’t require batteries and are simple to use but can be slower and less precise. Knowing these options helps you pick one that fits your kitchen routine.
Features To Consider
- Speed:How fast do you need the reading? Instant-read models usually give results within 3-5 seconds.
- Accuracy:A thermometer that’s off by a few degrees can ruin your meal. Look for one with a margin of error of ±1°F or less.
- Display:Digital displays are easier to read, especially in dim lighting or when you’re busy cooking.
- Probe length and flexibility:Longer probes reach deeper into thick cuts, and flexible probes can be easier to insert.
- Durability:If you grill outside, choose a thermometer that can handle heat and smoke.
Pros And Cons Of Each Type
| Thermometer Type | Pros | Cons |
|---|---|---|
| Instant-Read Digital |
|
|
| Probe Thermometer (Leave-in) |
|
|
| Dial/Analog Thermometer |
|
|
Have you ever burned a steak because the thermometer took too long or gave you the wrong reading? Choosing the right type and features can save you from that frustration. What kind of cooking do you do most often? Your answer will guide you to the perfect thermometer for your kitchen.

Credit: inkbird.com
Preparing Your Thermometer
Clean the thermometer probe with warm, soapy water before use. Calibrate it by placing the probe in ice water to check accuracy. This ensures precise temperature readings for safe cooking.
Preparing your thermometer is crucial for accurate meat temperature readings. A properly prepared thermometer ensures your meat is cooked safely. This process involves several simple steps.Calibrating The Device
Calibrate your thermometer for precise readings. Use a bowl of ice water. Insert the thermometer into the ice water. It should read 32°F (0°C). If not, adjust the calibration nut. Some digital thermometers have a reset button. Follow the manufacturer’s instructions for this. Regular calibration maintains accuracy.Cleaning Before Use
Clean your thermometer before each use. This prevents cross-contamination. Use warm, soapy water. Wipe down the probe thoroughly. Rinse it well with clean water. Dry with a clean towel. Avoid submerging digital units in water.Battery Check And Maintenance
Check the battery level regularly. A weak battery can affect accuracy. Replace batteries if readings are inconsistent. Keep spare batteries on hand. Store your thermometer in a safe place. Protect it from extreme temperatures and moisture. Proper storage prolongs its life.Meat Temperature Basics
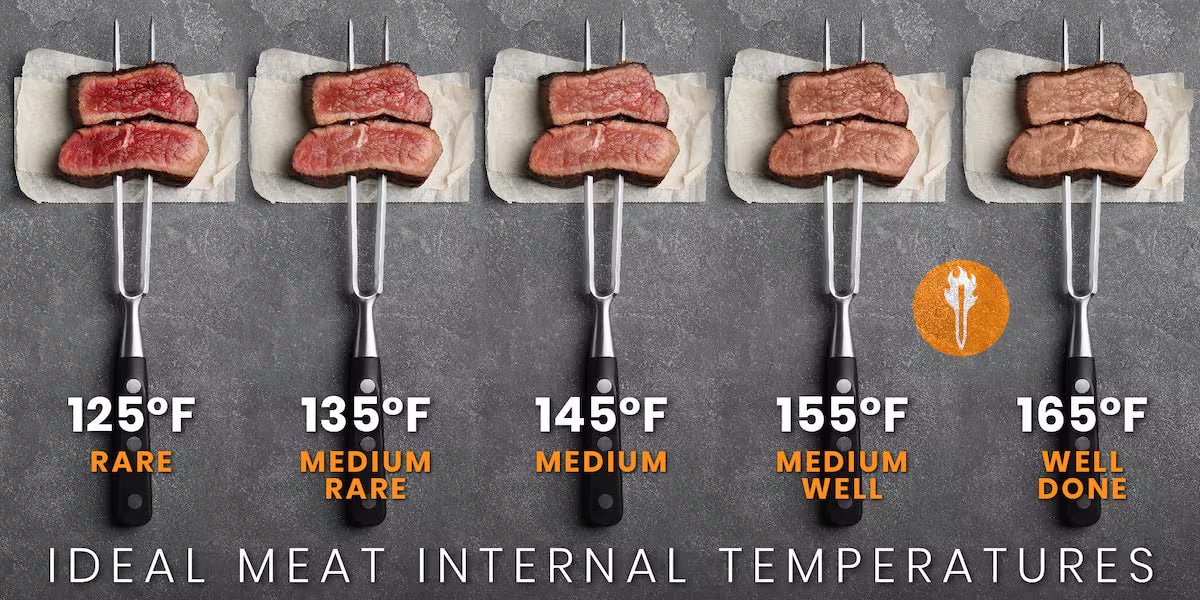
Understanding meat temperature basics is key for cooking meat safely and deliciously. Using a meat thermometer helps you check the exact temperature inside the meat. This ensures it is cooked just right, neither undercooked nor overdone. Knowing safe temperatures protects against harmful bacteria. Learning how meat temperature changes during resting improves texture and flavor. Different parts of meat cook differently and have unique temperature zones. These basics make cooking meat easier and more enjoyable.
Safe Cooking Temperatures
Safe cooking temperatures kill bacteria that cause illness. Each type of meat has its own safe temperature. For example:
- Chicken and poultry: 165°F (74°C)
- Ground beef and pork: 160°F (71°C)
- Steaks, roasts, and chops: 145°F (63°C)
- Fish: 145°F (63°C)
Always insert the thermometer into the thickest part of the meat. Avoid touching bone or fat for accurate readings.
Resting Temperatures Explained
Resting meat allows juices to redistribute inside. The temperature can rise 5-10°F (3-6°C) after cooking. This is called carryover cooking. Remove meat from heat just before reaching the target temperature. Let it rest covered for 5 to 10 minutes. Resting ensures tender and juicy meat.
Temperature Zones In Meat Cuts
Meat is not the same temperature throughout. The outside cooks faster than the center. Different zones include:
- Outer zone: Well done, highest temperature
- Middle zone: Medium to medium-well
- Center: Rare to medium-rare, lowest temperature
Using a thermometer helps find the perfect doneness by checking the center temperature. This avoids overcooking or undercooking meat.
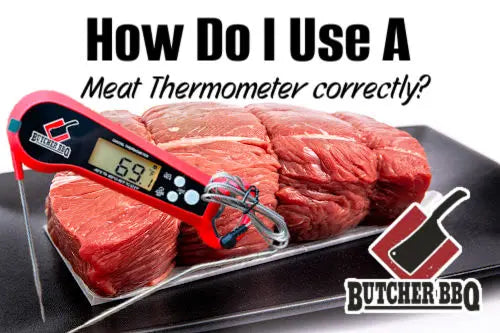
Credit: butcherbbq.com
Using The Thermometer Correctly
Using a meat thermometer correctly ensures your food cooks safely and tastes great. Proper use helps avoid undercooked or overcooked meat. It also keeps your cooking process simple and stress-free.
Where To Insert The Probe
Insert the probe into the thickest part of the meat. Avoid bones, fat, or gristle. These parts can give false temperature readings. For whole poultry, place the probe in the inner thigh or breast. For steaks or chops, stick the probe into the center. Make sure the probe tip is deep enough to reach the center.
Avoiding Common Mistakes
- Do not touch the bone with the probe.
- Insert the probe before cooking starts to monitor temperature continuously.
- Wait a few seconds after inserting the probe before reading the temperature.
- Clean the probe between uses to prevent cross-contamination.
- Do not leave the thermometer in the oven unless it is designed for that purpose.
Reading The Temperature Display
Check the digital or dial display carefully. The number shows the current internal temperature of the meat. Wait until the reading stops changing before noting it. Compare the temperature to safe cooking guidelines. Remove the meat from heat once it reaches the recommended temperature. Remember, the temperature may rise slightly after taking the meat off the heat.
Tips For Quick And Accurate Readings
Getting a quick and accurate temperature reading from your meat thermometer ensures perfectly cooked food every time. Simple habits help avoid guesswork and keep your cooking on track. Follow these tips for faster and more reliable results.
Allowing Time For Stabilization
Insert the thermometer probe fully into the thickest part of the meat. Hold it steady and wait for the reading to stop changing. This pause lets the thermometer adjust to the meat’s temperature. Avoid pulling out the probe too soon. A stable number means an accurate reading.
Checking Multiple Spots
Check temperature in several places to get a true reading. Different parts of the meat can cook unevenly. Test the thickest area and a few spots nearby. This helps avoid undercooked or overcooked sections. Note the highest temperature for safety.
Using Thermometer Alerts
Many digital thermometers have alerts for target temperatures. Set your desired temperature before cooking. The thermometer beeps when the meat reaches this point. This feature saves time and prevents overcooking. Use alerts to monitor food without constant checking.
Credit: canadabeef.ca
Cleaning And Storing Your Thermometer
Cleaning and storing your meat thermometer correctly keeps it accurate and safe for use. Dirt and food residue can affect its performance. Proper care also prevents damage and extends its life. Simple steps help maintain your thermometer in good condition.
Proper Cleaning Techniques
Clean the probe after each use to remove bacteria and food particles. Use warm water and mild soap. Avoid submerging the entire thermometer unless it is waterproof. Wipe the display and handle with a damp cloth. Rinse the probe well and dry it with a clean towel. Never use abrasive cleaners or scrubbers that can scratch the surface.
Safe Storage Practices
Store the thermometer in a dry place away from heat and moisture. Use the protective case if it came with one. Keep the probe covered to avoid bending or damage. Avoid placing the thermometer near sharp objects or heavy items. Ensure it is kept out of reach of children. A dedicated drawer or container works well.
Extending Thermometer Lifespan
- Clean immediately after use to prevent residue build-up.
- Handle the probe gently to avoid bending or breaking.
- Replace batteries regularly to keep it working properly.
- Calibrate the thermometer as recommended by the manufacturer.
- Store it in a cool, dry place with protective covering.
Frequently Asked Questions
How Do I Read A Meat Thermometer Correctly?
Insert the probe into the thickest part of the meat. Avoid bones and fat for an accurate reading. Wait a few seconds until the temperature stabilizes before checking the display.
What Is The Ideal Temperature For Cooked Meat?
Different meats require different temperatures. For example, poultry should reach 165°F, while beef varies from 125°F to 160°F depending on doneness. Always check a reliable guide for specific meat types.
Can I Use A Meat Thermometer For Frozen Meat?
No, a meat thermometer measures internal temperature during cooking. For frozen meat, thaw it properly before checking temperature to ensure accurate and safe cooking.
How Often Should I Calibrate My Meat Thermometer?
Calibrate your thermometer every few months or if it drops from a height. Regular calibration ensures accurate temperature readings and safe cooking results.
Conclusion
Checking meat temperature with a thermometer keeps food safe. Insert the probe into the thickest part of the meat. Wait for the reading to stabilize before you check. Different meats need different temperatures to cook well. Using a thermometer helps avoid undercooked or overcooked meals.
It also saves you from guessing and wasting food. Keep your thermometer clean and store it properly. Practice makes this step quick and easy. Cooking with confidence feels good. Enjoy your perfectly cooked meat every time.
