
Are you ready to take your barbecue skills to the next level? Learning how to assemble an offset smoker can open the door to rich, smoky flavors that store-bought grills simply can’t match.
But if you’re staring at a pile of parts and feeling overwhelmed, you’re not alone. This guide will walk you through each step, making the process simple and stress-free. By the end, you’ll have your offset smoker set up perfectly, ready to impress your friends and family with mouthwatering, slow-cooked meals.
Keep reading, and let’s get your smoker fired up!

Credit: ddrbbqsupply.com
Choosing The Right Offset Smoker
Choosing the right offset smoker is a crucial step that sets the foundation for your smoking success. The perfect smoker matches your cooking style, space, and budget. Think about how often you’ll use it and what kind of food you want to smoke—these factors will guide your choice.
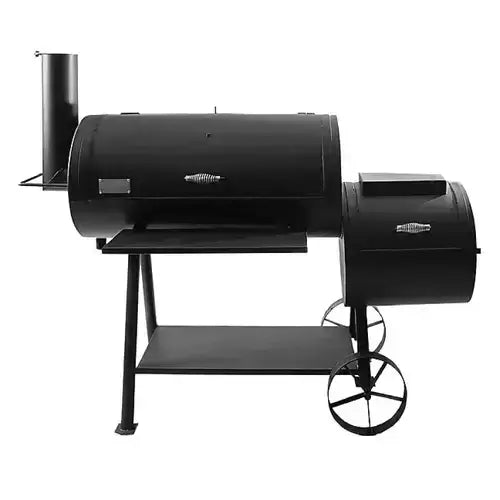
Types Of Offset Smokers
Offset smokers come in different styles, each with unique advantages. Traditional barrel smokers offer great heat control and a classic look. Box smokers give you more cooking space but can be a bit harder to manage heat-wise.
There are also vertical offset smokers, which save yard space and often have multiple cooking racks. Ask yourself: Do you want something simple or more versatile? Your answer will shape which type fits your needs.
Materials And Build Quality
Steel thickness matters more than you might think. Thicker steel retains heat better and lasts longer, which means more consistent cooking and less chance of rust. Look for smokers made with at least ¼-inch steel for durability.
Welds and joints should be solid, not flimsy or uneven. Poor build quality can lead to air leaks, making temperature control a headache. I once bought a smoker with thin walls and it struggled to hold heat on windy days—something I wouldn’t repeat.
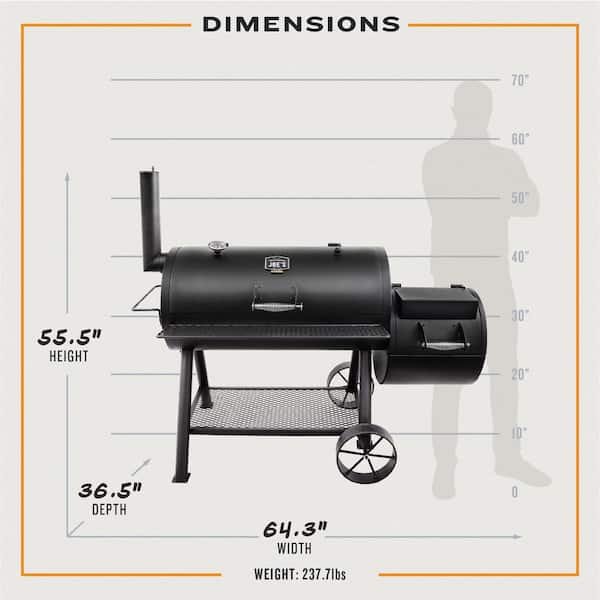
Size And Capacity Considerations
Think about how much food you plan to smoke at once. A small offset smoker is perfect for weekend barbecues with friends, but if you’re feeding a crowd, you’ll want a larger cooking chamber.
Also, consider the smoker’s footprint. Do you have enough space in your backyard or patio? Remember, a bigger smoker means more fuel and longer heat-up times. Balancing size with your actual needs saves money and effort.
Tools And Supplies Needed
Gathering the right tools and supplies makes assembling an offset smoker easier and safer. Having everything ready helps you avoid delays and frustration. The tools listed below suit most basic smoker builds and repairs.
Essential Tools
- Socket wrench set for tightening bolts securely
- Adjustable wrench to handle different nut sizes
- Drill with metal drill bits for making holes
- Measuring tape for accurate alignment and spacing
- Level to ensure your smoker sits flat and stable
- Metal file to smooth rough or sharp edges
- Clamps to hold pieces steady during assembly
- Safety gloves to protect hands from sharp metal
- Safety goggles to shield eyes from sparks and debris
Additional Helpful Items
- Marker or chalk for marking drill points
- Rubber mallet for gentle tapping and adjustments
- Wire brush to clean metal surfaces before welding
- Welding machine and supplies if welding is required
- Heat-resistant paint for finishing and protecting metal
- Work table or sturdy surface to assemble parts on
- Shop vacuum to clean metal shavings and dust
Preparing The Workspace
Preparing the workspace is crucial before assembling your offset smoker. A clean, organized area helps the process go smoothly. It also reduces mistakes and accidents. Taking time to get the space ready saves effort later.
Clearing And Organizing Area
Remove all unnecessary items from the workspace. Clear enough room to move around freely. Lay out all parts and tools in a neat order. Group similar items together for easy access. Use a flat, stable surface to work on. Good lighting helps you see small details better.
Safety Precautions
Wear gloves to protect your hands from sharp edges. Use safety glasses to shield your eyes from dust or sparks. Keep a fire extinguisher nearby just in case. Avoid loose clothing that could catch on parts. Make sure the area is well ventilated. Keep children and pets away from the workspace.
Unpacking And Inspecting Parts
Unpacking and inspecting parts is the first crucial step in assembling your offset smoker. This process ensures you have all the necessary components and that they are in good condition. Careful inspection helps avoid delays and frustration during assembly.
Take your time to open the box carefully. Lay out each item in a clean, open space. This makes it easier to check and organize the parts before starting.
Checking For Missing Components
Check the parts list included in the manual. Compare every item on the list with what you have unpacked. Missing parts can stop the assembly and use of your smoker.
- Look for small items like screws and bolts.
- Verify larger pieces such as the firebox and cooking chamber.
- Note any damaged or bent parts.
If you find missing or damaged parts, contact the seller or manufacturer immediately. Do not begin assembly without all parts present.
Identifying Main Sections
Separate the main sections of the smoker to understand how they fit together. Knowing each part helps in following the assembly instructions smoothly.
- Locate the cooking chamber—the largest section.
- Find the firebox, usually smaller and attaches to the side.
- Identify the chimney or smoke stack.
- Set aside legs, shelves, and handles.
Organizing the parts by section saves time during assembly. It also prevents confusion and mistakes.
Assembling The Firebox
Begin by attaching the firebox to the main smoker body using bolts and nuts. Ensure all parts fit tightly to prevent smoke leaks. Check alignment before fully tightening for proper airflow and heat control.
Assembling the Firebox is a critical step in setting up your offset smoker. This component is where your fire will burn, so precision and attention to detail here will significantly impact your smoking experience. Whether you’re a seasoned pitmaster or a barbecue novice, taking the time to assemble the firebox correctly ensures that your smoker operates efficiently and safely.Attaching The Firebox Walls
Begin by identifying the walls of your firebox. Typically, these are the heavier panels in your kit. Align each wall with the corresponding holes on the main chamber. Use the bolts and nuts provided to secure them. Hand-tighten initially to ensure flexibility in adjustments. Once all walls are aligned, go back and use a wrench to tighten each bolt firmly. This ensures stability during your smoking sessions.Securing The Door And Vents
The door and vents are crucial for controlling the airflow and temperature in your smoker. First, attach the door by aligning it with the hinges on the firebox. Ensure it swings freely and closes snugly. This prevents unwanted heat loss during cooking. Next, attach the vents. These should open and close smoothly, giving you control over the oxygen feeding your fire. Test them a few times to ensure they move without resistance. Pay close attention to the alignment of these components. Any gaps can lead to inconsistent cooking temperatures, affecting the quality of your barbecue. Have you ever noticed how a small draft can turn a cozy room cold? The same principle applies here. Properly securing the door and vents keeps your smoker’s heat and smoke where it belongs—inside. Remember, the devil is in the details. A well-assembled firebox sets the stage for culinary success. So, are you ready to take your smoking skills to the next level?Constructing The Cooking Chamber
The cooking chamber is the heart of your offset smoker. Building it right ensures even heat distribution and maximum flavor in every bite. Focus on sturdy construction and proper fitting to keep smoke and heat where they belong—inside the chamber.
Installing The Cooking Grates
Choose durable, rust-resistant grates, like stainless steel or cast iron. Measure the inside width and length of your cooking chamber carefully before buying or cutting grates. A tight fit prevents heat loss and keeps the grates stable during cooking.
Use adjustable brackets or weld strong supports on the chamber walls to hold the grates securely. Make sure the grates sit level to avoid food sliding or uneven cooking. If you plan to cook different foods simultaneously, consider multiple grate levels for versatility.
Mounting The Door And Handles
The door must seal tightly to keep smoke and heat inside. Use heavy-duty hinges that can support the door’s weight without sagging over time. Test the door’s swing and ensure it opens smoothly without gaps.
Attach heat-resistant handles that stay cool enough to touch. Position them for easy access but away from direct heat sources to protect your hands. Think about adding a latch or magnetic closure to keep the door securely shut during long smokes.
Connecting Firebox To Cooking Chamber
Connecting the firebox to the cooking chamber is a key step in building your offset smoker. This connection ensures proper heat flow and smoke circulation. It must be secure and airtight to keep the smoker working efficiently. Careful alignment and sealing will help maintain steady temperatures and consistent smoke flavor.
Aligning The Units
Place the firebox next to the cooking chamber on a flat surface. Check that the opening of the firebox matches the hole on the cooking chamber. Both units should line up evenly. Use clamps or temporary supports to hold them steady. Ensure the firebox sits flush against the cooking chamber to avoid gaps.
Sealing And Fastening
Apply high-temperature silicone or gasket material around the edges of the firebox opening. This creates a tight seal to stop smoke leaks. Use bolts or heavy-duty screws to fasten the firebox to the cooking chamber. Tighten all fasteners evenly to keep the units snug. Double-check that no gaps remain after fastening.
Credit: ddrbbqsupply.com
Attaching The Chimney
Attaching the chimney to your offset smoker is a crucial step that affects both the smoker’s performance and safety. A properly installed chimney ensures efficient smoke flow, helping you achieve that rich, smoky flavor in your food. Take your time with this part; a loose or misaligned chimney can cause smoke leaks or uneven cooking temperatures.
Positioning The Chimney
Start by finding the right spot for the chimney on the smoker’s main cooking chamber. Ideally, it should be placed near the top rear, allowing smoke to exit smoothly while pulling air through the firebox.
Double-check that the chimney aligns with the existing holes or cutouts on your smoker’s body. If your smoker doesn’t have a pre-cut hole, mark the area carefully and use a drill or metal cutter to create the opening.
Think about how the chimney’s height will affect the smoke draw. Too short, and you might get poor airflow; too tall, and it could be unstable or catch too much wind. Have you noticed how a taller chimney can sometimes create a stronger draft? That’s exactly what you want for consistent heat.
Securing With Screws Or Bolts
Once positioned, secure the chimney using screws or bolts provided with your smoker kit. Choose fasteners that resist rust, such as stainless steel, to keep your setup durable over time.
It’s best to tighten the screws evenly, moving diagonally across the mounting plate. This prevents warping or gaps that could let smoke escape.
If your chimney has a flange or gasket, make sure it’s properly seated before securing. This adds a seal that improves smoke retention and keeps moisture out.
- Use a drill with the right bit size to avoid stripping screws
- Check for snugness but avoid overtightening to prevent metal damage
- Test the chimney’s stability by gently shaking it after installation
Have you ever had a chimney wobble during cooking? Securing it firmly can save you from that hassle and ensure a smoother smoking experience.
Installing Additional Features
Attach extra shelves, thermometers, or hooks to boost the smoker’s function. These additions make cooking easier and more organized. Choose features that fit your needs and install them securely.
Installing additional features in your offset smoker can elevate your barbecue experience from good to exceptional. It’s not just about having a smoker; it’s about customizing it to suit your cooking style. Let’s dive into some practical enhancements that can make your smoking sessions more efficient and enjoyable.Thermometer Placement
Accurate temperature control is crucial for successful smoking. Install a high-quality thermometer on the lid of your offset smoker. Make sure it’s at grill level where the meat cooks, not just at the top of the lid. Consider using multiple thermometers if you often smoke different types of meat simultaneously. This helps you keep track of various cooking zones. A well-placed thermometer saves you from constantly opening the smoker, maintaining heat and smoke levels.Shelves And Storage Racks
Adding shelves and storage racks can significantly enhance your smoking workflow. Attach a sturdy side shelf to keep your tools and sauces within arm’s reach. This minimizes running back and forth to the kitchen, allowing you to focus on perfecting your barbecue. Install storage racks underneath for keeping wood chips, charcoal, and other essentials organized. A well-organized smoker setup not only saves time but also keeps you in control during the smoking process. Have you ever been frustrated searching for your basting brush mid-smoke? With proper storage, those moments become a thing of the past. Customizing your offset smoker to fit your needs can transform your cooking experience. Which feature will you add first to take your barbecue skills to new heights?
Credit: www.youtube.com
Final Checks And Adjustments
Before firing up your offset smoker, the final checks and adjustments are crucial. These steps ensure your smoker works efficiently and safely. Skipping them might lead to uneven cooking or wasted fuel, which nobody wants after all the hard work assembling it.
Tightening All Connections
Loose bolts and screws can cause smoke leaks or instability. Grab a wrench or screwdriver and go over every joint and connection on your smoker. Pay special attention to the firebox and chimney attachments—they often loosen during assembly.
Make sure the bolts are snug but avoid overtightening to prevent stripping threads. If you notice any parts that don’t align perfectly, adjust them now. Have you ever started cooking only to find smoke escaping? Tight connections save you from that frustration.
Testing Door Seals And Vents
Doors and vents control airflow and temperature, so their seals must be tight. Close the firebox and cooking chamber doors, then inspect for visible gaps or light shining through. If you spot any, add or replace gasket material.
Open and close the vents to confirm they move smoothly and hold position. You want precise airflow control to maintain consistent heat. Ever struggled with a smoker that couldn’t hold temperature? Properly sealed doors and adjustable vents are the key.
Seasoning The Smoker
Seasoning the offset smoker prepares it for cooking and improves flavor. It protects the metal from rust and removes factory residues. Proper seasoning helps your smoker last longer and cook better.
Cleaning Before Use
Start by wiping the inside with a damp cloth. Remove any dust, dirt, or oils left from manufacturing. Avoid using soap or harsh chemicals. Check the grates and firebox for any debris. Clean these parts thoroughly to ensure a safe cooking surface.
Initial Burn For Curing
Light a small fire using hardwood or charcoal. Keep the temperature low, around 225°F (107°C). Let the smoker burn for 2 to 4 hours. This process cures the paint and seals the metal. Smoke may appear; this is normal. After cooling, apply a thin layer of cooking oil to the grates and inside surfaces. Repeat the burn and oiling two to three times for best results.
Frequently Asked Questions
What Tools Are Needed To Assemble An Offset Smoker?
Basic tools like wrenches, screwdrivers, and pliers are essential. A drill may help with pilot holes. Having gloves and safety glasses is recommended for protection during assembly.
How Long Does It Take To Assemble An Offset Smoker?
Assembly typically takes 1 to 3 hours depending on experience. Reading the manual beforehand speeds up the process. Taking time ensures proper fit and safety.
How Do You Ensure Proper Airflow In An Offset Smoker?
Proper airflow is controlled by adjusting the intake and exhaust vents. Keep the vents partially open for consistent heat. Avoid sealing them completely to prevent smoke buildup.
Can I Assemble An Offset Smoker Without Prior Experience?
Yes, clear instructions and patience make it possible. Watching tutorial videos can help. Start with simple steps and double-check connections for a secure build.
Conclusion
Assembling an offset smoker takes patience and care. Follow each step clearly to avoid mistakes. Double-check the parts before starting the build. Take your time to fit everything tightly and safely. Soon, you will enjoy smoking delicious food outdoors. Practice will help you use the smoker with confidence.
Keep the smoker clean to make it last longer. Enjoy your cooking journey and tasty results!
